Are you ready to create a stunning and space-saving piece of furniture for your home? Building a queen bunk bed might sound challenging, but with the right guidance, you can do it yourself.
Imagine having a cozy, stylish bed that fits perfectly in your room and offers extra sleeping space for family or guests. In this guide, you’ll discover simple steps, helpful tips, and expert advice to turn this idea into reality. Keep reading, and you’ll soon know exactly how to build your own queen bunk bed with confidence and ease.
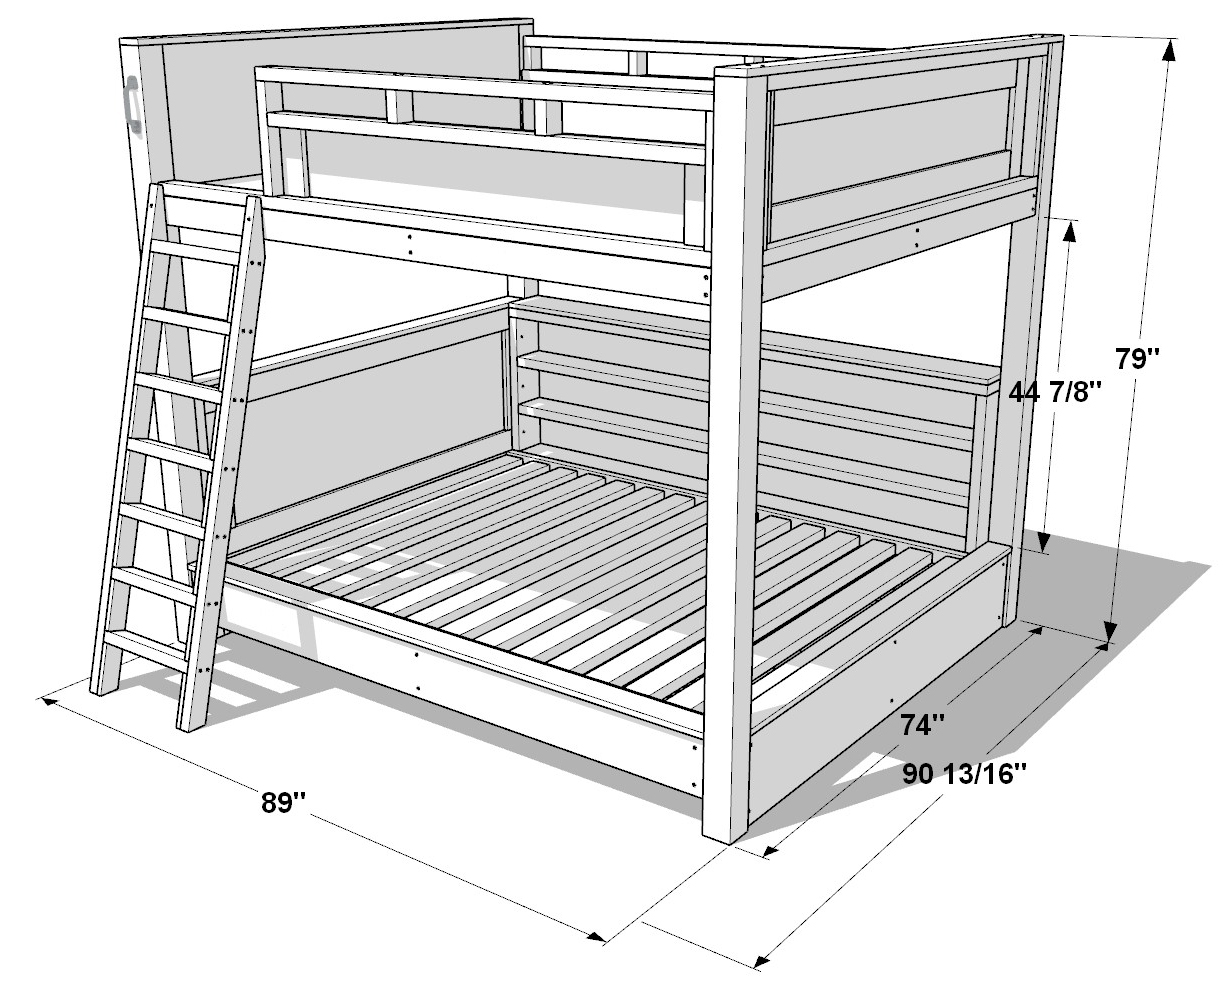
Credit: gooddiyplans.com
Choosing Materials
Choosing the right materials is key to building a strong queen bunk bed. The materials affect safety, durability, and look. Pick materials that suit your budget and style. Quality materials make the bed last longer and stay safe.
Types Of Wood
Solid wood is the best choice for bunk beds. Pine is common and affordable. Oak and maple are stronger but cost more. Avoid soft woods that can dent or break easily. Plywood can be used for parts but not for the frame. Look for wood that is smooth and free of cracks.
Required Tools
Gather tools before you start building. You will need a saw, drill, screwdriver, and measuring tape. Sandpaper or a sander helps smooth rough edges. A level ensures the bed is straight. Clamps hold pieces together while you work. Make sure all tools are in good condition.
Safety Gear
Protect yourself with safety gear. Wear safety glasses to guard your eyes. Use ear protection if tools are loud. Gloves protect hands from splinters and cuts. A dust mask keeps wood dust out of your lungs. Safety gear helps prevent accidents and injuries.

Credit: topshelfdiy.com
Planning The Design
Planning the design is the first step to build a queen bunk bed. This step ensures the bed fits well and looks good. Careful planning saves time and avoids mistakes. Focus on space, style, and details before cutting any wood.
Good planning helps create a safe and sturdy bed. It also makes the building process easier and faster. Let’s explore three key parts of planning the design.
Measuring Space
Start by measuring the room where the bunk bed will go. Measure the length, width, and height of the space. Leave extra space around the bed for comfort and safety. Check for doors, windows, and heating vents nearby. These details affect the size and position of the bed.
Write down all measurements clearly. Use a tape measure and a level for accuracy. Double-check numbers before moving on to the next step.
Drawing Blueprints
Create a simple blueprint of the queen bunk bed. Draw the bed from different views: front, side, and top. Include all parts like ladder, guardrails, and mattress size. Use graph paper or drawing software for neat lines.
Blueprints help visualize the final product. They guide you through cutting and assembling parts. Mark exact dimensions on the drawing for each piece of wood.
Selecting Style
Choose a style that matches the room’s decor and your taste. Decide between modern, rustic, or classic designs. Think about colors, shapes, and materials. Wood types like pine or oak add different looks and strengths.
Consider functional features like storage drawers or desks. Style affects comfort and usability. Pick a style that fits your needs and space.
Cutting The Wood
Cutting the wood is a key step in building your queen bunk bed. It shapes all parts to the right size and form. Proper cutting ensures strong and stable bed frames. Take your time for precise cuts.
Measuring And Marking
Start by measuring the wood carefully. Use a tape measure for exact length and width. Mark the cutting lines with a pencil. Double-check each measurement before marking. Clear marks help you cut straight and avoid mistakes.
Using Power Tools
Use a circular saw or miter saw for cutting wood. These tools give clean, straight cuts quickly. Always wear safety goggles and gloves. Hold the wood firmly while cutting. Follow your marks closely. Move the saw slowly for smooth cuts.
Sanding Edges
Sanding smooths rough edges after cutting. Use sandpaper or a power sander. Sand all edges until they feel smooth to touch. This step prevents splinters and improves the bed’s look. Take your time on corners and ends for safety.
Assembling The Frame
Assembling the frame is the first big step in building your queen bunk bed. It sets the foundation for a safe and sturdy bed. Follow each step carefully to make sure the frame is strong. Take your time and use the right tools for the best results.
Building The Base
Start by putting together the base frame. Use the wood pieces marked for the bottom part. Connect the side rails to the head and footboards using screws. Make sure all corners form right angles. Check the frame for any loose parts and tighten them.
Constructing The Guardrails
Next, attach the guardrails to the upper bunk. These rails keep sleepers safe and stop falls. Align the rails with the bed frame’s top edges. Use bolts to secure the rails firmly. Test the rails by gently shaking them to confirm stability.
Adding Support Slats
Place the support slats across the base frame. These slats hold the mattress and add strength. Space the slats evenly, about 2 to 3 inches apart. Screw each slat tightly into the side rails. Check that all slats lie flat and do not wobble.
Installing Ladder And Accessories
Finishing touches make your queen bunk bed look great and last long. They protect the wood and add style. This part is simple but very important. Small details make a big difference in your bed’s final look and strength.
Focus on painting or staining, sealing for durability, and adding comfortable mattresses. These steps give your bed a polished and ready feel.
Painting Or Staining
Choose paint or stain to match your room’s style. Paint gives bright colors and hides wood grain. Stain shows the wood’s natural beauty and texture. Use smooth, even strokes to avoid drips. Let each coat dry well before adding another. Light sanding between coats helps the finish stick better.
Sealing For Durability
Sealing protects your bed from scratches and spills. Use a clear polyurethane or varnish. Apply thin, even layers with a brush. Let the sealant dry completely before using the bed. This step keeps your bed strong and looking new for years. It also makes cleaning easier and faster.
Adding Mattresses
Pick mattresses that fit the queen bunk bed perfectly. Measure the bed’s frame before buying. Choose firm but comfortable mattresses for safety and support. Add mattress protectors to keep them clean. Arrange pillows and bedding neatly for a cozy look. This final step makes the bed ready for use and rest.

Credit: topshelfdiy.com
Finishing Touches
Safety checks are crucial when building a queen bunk bed. They protect users from accidents and injuries. Careful inspection ensures the bed is strong and secure. Follow these simple steps to confirm your bunk bed is safe for use.
Testing Stability
Start by gently shaking the bed frame. It should not wobble or move. Check all joints and connections for tightness. Use a wrench or screwdriver to tighten loose bolts. Place some weight on the bed to see if it holds steady. A stable bed frame means safer sleep for everyone.
Inspecting For Hazards
Look closely for sharp edges or splinters on the wood. Sand rough spots to make them smooth. Ensure no nails or screws stick out. Check the ladder steps for secure attachment. Remove anything that could cause cuts or scrapes. A hazard-free bunk bed reduces risks of injury.
Weight Limits
Know the maximum weight the bunk bed can hold. This includes the mattress and people using the bed. Never exceed the recommended weight limit. Overloading can cause the bed to break or collapse. Always follow the manufacturer’s guidelines for safe weight use.
Frequently Asked Questions
What Materials Are Needed To Build A Queen Bunk Bed?
You need sturdy wood, screws, bolts, a drill, saw, measuring tape, sandpaper, and wood finish. Quality materials ensure safety and durability. Choose hardwood like oak or pine for strength. Proper tools make the assembly easier and precise.
How Long Does It Take To Build A Queen Bunk Bed?
Building a queen bunk bed typically takes 6 to 10 hours. Time depends on skill level and tools. Planning and preparation reduce construction time. Allow extra time for sanding and finishing to ensure a smooth surface.
Is Building A Queen Bunk Bed Safe For Kids?
Yes, if built correctly with safety standards. Use strong materials and secure fasteners. Add guardrails and proper ladder placement to prevent falls. Follow weight limits and regularly inspect for loose parts.
Can I Customize The Design Of A Queen Bunk Bed?
Absolutely, you can customize size, color, and features. Add storage drawers, shelves, or a trundle bed. Choose finishes that match your room decor. Customization enhances functionality and aesthetic appeal.
Conclusion
Building a queen bunk bed can save space and add style to any room. Follow steps carefully for safety and strength. Choose good materials and measure twice before cutting. Take your time to assemble all parts correctly. A sturdy bed means better sleep and peace of mind.
Enjoy the extra room and a cozy place to rest. With patience and care, your project will turn out great. Give your space a fresh look with a queen bunk bed. Simple, smart, and practical.