Are you ready to create a stunning queen bunk bed that saves space and adds style to your room? Building your own queen bunk bed might sound challenging, but with the right steps, you can do it yourself.
Imagine having a cozy, custom-made bed that fits perfectly in your space and meets your needs. In this guide, you’ll discover simple instructions and helpful tips to make the process smooth and rewarding. Keep reading, and soon you’ll have a beautiful queen bunk bed that everyone will admire.
Materials And Tools Needed
Building a queen bunk bed needs the right materials and tools. Choosing good quality wood and hardware helps make the bed strong and safe. Having the proper tools makes the work easier and more precise. Below are the key materials and tools you will need.
Wood Types And Dimensions
Use solid wood like pine, oak, or maple for strength. Pine is easier to work with and costs less. Oak and maple are harder and last longer. Select wood boards that are smooth and free of knots.
For the frame, use 2×6 or 2×8 boards. For slats, 1×4 or 1×6 boards work well. The length depends on your bed size, usually 80 inches or more for a queen mattress.
Hardware And Fasteners
Choose sturdy screws and bolts to hold the bed together. Use wood screws that are at least 2.5 inches long. Lag bolts give extra strength at key joints. Add metal brackets or corner braces for stability.
Don’t forget washers and nuts for bolts. Use wood glue on joints for extra hold. Sandpaper and wood filler help finish the surfaces smoothly.
Required Tools
Gather basic tools like a power drill and screwdriver. A saw, such as a circular or miter saw, cuts wood to size. A tape measure and square ensure accurate cuts and angles.
Use a sander or sanding block to smooth edges. Clamps hold pieces firmly while assembling. A level makes sure the bed sits flat and balanced.
Design And Measurements
Design and measurements are the first steps in building a queen bunk bed. They help ensure the bed fits your space and meets your needs. Careful planning saves time and effort during construction. Precise measurements make the bed safe and comfortable. Let’s explore how to choose the right size, plan the frame, and focus on safety.
Choosing The Bed Size
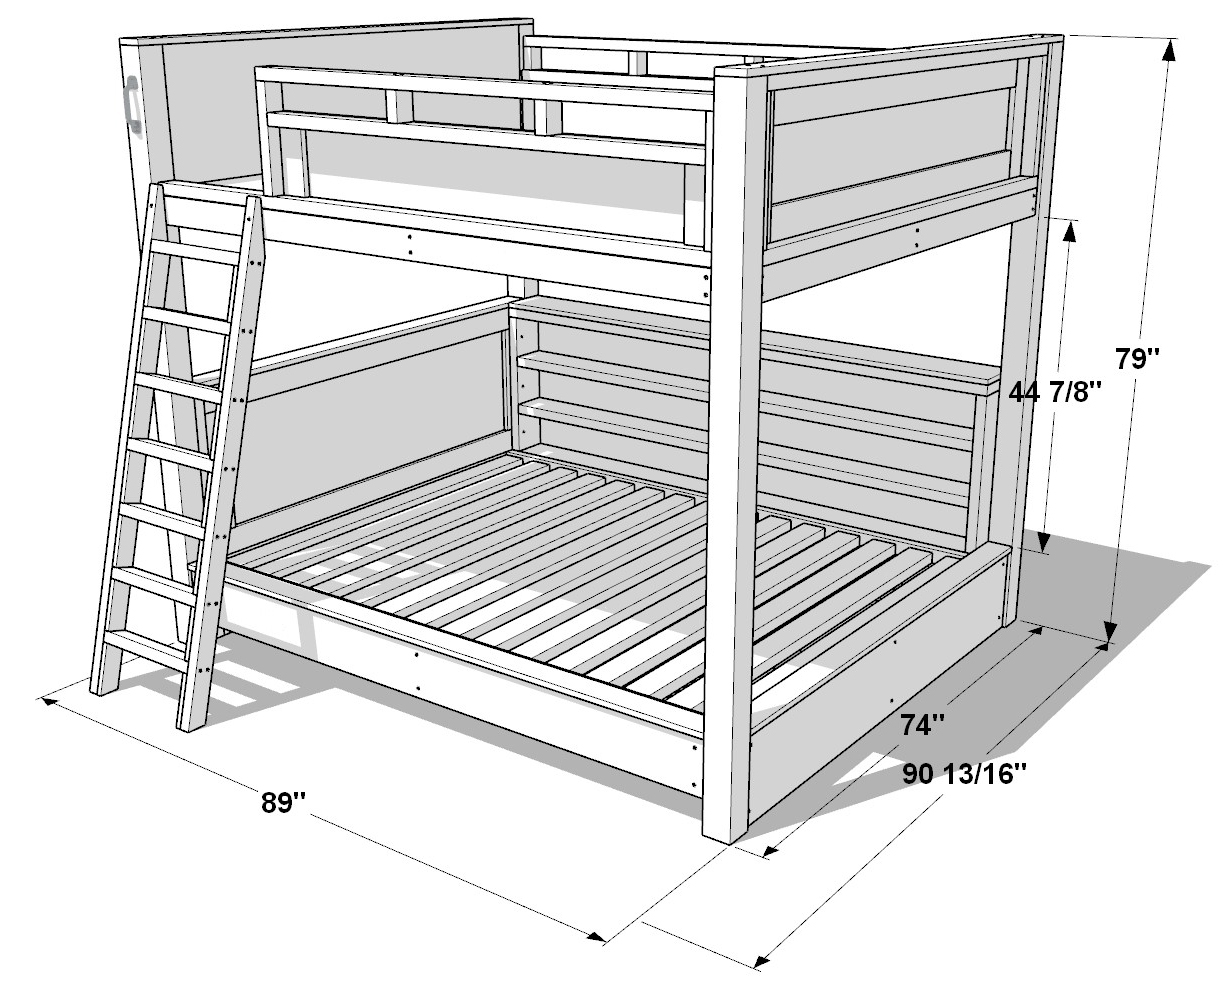
The queen mattress measures 60 inches wide and 80 inches long. This size gives more sleeping space than a twin or full bed. Measure your room before deciding. Leave enough space around the bed for movement. Consider the height of your ceiling. The top bunk should have enough headroom. Choose a mattress thickness that fits well in the frame.
Planning The Frame Structure
The frame must support two mattresses safely. Use strong wood like pine or oak. Design the frame with sturdy posts and beams. The posts should be at least 4×4 inches thick. Plan for slats to hold the mattress firmly. Include a ladder for easy access to the top bunk. Think about the style you want—simple or decorative. Draw a clear sketch with all dimensions before cutting wood.
Safety Considerations
Safety is the top priority in bunk bed design. Add guardrails on all sides of the top bunk. The rails should be at least 5 inches above the mattress. Make sure the ladder is stable and easy to climb. Avoid gaps that can trap a child’s head or limbs. Check that all screws and bolts are tight. Sand all edges to prevent splinters. Test the bed’s stability before use.
Cutting And Preparing Wood
Cutting and preparing wood is a key step in building a queen bunk bed. It ensures each piece fits perfectly. Accurate cutting and smooth surfaces make the bed strong and safe. Take time to measure, cut, and finish each board carefully. This helps avoid mistakes and saves wood.
Measuring And Marking
Start by measuring the wood pieces exactly. Use a tape measure for accuracy. Mark the cut lines clearly with a pencil. Double-check measurements before cutting. Mark all pieces needed for the bed frame. Clear marks guide your cuts and prevent errors.
Cutting Techniques
Use a saw suitable for the wood type and thickness. A circular saw or handsaw works well for straight cuts. Cut slowly along the marked lines. Keep your hands steady and eyes on the cut. Smooth, straight cuts help the pieces fit tightly together.
Sanding And Finishing
Sand each cut edge to remove splinters and roughness. Use medium-grit sandpaper first, then fine-grit for a smooth finish. Sanding prevents injuries and improves wood adhesion. Wipe dust off after sanding. Smooth wood looks better and lasts longer.

Credit: topshelfdiy.com
Building The Bed Frame
Building the bed frame is the first step to create a sturdy queen bunk bed. This frame holds everything together. It needs to be strong and safe. Follow each step carefully to build a solid base for your bunk bed.
Assembling The Headboard And Footboard
Start by putting together the headboard and footboard. Use the wood pieces cut for these parts. Join the vertical posts to the horizontal panels. Make sure the corners are square. Tighten screws or bolts securely. These pieces give the bed its shape and support.
Constructing Side Rails
Next, build the side rails. Attach the long wood boards that connect the headboard and footboard. These rails hold the mattress and provide stability. Check that the rails are level and straight. Use strong screws or brackets to fix them in place. Proper side rails keep the bed safe and balanced.
Joining Frame Components
Finally, join all the frame parts together. Align the headboard, footboard, and side rails correctly. Use bolts or heavy-duty screws to fasten the frame securely. Double-check all connections for tightness. The frame must not wobble or shift. A well-joined frame ensures the bunk bed stays steady and durable.
Adding Bunk Supports And Ladder
Adding bunk supports and a ladder is an important step in building your queen bunk bed. These parts keep the bed strong and safe. They also make it easy to climb to the top bunk.
Start by installing support slats. These slats hold the mattress and stop it from falling. Next, build and attach the ladder. The ladder gives quick access to the top bunk. Finally, secure guardrails. Guardrails protect from falling while sleeping.
Installing Support Slats
Measure the width between the bed frames. Cut wooden slats to fit this space. Place slats evenly across the bed frame. Use screws to fix each slat tightly. Check for any gaps or loose slats. Proper support stops the mattress from sagging.
Building And Attaching The Ladder
Choose sturdy wood for the ladder steps and sides. Cut two long side pieces and several step pieces. Attach steps evenly between the sides with screws. Sand all edges to avoid splinters. Position the ladder where it is easy to reach. Secure it firmly to the bed frame.
Securing Guardrails
Cut guardrails to match the length of the top bunk. Attach the guardrails on the open sides of the bed. Use strong screws to fix the rails. Make sure the rails stand high enough to prevent falls. Double-check the rails for stability before use.

Credit: topshelfdiy.com
Finishing Touches
Finishing touches make your queen bunk bed look complete and inviting. They add style and comfort. These final steps help protect the wood and ensure safety. Let’s explore how to finish your bed perfectly.
Painting Or Staining Options
Choose paint or stain to match your room’s style. Paint offers bright colors and hides wood marks well. Stain shows the wood grain and gives a natural look. Use non-toxic, child-safe paint or stain for safety. Apply two coats for strong coverage. Let each coat dry fully before the next.
Adding Mattress And Bedding
Select mattresses that fit the bunk bed size exactly. Firm mattresses provide better support and safety. Choose bedding that matches your room’s color scheme. Use soft sheets and cozy blankets for comfort. Secure bedding to prevent slipping during sleep. Pillows add a nice finishing touch.
Final Safety Checks
Check all screws and bolts are tight and secure. Make sure guardrails are strong and cover the bed sides. Test the ladder for stability and proper angle. Look for sharp edges and sand them smooth. Confirm the bed holds weight safely before use. These checks keep the bunk bed safe for everyone.
Credit: gooddiyplans.com
Frequently Asked Questions
What Materials Are Needed To Build A Queen Bunk Bed?
You need sturdy wood, screws, bolts, wood glue, sandpaper, and paint. Choose high-quality plywood or hardwood for durability and safety. Also, have proper tools like a drill, saw, measuring tape, and clamps ready for accurate assembly.
How Long Does It Take To Build A Queen Bunk Bed?
Building a queen bunk bed typically takes 8 to 12 hours. This depends on your skill level, design complexity, and tool availability. Planning and preparation can reduce construction time significantly.
What Safety Features Should A Queen Bunk Bed Have?
Include guardrails on the top bunk, secure ladder attachment, and strong support beams. Use non-toxic finishes and smooth edges to prevent injuries. Ensure the bed frame can support weight safely to avoid accidents.
Can I Customize The Queen Bunk Bed Design?
Yes, you can customize size, finish, storage options, and ladder style. Personalize the bed to fit your room’s decor and specific needs. Custom designs enhance functionality and aesthetic appeal.
Conclusion
Building a queen bunk bed takes patience and careful steps. Start with a clear plan and the right tools. Measure twice to avoid mistakes. Take your time assembling each part. Safety matters—check all screws and joints. A sturdy bed lasts for years.
Enjoy the extra space it creates in your room. With effort, you get a strong and useful bunk bed. Simple steps lead to great results. Your new bed will bring comfort and style.
