Are you looking to create a clear and simple drawing of bunk bed architecture? Whether you’re planning a DIY project or want to visualize your design ideas, knowing how to draw a bunk bed layout can make a big difference.
This guide will help you break down the process step by step, so you can confidently bring your vision to life. By the end, you’ll have the skills to sketch a detailed and accurate bunk bed design that fits your space perfectly.
Ready to get started? Let’s dive in!
Materials And Tools Needed
Gathering the right materials and tools is key to drawing bunk bed architecture well. These items help create clear, accurate, and detailed sketches. Having everything ready makes the drawing process smooth and enjoyable.
Drawing Tools
Use pencils with different hardness for varied lines. A mechanical pencil keeps lines sharp. Erasers help fix mistakes and clean smudges. Fine-tip pens add final details and bold outlines. A sketchbook or good quality paper supports your work.
Reference Images
Collect photos or drawings of bunk beds. These images guide your design and structure. Study different styles and angles for better understanding. Save images with clear views of the bed’s parts. Reference pictures help keep your drawing accurate.
Measurement Tools
Use a ruler or scale for straight lines and correct proportions. A measuring tape helps check real-life dimensions if you have an actual bunk bed. Protractors assist in drawing angles accurately. These tools ensure your drawing matches real sizes and shapes.
Basic Bunk Bed Structure
The basic bunk bed structure forms the foundation of a safe and sturdy design. It includes key parts that hold the bed together. Understanding these parts helps you draw the bunk bed accurately. Each component has a clear purpose to support the beds and ensure safety.
Frame Shape
The frame shape is usually rectangular. It outlines the top and bottom beds. Use straight lines to draw the frame edges. Keep the proportions balanced to show correct bed size. The frame must look solid to suggest strength.
Support Beams
Support beams hold the frame and mattress in place. Draw vertical beams at the corners for stability. Horizontal beams run under each bed level. These beams prevent sagging and add strength. Make sure beams connect firmly with the frame.
Ladder Placement
The ladder allows climbing to the top bunk. Place it on one side of the frame. Draw the ladder with evenly spaced rungs. The ladder should lean slightly for easy climbing. Show it attached securely to the frame for safety.
Sketching The Outline
Sketching the outline is the first step to draw bunk bed architecture. It helps set the structure and shape. A clear outline guides the whole drawing process. Start simple, focusing on basic shapes and lines. This makes the drawing easy to follow and adjust.
Drawing The Main Frame
Begin by drawing two tall vertical lines. These lines form the bunk bed’s main supports. Connect them with horizontal lines at top and bottom. Draw a rectangle to shape the bed frame. Keep lines light for easy changes later.
Adding Bed Platforms
Inside the frame, sketch two rectangles. These represent the sleeping platforms. Place one rectangle near the top and the other near the bottom. Make sure platforms are parallel and evenly spaced. This shows the beds clearly and neatly.
Marking Ladder And Rails
Draw a ladder on one side of the frame. Use vertical lines with short horizontal steps. Add guard rails above the top platform. Use thin lines to show safety rails. These details make the bunk bed look real and safe.
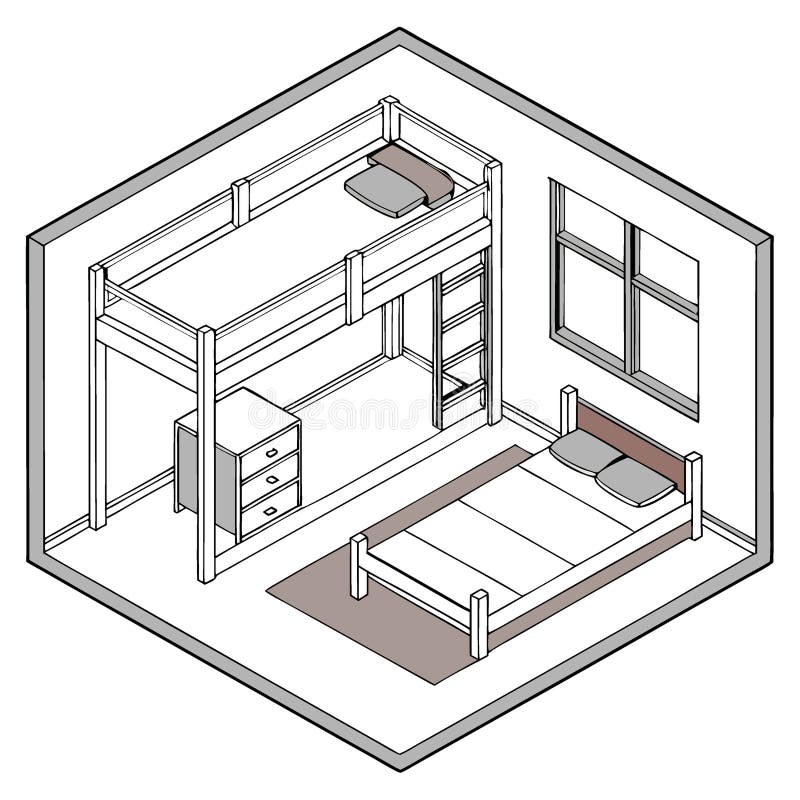
Credit: www.dreamstime.com
Adding Architectural Details
Adding architectural details to your bunk bed design makes it both functional and stylish. These details improve safety and usability. They also add personality to the bed’s look. Focus on key elements like safety rails, ladders, and storage. Each part plays a vital role in the overall design.
Incorporating Safety Rails
Safety rails protect the top bunk from falls. Use sturdy materials like wood or metal. The rails should be high enough to keep sleepers safe. Leave enough space for easy climbing in and out. Rounded edges prevent injuries. Secure the rails firmly to the bed frame. This ensures stability and peace of mind.
Designing The Ladder
The ladder connects the lower and upper bunks. Choose a design that fits your room space. Straight ladders are simple and save space. Angled ladders feel easier to climb. Use wide, flat steps for comfort. Attach the ladder tightly to the bed frame. Consider adding hand grips for extra support.
Adding Storage Features
Storage makes the bunk bed more practical. Draw drawers or shelves under the bottom bunk. Use the space at the ends for small shelves. These spots hold books, toys, or night lights. Built-in storage keeps the room neat. Plan for easy access without cluttering the bed area. Storage details add function and style at once.
Shading And Texturing
Shading and texturing bring your bunk bed drawing to life. They add depth and realism to the flat shapes. This step highlights materials and how light interacts with surfaces.
Focus on different parts of the bunk bed. Each material needs unique shading and texture. Wood and metal, for example, require different techniques. Proper shading helps viewers understand the structure better.
Wood Grain Effects
Wood grain gives the bunk bed a natural look. Use fine, curved lines to mimic wood patterns. Draw these lines following the board’s shape. Vary line thickness and spacing for realism. Add knots and slight imperfections to avoid flatness. Lightly shade areas between grains for texture.
Metal Parts Shading
Metal surfaces are smooth and reflective. Use soft gradients to show shine and reflections. Darken edges to create a solid, sturdy feel. Highlight spots where light hits strongest. Avoid harsh lines; metal looks sleek and smooth. Small scratches or dents add realism.
Light And Shadow Placement
Light direction defines shadows and highlights. Decide where the light source is before shading. Shadows fall opposite the light. Shade under the bed and inside corners darker. Use lighter shading on surfaces facing the light. This contrast shapes the bunk bed’s form clearly.

Credit: buybuybaby.bedbathandbeyond.com
Coloring Techniques
Coloring techniques bring your bunk bed drawing to life. They add depth and make the design clear. Good coloring helps show materials and light effects. It also highlights the shape and style of the bed. Follow simple steps to color your drawing well.
Choosing Color Palette
Pick colors that match the bunk bed’s material. Wood tones like brown or beige work well. Use cool colors for metal parts, such as gray or blue. Limit your palette to three or four colors. This keeps the drawing neat and easy to read. Consider the room’s style when choosing colors.
Applying Base Colors
Start by coloring large areas with base colors. Use flat, even strokes to cover the surface. Avoid heavy pressure to keep the color smooth. Base colors set the foundation for details. Let the base layer dry before adding more layers. This step makes later shading easier.
Highlighting And Blending
Add highlights to show where light hits the bed. Use a lighter shade or white for these spots. Blend colors softly to avoid harsh lines. Use small circular motions or a blending tool. This technique gives a smooth, realistic look. Highlights and blending create a sense of depth.
Final Touches And Presentation
Final touches bring your bunk bed drawing to life. This stage sharpens the look and adds depth. Presentation makes your work stand out. Take time to refine and prepare your drawing for display.
Clean Lines And Erasing
Use a sharp eraser to remove extra pencil marks. Clean lines make your drawing clear and neat. Trace over important edges with a fine pen or darker pencil. This step helps highlight the bunk bed’s structure. Avoid smudges by working gently and patiently.
Adding Background Elements
Background details give context to your bunk bed. Sketch simple walls, windows, or floorboards around the bed. These elements add space and depth to your drawing. Keep backgrounds light to avoid overpowering the main subject. Small touches make your scene more realistic.
Framing The Drawing
Framing gives a finished look to your artwork. Use a ruler to draw a neat border around the drawing. This frames the bunk bed and keeps focus on it. Choose a frame size that fits the paper well. A clean frame enhances presentation and protects your work.
Credit: www.fretzrv.com
Frequently Asked Questions
How Do You Start Drawing Bunk Bed Architecture?
Begin by sketching a simple rectangular frame for the bunk bed. Add vertical posts at each corner, then draw horizontal supports for both beds. Include ladders and guardrails to complete the structure. Use light lines to adjust proportions before finalizing the drawing with darker lines.
What Tools Are Best For Bunk Bed Architectural Drawings?
Use a pencil, ruler, and graph paper for precision. Digital tools like AutoCAD or SketchUp help create detailed, scalable drawings. These tools offer accuracy and flexibility, making it easier to modify dimensions and add architectural details efficiently.
How To Ensure Safety In Bunk Bed Design Drawings?
Include guardrails on the top bunk and a sturdy ladder in your drawing. Ensure adequate headroom between beds and proper weight support. These safety features prevent accidents and meet standard bunk bed regulations in architectural plans.
What Dimensions Are Standard For Bunk Bed Architecture?
A typical bunk bed is about 80 inches long, 42 inches wide, and 65 inches tall. Maintain at least 30 inches of space between the upper and lower beds. These dimensions ensure comfort and comply with safety standards in design.
Conclusion
Drawing bunk bed architecture can be simple and fun. Follow the steps to create clear, neat designs. Use basic shapes and lines to show details well. Practice helps you improve your drawing skills quickly. Keep your work tidy and check measurements often.
This way, your bunk bed plans look real and useful. Enjoy creating your own designs with confidence. Try different styles to find what suits you best. Drawing bunk beds opens doors to many building projects. Keep learning, and your drawings will get better every time.