Looking for a simple way to add extra storage without taking up floor space? Hanging a coat rack on your wooden door is a smart, easy solution.
You might think it’s tricky or that you need special tools, but with the right steps, you can do it yourself quickly and securely. Imagine having your coats, hats, and bags neatly organized and within reach every time you enter your room.
Ready to learn how to make your door work harder for you? Keep reading, and you’ll discover all the tips and tricks to hang a coat rack like a pro.

Credit: thatmusicmag.com
Choose The Right Coat Rack
Choosing the right coat rack for a wooden door is important. It affects how well the rack fits and holds your items. A good choice makes hanging coats easy and keeps the door safe from damage. Think about style, size, and strength before buying.
Types Of Coat Racks For Wooden Doors
Over-the-door racks are popular. They hang without nails or screws. Hooks rest on top of the door. These racks are easy to install and remove.
Wall-mounted racks need screws or nails. They attach firmly to the door surface. Choose these if you want a strong hold for heavier coats.
Adhesive racks use sticky pads. They do not harm the door finish. Perfect for light jackets or scarves but not heavy coats.
Size And Weight Considerations
Check the door size before buying. A rack too big can block the door or look odd. A small rack may not hold many coats.
Think about the weight of your coats. Heavy coats need racks with strong hooks or screws. Light racks work well for thin jackets or hats.
Balance size and strength for the best fit. A sturdy rack that fits the door keeps your space neat and safe.
Gather Necessary Tools And Materials
Before hanging a coat rack on a wooden door, gathering the right tools and materials is essential. This step ensures the process goes smoothly and the rack stays secure. Having everything ready saves time and prevents frustration.
Knowing what to prepare helps you avoid interruptions in your project. Here is a clear list of what you need.
Tools Needed
- Screwdriver (manual or electric)
- Measuring tape
- Drill with drill bits
- Level
- Pencil or marker
- Hammer (optional, for wall anchors)
Materials To Have On Hand
- Coat rack with mounting hardware
- Screws suitable for wood
- Wall anchors (if needed)
- Protective pads or felt (to avoid door damage)
Prepare The Wooden Door
Preparing the wooden door is the first step to hang a coat rack properly. A clean and well-marked surface helps the rack stay secure. It also prevents damage to the door. Take your time with this step to get good results.
Start by cleaning the door surface. Then, mark the spots where you will place the screws or hooks. These small actions make a big difference in the final look and strength of the coat rack.
Clean The Surface
Wipe the door with a soft cloth to remove dust and dirt. Use mild soap and water for sticky spots. Avoid harsh chemicals that can damage the wood finish. Let the door dry completely before moving to the next step. A clean surface helps the screws or hooks hold better.
Mark The Placement Spots
Decide where you want the coat rack on the door. Use a pencil to mark the exact points for screws or hooks. Measure carefully to keep the rack level. Check twice before drilling or screwing. Clear marks guide you and prevent mistakes.
Credit: www.walmart.com
Drill Pilot Holes
Drilling pilot holes is an important step before hanging a coat rack on a wooden door. These small holes guide the screws and prevent the wood from splitting. Pilot holes make the installation smoother and keep the door strong.
Select Drill Bit Size
Choose a drill bit slightly smaller than the screw’s thickness. This size helps the screw grip the wood firmly. Too large a hole will make the screw loose. Too small will cause the wood to crack. Match the drill bit to the screw for the best hold.
Drilling Tips For Wooden Doors
Mark the spots carefully where you want to drill. Hold the drill steady and drill straight into the door. Drill slowly to avoid damaging the wood. Stop once the hole is deep enough for the screw. Clean any dust from the hole before inserting the screw.
Attach The Coat Rack
Attaching the coat rack to a wooden door is a key step. It keeps the rack stable and ready for use. Take time to place it correctly and fasten it well. This ensures the rack holds coats safely without damage to the door.
Aligning The Rack
Start by holding the coat rack against the door. Match it to the height and position you want. Use a level tool if you have one. This helps keep the rack straight. Mark the screw holes lightly with a pencil. Double-check the alignment before drilling or screwing.
Screwing It In Securely
Use screws that fit the rack and door type. Drill small pilot holes in the marked spots. This prevents the wood from splitting. Screw the rack tightly but do not over-tighten. Over-tightening can crack the door or strip the screw holes. Test the rack by gently pulling it. It should feel firm and steady.

Credit: www.amazon.com
Test Stability And Adjust
After hanging your coat rack on the wooden door, testing its stability is key. This step ensures the rack holds your coats safely without slipping or falling. Small shifts can make a big difference in how secure the rack feels.
Focus on how the rack stands and supports weight before using it fully. Adjustments might be needed to keep everything steady and reliable. Take your time to check and fix any issues.
Check Weight Support
Start by gently placing coats on the rack. Notice if the door shows signs of strain or if the rack moves. Try different weights to see how well the rack holds up. Pay attention to any wobbling or tilting. Stability means no shaking or loose parts.
Make Necessary Adjustments
If the rack feels unsteady, tighten screws or hooks. Adjust the position on the door for better balance. Use extra support like adhesive strips if needed. Small changes can improve strength and prevent damage. Keep testing until the rack feels firm and secure.
Alternative Hanging Methods
Sometimes drilling holes in a wooden door is not the best option. Alternative hanging methods can save your door’s finish and still hold your coat rack firmly. These options are simple and quick to use. They also work well for renters or anyone who avoids making permanent changes.
Using Adhesive Hooks
Adhesive hooks stick directly to the door surface. They do not require nails or screws. Choose strong hooks designed for heavier weights. Clean the door surface before applying the hook. Press the hook firmly and wait for the adhesive to set. Hang your coat rack carefully on the hooks. Remove hooks gently to avoid damage.
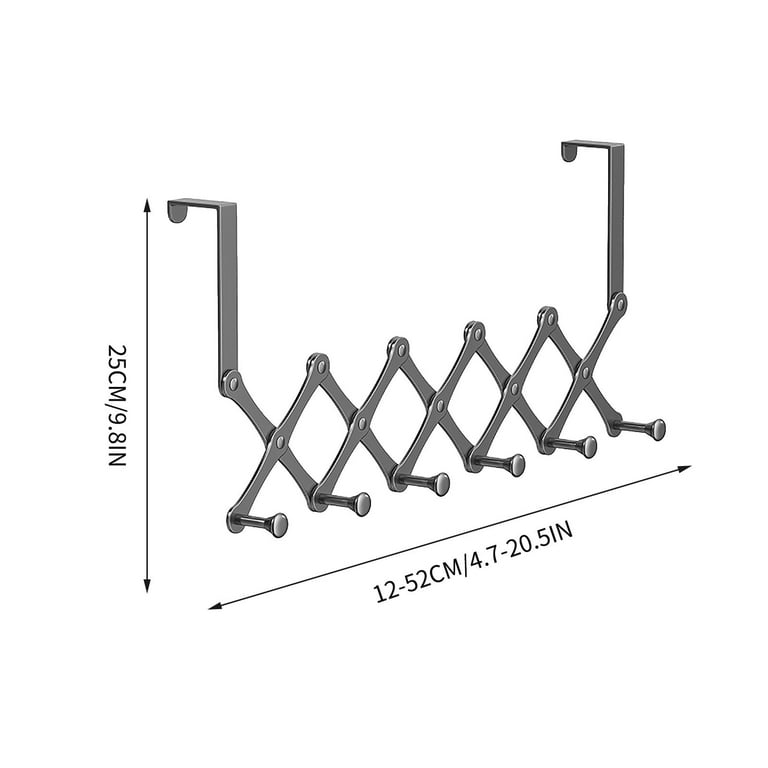
Over-the-door Racks
Over-the-door racks hang on the top edge of the door. They do not need any tools or adhesives. These racks are easy to install and remove. They hold multiple items without straining the door. Choose a rack that fits your door’s thickness. This method keeps the door intact and tidy. It is ideal for temporary or flexible use.
Frequently Asked Questions
How Do I Hang A Coat Rack On A Wooden Door?
First, measure and mark the desired height on the door. Use screws or hooks designed for wood. Pre-drill holes to avoid splitting. Secure the coat rack firmly, ensuring it supports the weight of coats without damaging the door.
What Tools Are Needed To Install A Coat Rack?
You will need a drill, screwdriver, measuring tape, pencil, and screws or hooks. A level helps ensure the rack is straight. Pre-drilling is essential to prevent wood splitting. These basic tools make installation quick and safe.
Can I Hang A Heavy Coat Rack On A Wooden Door?
Yes, but choose sturdy screws and anchors. Ensure the door is solid and can handle extra weight. Distribute the coat rack evenly to avoid door damage. Avoid overloading the rack to maintain door integrity.
How High Should I Install A Coat Rack On A Door?
Install the coat rack at about 5 to 6 feet from the floor. This height suits most adults for easy access. Adjust based on user height and door size. Proper height ensures comfort and prevents door damage.
Conclusion
Hanging a coat rack on a wooden door is simple and useful. Follow each step carefully for a strong hold. Choose the right tools and materials for best results. Check the door’s condition before you start. A well-installed rack keeps your space neat and organized.
Small efforts bring big changes to your daily routine. Enjoy your new coat rack and the added convenience it offers. Keep practicing, and you’ll improve your DIY skills quickly.