Looking for a simple way to organize your space and add a personal touch to your home? Hanging a homemade coat rack is easier than you think—and it can transform your entryway instantly.
Imagine having a stylish, sturdy rack that fits your style perfectly and keeps your coats, bags, and hats neatly in place. In this guide, you’ll discover step-by-step how to hang your own coat rack safely and securely. Keep reading, and by the end, you’ll have the confidence and know-how to complete this project like a pro.

Credit: dcare-eg.com
Choose The Right Location
Choosing the right location for your homemade coat rack is key for daily use and room style. The spot must be practical and fit your space well. This helps keep your home tidy and your coats easy to reach.
Assess Wall Space
Find a wall with enough empty space. Avoid crowded areas with too many items. The wall should be strong enough to hold weight. Check for studs behind drywall for better support. Clear space around the rack for easy hanging and removal of coats.
Consider Height And Accessibility
Place the rack at a height everyone can reach. About 5 to 6 feet from the floor works well for most people. Make sure children can also reach lower hooks if needed. Avoid placing the rack too high or too low. Easy access saves time and keeps things neat.
Gather Necessary Tools And Materials
Gathering the right tools and materials makes hanging your homemade coat rack easier and safer. Having everything ready helps avoid interruptions and mistakes. This step saves time and ensures a better result. Focus on what you need to complete the project smoothly.
List Essential Tools
Start with basic hand tools. A drill is crucial for making holes in the wall. Use a screwdriver to fix screws tightly. A level helps keep the coat rack straight. A measuring tape measures space and placement. A pencil marks where to drill. Consider wall anchors for heavy coats. Safety goggles protect your eyes from dust and debris.
Select Suitable Hooks Or Pegs
Choose hooks or pegs that fit your coat rack design. Metal hooks are strong and durable. Wooden pegs match rustic or homemade racks well. Make sure they are sturdy enough for heavy coats. Pick sizes that suit the space and coat types. Smooth edges prevent damage to clothes. Test them on your rack before installation.
Prepare The Coat Rack
Preparing the coat rack is an important step before hanging it on the wall. This step helps make sure the rack looks good and works well. Taking time to prepare the wood and plan where the hooks go will make the whole project easier and neater.
Sand And Finish The Wood
Start by sanding the wood to make it smooth. Use fine-grit sandpaper to remove rough spots and splinters. Sand along the wood grain for the best results. After sanding, wipe the dust off with a clean cloth.
Apply a finish to protect the wood and enhance its look. You can use paint, stain, or clear varnish. Choose a finish that matches your room style. Let the finish dry completely before moving to the next step.
Mark Hook Positions
Decide where the hooks will be placed on the rack. Space the hooks evenly for balance and easy use. Use a pencil to mark each spot clearly. Check that the marks are straight by using a ruler or level.
Consider the size of the coats or bags you will hang. Leave enough space between hooks to avoid crowding. Properly marking the positions helps with accurate drilling and attaching hooks later.
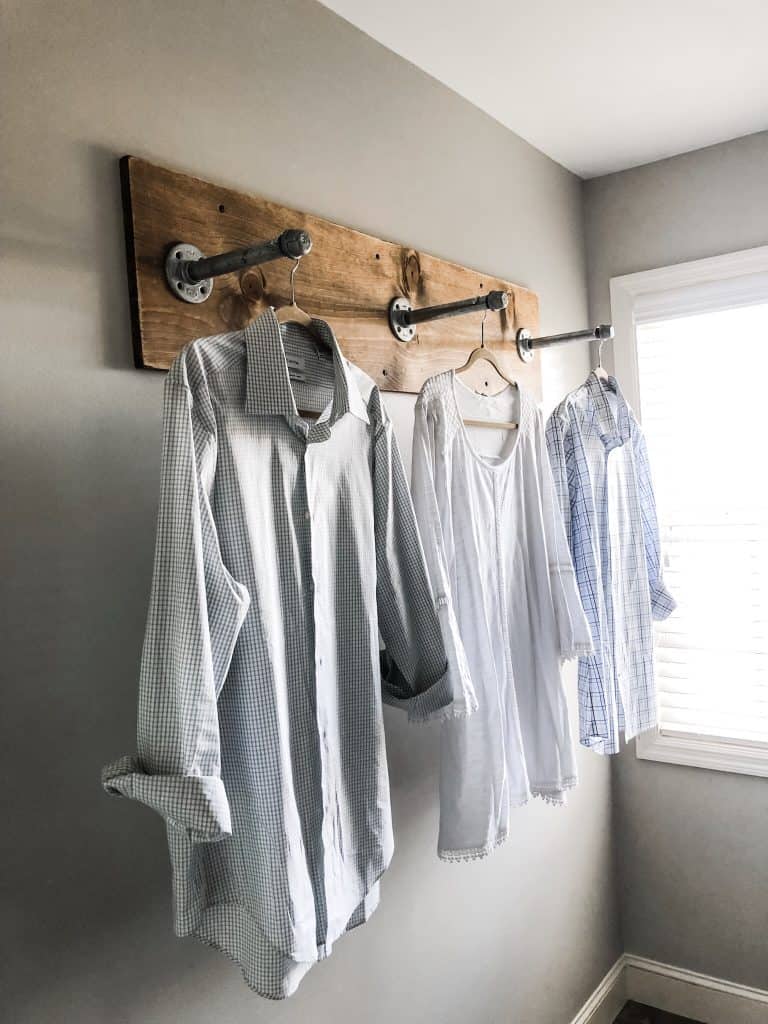
Credit: www.pamsteele.org
Find Wall Studs
Finding the right place to hang your homemade coat rack is very important. You need to attach it to wall studs. Studs give strong support. Without them, the rack might fall off the wall. This section guides you to find wall studs easily and mark their locations for safe hanging.
Use A Stud Finder
A stud finder helps locate wooden or metal studs behind your wall. Turn it on and move it slowly across the wall. The device will beep or light up when it finds a stud. This tool saves time and effort. It is more accurate than guessing or tapping on the wall.
Hold the stud finder flat against the wall. Move it horizontally at chest height. Mark the spots where the device signals a stud. Repeat the scan twice to confirm the stud’s position.
Mark Stud Locations
Marking stud locations is key before drilling holes. Use a pencil to draw small marks on the wall. These marks show where to place screws or hooks. Keep the marks level by using a ruler or level tool.
Measure the distance between marks to check if they are about 16 or 24 inches apart. This is the common spacing for studs. Marking clearly helps keep your coat rack straight and secure.
Mount The Coat Rack
Mounting the coat rack properly is important for safety and durability. It keeps the rack steady and ready to hold your coats. Take your time to place it right on the wall.
Drill Pilot Holes
Mark the spots on the wall where you want the rack. Use a level to keep it straight. Pick a drill bit slightly smaller than your screws. Drill pilot holes at the marks. These holes help guide the screws and prevent the wood from splitting.
Attach The Rack Securely
Hold the coat rack against the wall, lining up with the pilot holes. Use screws that fit your wall type. Drive the screws through the rack into the pilot holes. Tighten them until the rack feels firm. Check the rack by gently pulling to ensure it is secure.
Test Stability And Adjust
Testing the stability of your homemade coat rack is crucial for safety and durability. This step ensures the rack holds weight without wobbling or falling. Take time to check its balance and strength carefully. Small adjustments can make a big difference in how secure it feels.
Check Weight Support
Hang a few items on the rack to test its strength. Use coats or bags similar to what you will usually place. Watch for any signs of bending, shaking, or loosening. Press gently on the rack from different angles. It should stay firm and not move easily. This check helps you know if your rack can handle daily use.
Make Necessary Adjustments
If the rack feels loose or unsteady, tighten screws or nails first. Add extra support brackets if needed for better hold. Adjust hooks or mounting points to spread weight evenly. Recheck the rack after each change. Keep testing until the rack feels solid and secure. Proper adjustments keep your homemade rack safe and long-lasting.
Add Finishing Touches
Adding the final touches to your homemade coat rack makes it special and complete. This step helps the rack fit your home’s style perfectly. Small details bring out beauty and personality in your project. Finishing touches protect the wood and make the rack last longer.
Paint Or Stain Options
Choose paint or stain to match your room’s look. Paint offers many colors. Pick a shade that blends well with your walls and furniture. Use a brush or spray for even coverage. Let each layer dry before adding another.
Stain shows the natural wood grain. It gives a warm, classic feel. Pick a light or dark stain depending on your taste. Apply with a cloth or brush. Wipe off extra stain to avoid sticky spots. Use a clear sealant to protect the finish.
Decorate For Style
Decorate the rack to add charm and style. Attach hooks with unique shapes or colors. Add small shelves for keys or hats. Use stencils to paint simple patterns or words.
Try adding small plants or framed photos nearby. Choose decorations that match your home’s theme. Keep it simple for a clean look. These small touches make your coat rack a stylish part of your space.

Credit: www.youtube.com
Frequently Asked Questions
How Do I Choose The Right Wall For My Coat Rack?
Select a sturdy wall near your entryway for convenience. Ensure it can support the rack’s weight and frequent use. Avoid walls with plumbing or electrical wiring behind them.
What Tools Are Needed To Hang A Homemade Coat Rack?
You typically need a drill, level, screws, anchors, a measuring tape, and a screwdriver. These tools ensure secure and accurate installation.
How High Should I Mount A Homemade Coat Rack?
Mount the coat rack about 5 to 6 feet from the floor. This height is accessible for most users and keeps coats off the ground.
Can I Hang A Homemade Coat Rack On Drywall?
Yes, but use wall anchors or toggle bolts to support weight. Anchors prevent the rack from pulling out of the drywall.
Conclusion
Hanging a homemade coat rack is simple and rewarding. Follow the steps carefully to ensure a secure hold. Choose the right tools and materials for best results. Take your time measuring and marking the wall. Enjoy the satisfaction of adding a personal touch to your home.
A sturdy coat rack keeps your space neat and organized. Try this easy project to improve your home today.