Are you looking to save space and add a clever twist to your room? Building a Murphy bunk bed might be exactly what you need.
Imagine having a comfy bed that folds up neatly against the wall during the day, giving you more room to move and live. In this guide, you’ll discover simple, clear steps to create your own Murphy bunk bed, even if you’re not a pro.
By the end, you’ll have the confidence to transform your space and impress everyone with your smart solution. Keep reading, and let’s get started on making your room both practical and stylish!
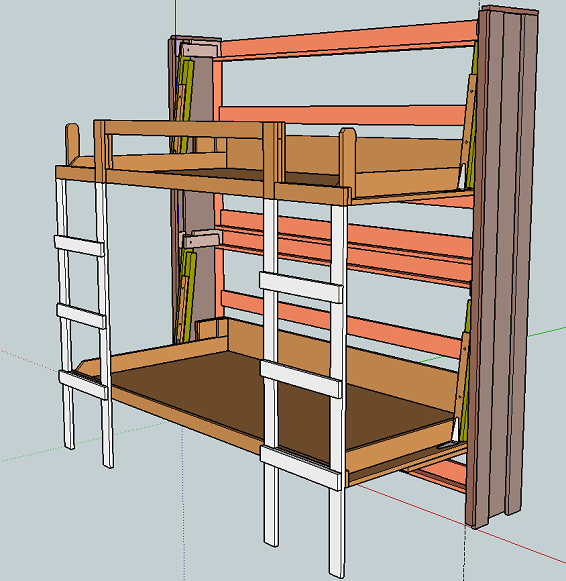
Credit: www.ana-white.com
Choosing The Right Materials
Choosing the right materials is key to building a strong Murphy bunk bed. Good materials ensure safety and long-lasting use. It also makes the bed look better and easier to build. Focus on wood types and hardware for the best results.
Types Of Wood For Durability
Solid hardwoods like oak and maple offer excellent strength. They resist dents and scratches well. Pine is softer but easier to work with and costs less. Plywood is stable and less prone to warping. Choose wood with few knots and straight grain. This improves the bed’s sturdiness and appearance.
Essential Hardware And Tools
Strong hinges are crucial for smooth folding and unfolding. Use heavy-duty steel for better support. Quality screws and bolts keep everything tight and secure. A good locking mechanism prevents the bed from moving. Basic tools include a drill, screwdriver, saw, and measuring tape. These help make precise cuts and fasten pieces safely.
Designing Your Murphy Bunk Bed
Designing your Murphy bunk bed is the first step to creating a practical and space-saving piece. This stage sets the foundation for a bed that fits well and works perfectly in your room.
Good design means thinking about size and space carefully. It helps you avoid mistakes and ensures the bed will be safe and comfortable.
Measuring Your Space Accurately
Start by measuring the wall where the bed will go. Use a tape measure to get the height, width, and depth.
Check for any obstacles like light switches or outlets. Write down all measurements clearly.
Measure the floor space around the bed area. This helps with planning the bed’s full size.
Planning The Bed Dimensions
Decide how big each bunk should be. Standard bed sizes work well for comfort.
Think about the thickness of the mattress and the frame. Add this to your measurements.
Make sure there is enough space to fold the bed up and down easily.
Include safety space around the bed. This keeps the area safe for use.
Preparing The Workspace
Preparing your workspace is the first step in building a Murphy bunk bed. A clean, organized area helps you work faster and safer. It also makes finding tools and parts easier. This section covers how to clear and organize your space and what safety steps to follow before starting.
Clearing And Organizing The Area
Remove all unnecessary items from the room. This creates more space to move around. Set aside furniture and decorations that might get in the way. Arrange your tools and materials in one spot. Group similar items together for quick access. A tidy workspace reduces mistakes and saves time.
Safety Precautions To Follow
Wear safety glasses and gloves to protect your eyes and hands. Keep a first aid kit nearby. Make sure the floor is dry and free of debris. Use proper lifting techniques to avoid injury. Check that power tools have safety guards. Clear the area of children and pets before starting work.

Credit: www.easydiymurphybed.com
Building The Frame
Building the frame is the most important step in making a Murphy bunk bed. It gives the bed its shape and strength. A strong frame keeps the bed safe and steady. Start with good wood and careful measuring. Take time to cut and fit the pieces right. This will make sure the bed works well and lasts long.
Focus on two main parts: cutting and assembling the wood, and installing support structures. Both steps need care and attention. Follow each step clearly to build a solid frame for your Murphy bunk bed.
Cutting And Assembling The Wood
Choose sturdy wood like pine or oak. Use a saw to cut the pieces to the right size. Measure twice before cutting once. Cut the side panels, top and bottom frames, and slats for the bed base. Sand the edges to avoid splinters.
Assemble the frame by connecting the wood pieces with screws or bolts. Use a drill for strong joints. Make sure the corners are square. Clamp the pieces to hold them steady while you work. Check the frame for any gaps or loose parts.
Installing Support Structures
Support structures keep the bed stable and safe. Install vertical supports on the side panels. These hold the weight of the mattress and sleepers. Add horizontal braces between the sides. This prevents the frame from wobbling.
Attach strong metal brackets or hinges where the bed will fold. These must hold the bed firmly to the wall. Test the frame by folding and unfolding it carefully. Tighten any loose screws to ensure safety. Proper support makes the Murphy bunk bed reliable and easy to use.
Attaching The Murphy Mechanism
Attaching the Murphy mechanism is a key step in building your Murphy bunk bed. This part allows the bed to fold up and down easily. It also keeps the bed stable and safe when in use or stored.
Proper installation ensures smooth operation and long-lasting performance. Take your time and follow each step carefully. The right mechanism will make your bunk bed both practical and durable.
Choosing The Right Lift System
Select a lift system designed for Murphy bunk beds. Check the weight capacity to match your bed size. Springs or pistons are common options. Springs offer strong support but need more space. Pistons work quietly and smoothly but cost more.
Look for a system with good reviews and clear instructions. This helps avoid problems during installation. Choose one that fits your skill level for easier setup.
Securing The Mechanism Safely
Fix the mechanism firmly to the bed frame and wall. Use heavy-duty screws and anchors for extra strength. Follow the manufacturer’s guide to place parts correctly. Double-check all bolts and screws for tightness.
Test the bed’s movement slowly at first. Ensure it opens and closes without sticking or wobbling. Secure all safety locks to prevent accidental falls. Safety is the top priority in this step.
Adding The Bunk Beds
Adding the bunk beds to your Murphy bed frame is a key step. It turns a simple bed into a space-saving solution for any room. This section guides you through building both the upper and lower beds. It also covers important safety and stability tips. Follow these steps carefully for strong and secure bunk beds.
Constructing The Upper And Lower Beds
Start by cutting the wood pieces for both beds. Use sturdy plywood for the bed bases. Attach slats evenly for mattress support. The upper bed needs extra support beams underneath. Build the frame with strong joints. Screw everything tightly to avoid wobbling. Make sure the beds fit perfectly within the Murphy frame.
Ensuring Stability And Safety
Check all screws and bolts twice. Add metal brackets at key joints for strength. Use safety rails on the upper bunk to prevent falls. Secure the beds firmly to the wall or frame. Test the beds by applying pressure gently. Confirm they hold steady without shifting. Never skip these safety steps to keep users safe.
Finishing Touches
Finishing touches bring your Murphy bunk bed to life. They make the bed look smooth and complete. These final steps protect the wood and add comfort for sleeping.
Careful finishing makes your project last longer. It also gives the bed a clean, polished look. Focus on sanding, painting, and adding mattresses and accessories.
Sanding And Painting
Start by sanding all wood surfaces with fine-grit sandpaper. This removes rough spots and splinters. Sand evenly to get a smooth finish. Wipe dust off with a clean cloth before painting.
Choose paint or stain that suits your room style. Use a brush or roller for even coverage. Apply thin coats and let each dry fully. Two or three coats create a durable, beautiful finish.
Seal with a clear varnish for extra protection. This prevents scratches and water damage. Let the bed dry completely before moving to the next step.
Installing Mattresses And Accessories
Select mattresses that fit your Murphy bunk bed perfectly. Measure the bed frame carefully before buying. Use firm but comfortable mattresses for support and safety.
Add bedding like sheets and pillows that match your room decor. Install safety rails or straps if needed to secure sleepers. Attach any shelves or hooks you want for extra storage.
Test the bed by folding and unfolding it several times. Make sure everything works smoothly and safely. Adjust any loose parts or fittings before use.

Credit: www.reddit.com
Maintaining Your Murphy Bunk Bed
Maintaining your Murphy bunk bed keeps it safe and comfortable for years. Regular care helps avoid big problems and costly repairs. Simple steps extend the life of your bed and keep it looking good.
Regular Checks And Repairs
Check the bed’s moving parts every month. Tighten screws and bolts that feel loose. Look for cracks or damage in the wood or metal. Fix small issues quickly to stop them from growing. Test the folding mechanism to ensure it moves smoothly. Keep the bed clean from dust and dirt to avoid wear.
Maximizing Longevity
Use the bed within weight limits to prevent damage. Avoid jumping or standing on the bed. Keep the bed dry and away from moisture. Apply a wood polish or protective finish once a year. Store the mattress properly when folding the bed. Use soft covers to protect the mattress from dust and stains.
Frequently Asked Questions
What Materials Do I Need To Build A Murphy Bunk Bed?
You need plywood, wood screws, hinges, a mattress, wall anchors, wood glue, and paint or stain. Quality materials ensure safety and durability.
How Much Space Is Required For A Murphy Bunk Bed?
A Murphy bunk bed requires at least 7 feet of wall space and 6 feet of ceiling height for proper installation and comfort.
Is Building A Murphy Bunk Bed Suitable For Beginners?
Yes, with clear instructions and basic carpentry skills, beginners can build a Murphy bunk bed safely and efficiently.
How Do I Ensure The Murphy Bunk Bed Is Safe?
Use sturdy materials, secure wall anchors, install reliable hinges, and regularly check all hardware for stability and safety.
Conclusion
Building a Murphy bunk bed saves space and adds style. Follow the steps carefully for a safe, sturdy result. Choose the right materials and tools before starting. Take your time to measure and assemble each part. This bed fits well in small rooms and homes.
Enjoy the extra sleeping space without clutter. A DIY Murphy bunk bed offers function and charm. Try this project to improve your living area today.