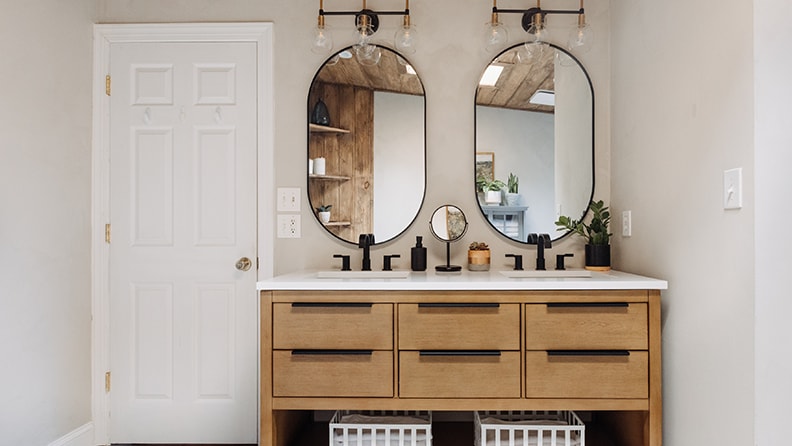
Are you ready to give your bathroom a fresh new look without spending a fortune? Installing a vanity cabinet is one of the easiest ways to upgrade your space, add storage, and boost your home’s value.
But if you’ve never done it before, the idea might seem overwhelming. Don’t worry—this step-by-step guide will walk you through the entire process, making it simple and manageable. By the end, you’ll feel confident and proud of your handiwork. Let’s get started and transform your bathroom together!
Choosing The Right Vanity Cabinet
Choosing the right vanity cabinet is an important step in your bathroom project. The right cabinet fits your space, style, and storage needs. It also makes your bathroom look neat and organized. This section helps you pick the best vanity cabinet for your home.
Measuring Your Space
Start by measuring the area where the vanity will go. Measure the width, depth, and height carefully. Check for any pipes or outlets that could affect installation. Write down all measurements. This helps avoid buying a cabinet that does not fit.
Selecting Style And Material
Think about the style of your bathroom. Choose a cabinet that matches the room’s look. Materials like wood, MDF, or metal work well in bathrooms. Wood offers a classic look, while metal can be modern. Pick a material that lasts and suits your style.
Considering Storage Needs
Decide what you want to store in the vanity. Drawers help keep small items organized. Cabinets with shelves hold larger items like towels. Choose a design with enough space for your needs. Good storage keeps your bathroom tidy and easy to use.

Credit: acedecorbath.com
Gathering Tools And Materials
Preparing to install a vanity cabinet requires gathering all the right tools and materials. Having everything ready saves time and avoids interruptions. It also ensures a smooth and safe installation process.
Below is a clear list to help you collect what you need before starting your project. This list includes basic tools and necessary hardware to complete the job efficiently.
Essential Tools List
- Measuring tape for accurate measurements
- Level to keep the cabinet straight
- Power drill with drill bits
- Screwdriver set (both flathead and Phillips)
- Stud finder to locate wall studs
- Adjustable wrench for plumbing connections
- Utility knife for cutting materials
- Clamps to hold pieces in place
- Safety glasses to protect your eyes
- Work gloves to protect your hands
Necessary Hardware And Supplies
- Vanity cabinet with all included parts
- Screws and wall anchors for mounting
- Silicone caulk to seal edges
- Plumbing fittings and connectors
- Wood shims to level the cabinet
- Painter’s tape for clean edges
- Drop cloth to protect the floor
- Pipe wrench for tightening plumbing
Preparing The Installation Area
Preparing the installation area is a crucial step before setting up your new vanity cabinet. It ensures the space is ready and safe for the installation process. Taking time to prepare helps avoid problems later on. This part covers removing old fixtures, checking walls and floors, and making sure plumbing is accessible.
Removing Old Fixtures
Start by removing the old vanity cabinet carefully. Turn off the water supply to avoid leaks. Use basic tools like a screwdriver and wrench to detach the cabinet and sink. Remove any nails or screws left on the wall. Clear out debris and clean the area for a smooth installation.
Checking Wall And Floor Conditions
Inspect the wall where the vanity will go. Look for water damage, mold, or loose drywall. Repair any cracks or holes to create a strong surface. Check the floor for uneven spots or damage. Fix these issues to keep your new cabinet stable and level.
Ensuring Plumbing Accessibility
Make sure the plumbing lines are easy to reach. Check the position of water supply pipes and drain lines. Adjust or extend pipes if needed for the new vanity. Confirm there are no leaks or blockages before installation. Proper plumbing access makes the process faster and easier.
Credit: www.lowes.com
Assembling The Vanity Cabinet
Assembling the vanity cabinet is a key step in your bathroom project. This part sets the base for your sink and countertop. Proper assembly ensures the cabinet is sturdy and looks good. Taking time here saves effort later. Follow clear steps to build your cabinet with ease and confidence.
Following Manufacturer Instructions
Start by reading the instructions carefully. Each cabinet model has unique parts and steps. Check the package to confirm all pieces are included. Identify screws, panels, and hardware before starting. Follow the order given to avoid mistakes. Use the recommended tools for best results. Keep instructions handy during the assembly process.
Tips For Efficient Assembly
Arrange parts in a clean workspace. This helps find items quickly. Use a soft surface to avoid scratches. Tighten screws just enough to hold parts together first. Final tightening comes after full assembly. Work in small steps to prevent errors. Ask a helper for large or heavy pieces. Take breaks if needed to stay focused.
Positioning And Securing The Cabinet
Positioning and securing the vanity cabinet is a key step in bathroom renovation. Proper placement ensures the cabinet fits well and functions properly. It also helps avoid damage to plumbing and walls. Take your time to align and level the cabinet before fixing it in place.
Aligning With Plumbing
Check the plumbing pipes before placing the cabinet. The drain and water lines must fit inside the cabinet space. Move the cabinet close to the wall but avoid pushing it too hard. Make sure the cabinet openings line up with the pipes. This step prevents leaks and allows easy access for repairs later.
Leveling The Cabinet
Use a spirit level to check the cabinet’s balance. Place it on top and sides of the cabinet. Adjust the cabinet feet or use shims under the base if needed. A level cabinet prevents water pooling and door misalignment. Take care to keep the cabinet steady during this process.
Mounting To The Wall
Find the wall studs using a stud finder for secure mounting. Drill pilot holes through the cabinet back into the studs. Use long screws to fasten the cabinet tightly to the wall. Double-check the cabinet’s position and level before tightening screws. Secure mounting keeps the cabinet stable and safe over time.
Installing The Sink And Faucet
Installing the sink and faucet is an important step in setting up your vanity cabinet. This part makes sure you have water running smoothly and no leaks. Proper installation helps your bathroom look great and work well.
Start by fixing the sink in place. Then, attach the faucet carefully. Follow the instructions that come with your sink and faucet for best results.
Connecting Water Lines
First, turn off the main water supply to avoid spills. Connect the hot and cold water lines to the faucet. Use a wrench to tighten the connections, but do not over-tighten. Check that all connections are secure. Make sure to use plumber’s tape on threads to prevent leaks.
Sealing And Testing For Leaks
Apply silicone sealant around the sink edges to stop water from seeping under. Let the sealant dry as per instructions. Turn the water supply back on slowly. Watch for any drips or leaks around connections. Tighten any loose fittings if needed. Testing now saves problems later.
Finishing Touches
The final steps of installing a vanity cabinet bring everything together. These finishing touches make your cabinet look complete and function well. Taking care of small details ensures a neat and lasting result.
Attaching Doors And Hardware
Start by fixing the doors on the cabinet frame. Use the hinges and screws that came with the kit. Check if the doors open and close smoothly. Adjust the hinges if needed to align the doors evenly. Next, install the handles or knobs. Tighten all screws firmly but do not over-tighten. Proper hardware installation improves cabinet usability and appearance.
Applying Caulk And Sealant
Apply caulk around the edges where the cabinet meets the wall. This prevents water from seeping behind the cabinet. Use a caulk gun for a smooth line. Smooth the caulk with a wet finger or tool. Seal any gaps between the countertop and the cabinet. Choose a waterproof sealant for best protection. Let the caulk dry fully before using the vanity.
Cleaning And Final Inspection
Clean all surfaces of dust and debris. Wipe doors, hardware, and countertop with a damp cloth. Check for any loose screws or gaps. Open and close doors to test the hardware. Fix any small issues you find. A clean, well-checked vanity cabinet adds value to your bathroom.

Credit: www.youtube.com
Frequently Asked Questions
How Do I Prepare The Wall For Vanity Cabinet Installation?
First, remove any old fixtures and clean the wall. Check for plumbing and electrical lines. Repair any damage and ensure the wall is level and dry before starting.
What Tools Are Needed To Install A Vanity Cabinet?
You will need a drill, level, tape measure, stud finder, screwdriver, and shims. Also, have a pencil, clamps, and silicone sealant handy for precise installation.
How Do I Secure The Vanity Cabinet To The Wall?
Locate wall studs using a stud finder. Use screws to attach the cabinet through the back panel into the studs. Ensure it is level and use shims if necessary.
Can I Install A Vanity Cabinet Over Existing Flooring?
Yes, you can install it over existing flooring if the floor is level and stable. Make sure the vanity sits flat and adjust with shims if needed.
Conclusion
Installing a vanity cabinet can improve your bathroom space quickly. Follow each step carefully for a smooth process. Measure and level to avoid mistakes. Secure the cabinet firmly to the wall for safety. Take your time and check your work as you go.
Enjoy the new look and extra storage it provides. This simple project adds value and style to your home. You can do it yourself with patience and basic tools.