Have you ever wished for more space to showcase your favorite books without taking up extra room? Building a bookshelf right into your wall is a clever way to save space and add a stylish touch to any room.
Imagine having a custom nook that perfectly fits your collection and blends seamlessly with your decor. In this guide, you’ll discover simple steps to create your own built-in bookshelf, even if you’re new to DIY projects. Ready to transform your wall into a beautiful storage solution?
Let’s get started!
Planning Your Bookshelf
Preparing the wall is a key step in building a bookshelf inside it. This stage sets the base for a strong and safe shelf. Careful work here makes the project easier and the shelf more durable.
Locating Studs And Wiring
Start by finding the wall studs. Studs are wooden beams that support the wall. Use a stud finder tool for this task. Mark each stud with a pencil. Check for wiring inside the wall. Avoid cutting into wires to prevent damage or shocks. Use a voltage detector to locate hidden wires.
Marking Shelf Positions
Decide the height and width of each shelf. Use a tape measure to mark these spots on the wall. Draw straight lines with a level for accuracy. Mark where the shelf supports will go. Keep space between shelves for books or decor. Clear marks help during cutting and installation.
Protecting Surrounding Areas
Cover the floor and nearby furniture with drop cloths. Tape plastic sheets over nearby outlets and switches. This prevents dust and debris from spreading. Wear safety goggles and a dust mask. Protecting the area keeps the workspace clean and safe.

Credit: www.youtube.com
Preparing The Wall
Building the frame is the first big step in making a bookshelf inside your wall. This frame holds all the shelves and books safely. It must be strong and fit perfectly in the wall space. Careful measuring and cutting make sure everything lines up well.
Start by preparing all the wood pieces. Then put them together to form a box-like shape. Finally, attach the frame firmly to the wall studs. This keeps the bookshelf steady and safe for use.
Cutting Wood Pieces
Measure the wall space where the bookshelf will go. Mark the wood pieces for the frame carefully. Cut the wood with a saw along the marks. Use a straight edge to keep cuts clean and even. Sand the edges lightly to avoid splinters.
Assembling The Frame
Lay the cut wood pieces on a flat surface. Join the pieces to form a rectangle or square frame. Use wood screws or nails to connect the corners tightly. Check the frame with a square tool to keep angles right. Add extra support pieces inside the frame if needed.
Securing The Frame To The Wall
Find the wall studs behind the drywall using a stud finder. Align the frame with these studs for strong support. Drill pilot holes in the frame to avoid wood splitting. Use long screws to attach the frame to the studs. Check the frame is level and adjust if needed.
Building The Frame
Installing shelves in your wall bookshelf is the step that brings your project to life. This part requires careful measuring and steady hands. It ensures your shelves hold books safely and look great. Follow simple steps for perfect results.
Cutting Shelf Boards
Start by measuring the space inside the frame. Mark the shelf boards to the exact length needed. Use a saw to cut along the marks carefully. Sand the edges smooth to avoid splinters. Check each board fits inside the frame snugly.
Attaching Shelves To The Frame
Place the cut shelf boards inside the frame. Use screws or brackets to attach shelves firmly. Drill pilot holes to prevent wood from splitting. Attach brackets under each shelf for extra support. Make sure each shelf is secured tightly to the frame.
Ensuring Level And Stability
Use a level tool to check each shelf is straight. Adjust screws or brackets if shelves tilt. Press shelves gently to check for wobble or movement. Tighten all fasteners until shelves feel solid. A stable shelf keeps your books safe and your wall strong.
Installing Shelves
Finishing touches make your built-in bookshelf look complete and polished. These steps improve both the look and feel. Small details create a big difference. Take time to perfect these final steps for a clean, professional result.
Sanding And Smoothing
Start by sanding all surfaces with fine-grit sandpaper. This removes rough spots and splinters. Smooth edges give a safe and neat finish. Sand corners carefully to avoid sharp edges. Wipe dust off with a damp cloth after sanding. A smooth surface helps paint or stain stick better.
Painting Or Staining
Choose paint or stain based on your room’s style. Paint gives a solid color and hides wood grain. Stain shows the natural beauty of the wood. Apply with a brush or cloth in thin, even coats. Let each coat dry fully before adding the next. Use a sealant to protect the finish and keep it lasting longer.
Adding Decorative Elements
Add trim or molding around the edges for a classic look. These details make the bookshelf stand out. Consider installing small LED lights to highlight your books. Decorative brackets can add style and support. Choose pieces that match your room’s decor. These touches give your bookshelf personality and charm.
Finishing Touches
Maintaining your built-in bookshelf keeps it looking good and lasting longer. Simple care can protect your wood and paint. It also helps your shelf stay safe and strong. Regular checks and cleaning make a big difference.
Regular Cleaning Tips
Dust your bookshelf often. Use a soft cloth or a feather duster. Avoid wet cloths that can damage wood. Clean corners and edges carefully. For tough dirt, use a mild soap with water. Dry the surface quickly to stop moisture damage.
Checking For Wear And Damage
Look at your bookshelf every few months. Check for cracks or loose boards. Tighten screws and nails if needed. Notice any signs of wood warping or paint peeling. Fix small problems early to avoid big repairs. This keeps your shelf safe and stable.
Updating Shelf Design
Change your shelf look with simple updates. Paint or stain can refresh the wood. Add new shelf brackets for style and strength. Rearrange shelves to fit different book sizes. Use decorative items to make it unique. Small changes keep your space fresh and inviting.
:max_bytes(150000):strip_icc()/dominiquegebruinsta-35b11dd4f037417980649e06e17c4027.jpg)
Credit: www.thespruce.com
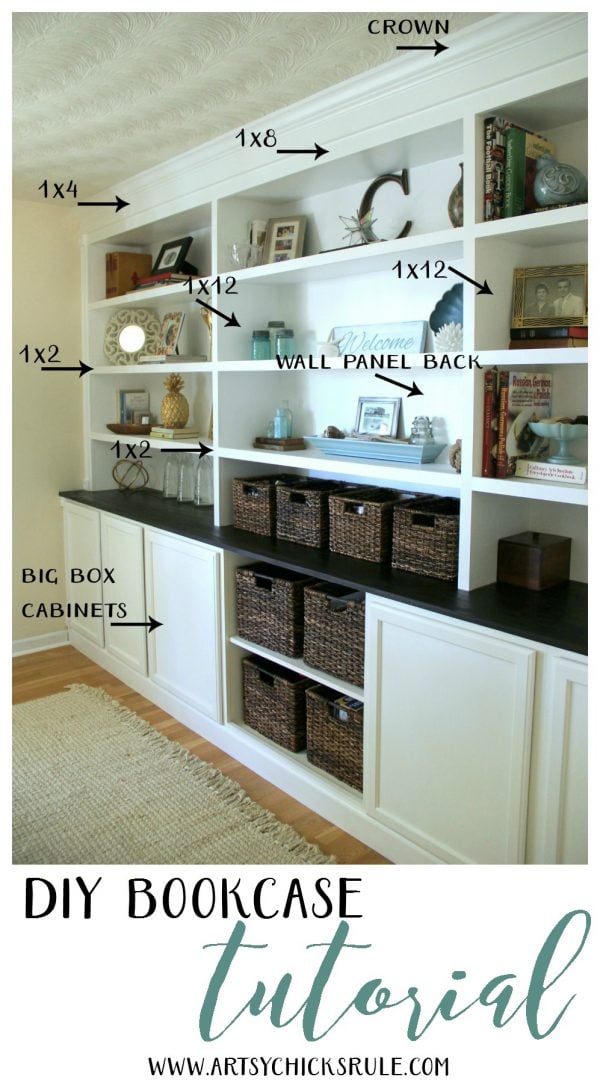
Credit: www.artsychicksrule.com
Frequently Asked Questions
How Do I Start Making A Bookshelf In The Wall?
Begin by choosing the wall location and measuring the available space. Then, mark the dimensions and check for studs and electrical wires before cutting.
What Materials Are Needed For A Built-in Wall Bookshelf?
You need plywood or MDF, wood screws, a saw, a drill, wood glue, sandpaper, paint or stain, and mounting brackets.
How Do I Ensure The Bookshelf Is Sturdy And Safe?
Attach the shelves securely to wall studs and use strong brackets. Use quality wood and double-check all fastenings for safety.
Can I Customize The Bookshelf Design To Fit My Space?
Yes, you can adjust the size, number of shelves, and finish to match your room’s style and storage needs.
Conclusion
Building a bookshelf inside a wall saves space and looks neat. It adds charm and extra storage to any room. With simple tools and steps, anyone can do this project. Take your time to measure and cut carefully. Choose strong materials to keep your books safe.
A built-in shelf fits your style and needs perfectly. Try this easy project to improve your home today.