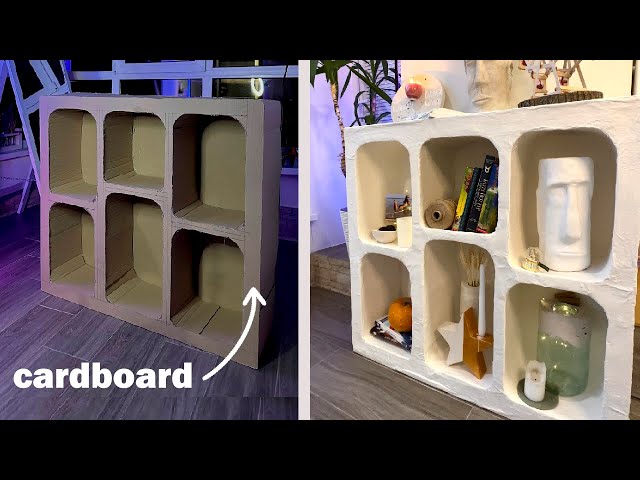
Are you looking for a simple and affordable way to organize your books? What if you could create a sturdy, stylish bookshelf using just cardboard?
It might sound surprising, but with the right steps, you can build a custom bookshelf that fits your space and style without spending much money. In this guide, you’ll discover easy tips and tricks to turn ordinary cardboard into a useful piece of furniture.
Keep reading, and you’ll be amazed at how quickly your clutter can turn into a neat, eye-catching display.
Materials Needed
Building a bookshelf out of cardboard is simple and fun. Gathering the right materials helps you make a strong and useful shelf. This section covers what you need before starting your project.
Types Of Cardboard
Choose thick, sturdy cardboard for the best results. Corrugated cardboard is the most common choice. It has a wavy layer inside that adds strength. Avoid thin or flimsy cardboard. Boxes from appliances or furniture work well. Recycle old shipping boxes to save money and help the environment.
Additional Supplies
Besides cardboard, some tools and materials make the process easier. Use a sharp box cutter or craft knife to cut clean edges. A metal ruler helps guide straight cuts. Hot glue or strong craft glue holds pieces together firmly. Masking tape can support joints while glue dries. Sandpaper smooths rough edges for a neat finish. Paint or decorative paper can add color and style.

Credit: www.instructables.com
Planning Your Bookshelf
Planning your bookshelf is the first step to a successful project. It helps you organize ideas and saves time. Good planning means fewer mistakes and better results.
Start by thinking about the space you want to use and the books you want to store. This will guide the size and shape of your bookshelf. Also, think about the style you prefer. Planning carefully makes building easier and more fun.
Measuring Space And Books
Measure the area where your bookshelf will stand. Note the height, width, and depth. Use a tape measure for accuracy. Write down the numbers.
Next, check the size of your books. Measure the tallest and widest books. Add a little extra space for easy access. This helps you decide shelf height and depth.
Think about how many books you have now. Also, think about future books. Leave room for growth. This stops your shelf from feeling too small later.
Design Ideas
Choose a simple design for your cardboard bookshelf. Straight lines are easier to cut and join. A box shape works well for most spaces.
Try shelves with different heights. This fits small and large books. You can also add small side pockets for magazines or papers.
Consider making your bookshelf light. Cardboard is light but strong when layered. Plan enough layers to hold your books safely.
Cutting The Cardboard
Cutting the cardboard is a key step in making a sturdy bookshelf. It shapes all the pieces that will hold your books. Precise cuts help the shelf fit together well. Careful cutting also makes the shelf look neat. Follow simple steps to mark and cut cardboard safely.
Marking Dimensions
Start by measuring the size of your bookshelf parts. Use a ruler or measuring tape for accuracy. Draw clear lines on the cardboard with a pencil. Mark each piece’s length and width carefully. Double-check measurements before cutting to avoid mistakes. Use a straight edge to keep lines straight. Clear marks guide you for smooth cutting.
Safe Cutting Techniques
Use a sharp craft knife or box cutter for clean cuts. Cut on a flat, hard surface to protect tables. Keep your fingers away from the blade path. Apply steady pressure without forcing the blade. Make several light passes instead of one deep cut. This prevents tearing the cardboard. Always cut away from your body for safety.
Credit: www.youtube.com
Assembling The Frame
Building a bookshelf from cardboard starts with assembling a strong frame. The frame holds the shelves and supports the weight of books. Careful assembly ensures the bookshelf lasts longer and stays stable.
Focus on precise cuts and straight edges for a neat frame. Use a flat surface for assembly. This helps keep everything aligned and even.
Joining Pieces Together
Start by arranging the cardboard pieces in the shape of the bookshelf frame. Use strong glue to attach the edges. Hold the pieces in place until the glue sets. Tape can help keep parts steady while drying.
Use small strips of cardboard inside corners for extra support. These strips act like braces and keep the frame square. Avoid gaps between pieces for better strength.
Reinforcing Joints
Reinforce joints with extra layers of cardboard. Cut strips and glue them over the seams. This prevents the frame from bending or breaking.
Apply pressure on the joints while drying to make them firm. Use clamps or heavy objects to hold pieces together. Check all joints for any weak spots before moving on.
Creating Shelves
Making a bookshelf from cardboard is simple and affordable. Cut sturdy pieces, fold edges, and glue them together. This DIY project saves space and recycles old materials.
Cutting Shelf Panels
Start by measuring the space inside your bookshelf frame. Use a ruler or tape measure for accuracy. Mark the cardboard sheets according to these measurements. Use a sharp craft knife or box cutter to cut along the marks. Cut slowly to keep edges straight and clean. Make sure each panel fits well inside the frame. Cut extra panels if you want more shelves. Remember to cut on a safe surface to protect your work area.
Securing Shelves In Place
Place the cut panels inside the bookshelf frame. Check if each panel sits flat and fits snugly. Use strong glue designed for cardboard to hold shelves firmly. Apply glue along the edges where the shelf meets the frame. Press the panel down and hold it for a few seconds. For extra strength, use small strips of cardboard as supports under each shelf. Let the glue dry completely before placing any books.
Adding Finishing Touches
Adding finishing touches to your cardboard bookshelf gives it a complete look. This step makes your project sturdy and beautiful. It also helps the bookshelf last longer and handle daily use. Simple steps can turn plain cardboard into a stylish piece for any room.
Painting And Decorating
Choose paint that sticks well to cardboard. Acrylic paint works best. Apply one or two thin coats. Let each coat dry fully before the next. Use bright colors or soft shades to match your space. You can also add patterns with stencils or painter’s tape.
Decorate with paper, fabric, or stickers for extra style. Glue these materials carefully to avoid wrinkles. A clean, neat design makes your shelf stand out. Keep decorations simple for a modern look or go bold for fun.
Protecting The Surface
Cardboard needs protection from moisture and wear. Use a clear sealant or varnish to coat the shelf. This layer keeps paint safe and prevents damage. Apply two thin coats with a brush or spray.
Let the sealant dry completely before use. Avoid heavy water spills near the shelf. Place your cardboard bookshelf away from damp areas. This care keeps it looking good for a long time.
Tips For Durability
Making a cardboard bookshelf is fun and creative. To keep it strong and last long, follow some simple tips. These tips help your bookshelf hold books safely and stay in good shape. Focus on how to spread weight and care for your bookshelf.
Weight Distribution
Place heavy books at the bottom. This stops the shelf from tipping over. Keep lighter items on top shelves. Spread books evenly across each shelf. Avoid putting all weight in one spot. This balance helps cardboard hold its shape. Use extra cardboard supports under heavy shelves. It makes the whole shelf stronger and stable.
Maintenance Advice
Keep the bookshelf dry. Cardboard gets weak from water. Wipe dust regularly with a dry cloth. Check for bends or soft spots often. Fix small damages quickly with glue or tape. Avoid overloading the shelves. Too much weight can cause damage. Store the bookshelf in a cool place. Heat and humidity can warp cardboard. These simple care steps extend your shelf’s life.

Credit: www.wikihow.com
Frequently Asked Questions
What Materials Are Needed To Make A Cardboard Bookshelf?
You need sturdy cardboard, a ruler, pencil, craft knife, glue, and tape. These materials ensure a strong and durable bookshelf structure.
How Do I Make A Cardboard Bookshelf Sturdy?
Use thick cardboard and reinforce edges with extra layers. Secure joints with strong glue and tape for added stability.
Can A Cardboard Bookshelf Hold Heavy Books Safely?
Cardboard shelves can hold light to medium-weight books. Avoid placing very heavy books to prevent bending or collapsing.
How Long Does It Take To Build A Cardboard Bookshelf?
Building a simple cardboard bookshelf takes about 2-4 hours. Time depends on design complexity and drying time for glue.
Conclusion
Building a cardboard bookshelf is simple and fun. You only need basic materials and some patience. This project saves money and helps the environment. You can customize the size and design to fit your space. Try adding colors or patterns for a personal touch.
Cardboard shelves hold light items well, like books and small decorations. With care, your shelf can last a long time. Give it a try and enjoy your new, handmade bookshelf. It’s a creative way to organize and decorate your room.