Are you looking to add more storage space without spending a fortune? Making a cheap bookshelf can be easier than you think.
Imagine having a sturdy, stylish shelf built by your own hands, saving money and giving your room a fresh look. In this guide, you’ll discover simple steps and clever tips to create a bookshelf that fits your style and budget perfectly.
Keep reading, and you’ll be surprised how quickly and affordably you can transform your space.
Materials On A Budget
Building a bookshelf does not need to be expensive. Choosing the right materials keeps costs low. Many budget-friendly options work well and look great. Quality and affordability can go hand in hand. This section explores cheap materials for your bookshelf project.
Reclaimed Wood
Reclaimed wood comes from old furniture, pallets, or buildings. It is often free or very cheap. This wood adds character with its weathered look. Sand it well to avoid splinters. Reclaimed wood is sturdy and eco-friendly. Using it reduces waste and saves money.
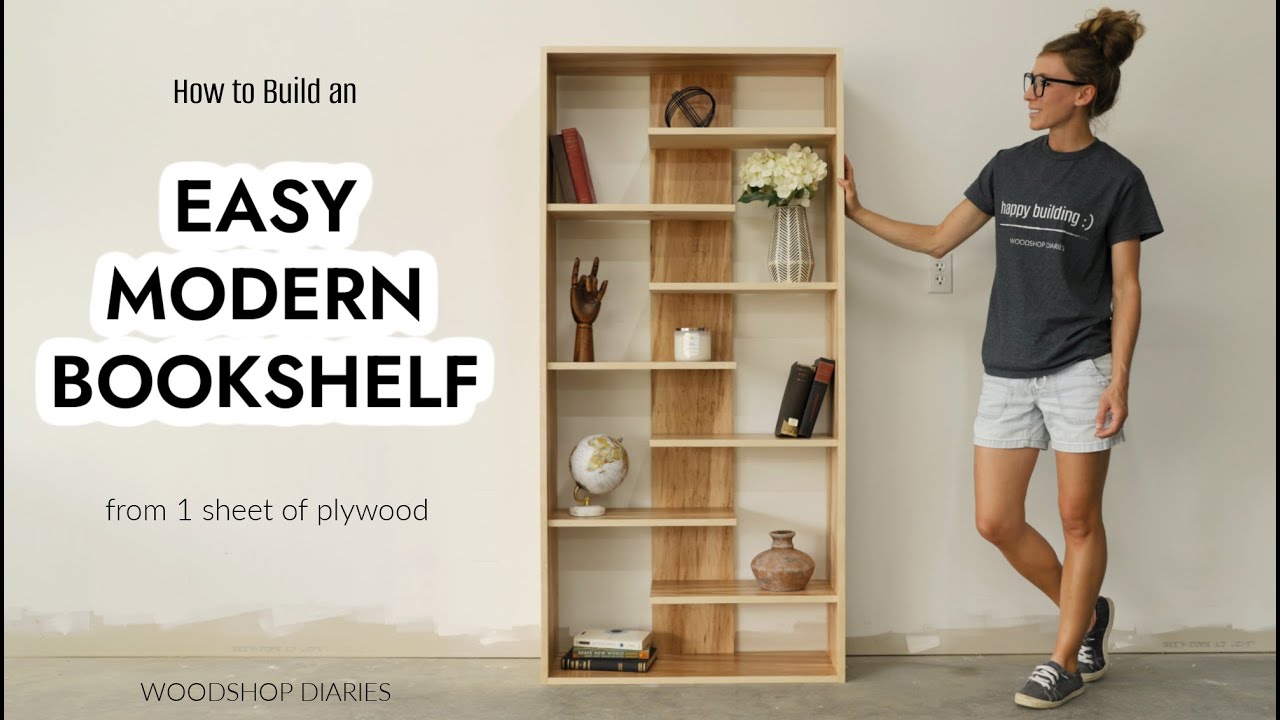
Plywood Options
Plywood is a popular choice for budget bookshelves. It is affordable and easy to cut. Choose plywood with a smooth surface for a neat finish. Thicker plywood holds heavier books better. You can paint or stain it to match your room. Plywood is lightweight and simple to work with.
Alternative Materials
Other materials include MDF, particleboard, and plastic crates. MDF is smooth and cheap but not very strong. Particleboard costs less but can sag under weight. Plastic crates stack easily and make unique shelves. Combining these materials can create a custom look. Always check the weight limit before use.
:max_bytes(150000):strip_icc()/dominiquegebruinsta-35b11dd4f037417980649e06e17c4027.jpg)
Credit: www.thespruce.com
Basic Tools Needed
Building a cheap bookshelf is easier with the right tools. The tools help you cut, shape, and assemble wood quickly and safely. You do not need many tools to start. A few basic tools will do the job well.
Knowing which tools to use saves time and effort. Some tools are for hand use only. Others need power to work faster. Choose tools that fit your skill level and budget.
Essential Hand Tools
Hand tools are simple and easy to control. A good tape measure helps you get exact sizes. A pencil marks your cutting lines clearly. Use a carpenter’s square to check right angles.
A handsaw is useful for cutting wood by hand. Sandpaper smooths rough edges for a clean finish. A hammer drives nails into the wood. Clamps hold pieces steady while you work.
Power Tools For Beginners
Power tools save time and reduce effort. A cordless drill is the best start. It drills holes and drives screws fast. A power sander smooths surfaces quickly and evenly.
A circular saw cuts wood straight and fast. Choose one with a safety guard for protection. Start with simple tools and learn to use them safely. These power tools help build your bookshelf with ease.
Simple Bookshelf Designs
Simple bookshelf designs save money and space. They fit many rooms and styles. These designs use easy materials. You can build them fast. They keep your books neat and easy to find.
Here are three simple designs you can try. Each one is low cost and easy to make.
Open Shelving Units
Open shelving units show your books clearly. They have no doors or covers. This design uses simple boards and brackets. You can fix them on walls or stand alone. Open shelves make rooms look bigger. You can paint or stain the wood for style.
Corner Bookshelves
Corner bookshelves use empty corner spaces well. They fit tight spots in rooms. This design usually has triangular shelves. You can build them with scrap wood pieces. They hold books and small decor items. Corner shelves add charm and save floor space.
Stacked Crate Shelves
Stacked crate shelves use wooden crates. These crates are cheap or free. Stack them in different ways to fit your space. You can paint or leave them natural. Crate shelves are strong and rustic. They hold many books and look unique.
Step-by-step Building Tips
Building a cheap bookshelf is easier than it seems. Follow these simple steps to create a sturdy and attractive shelf. Each step guides you through the process clearly. You can save money and enjoy your new bookshelf.
Measuring And Cutting
Start by measuring the space where the bookshelf will go. Use a tape measure to get accurate dimensions. Mark the wood pieces with a pencil. Cut the wood carefully with a saw. Make sure all pieces match the measurements.
Assembling The Frame
Lay out the cut wood pieces on a flat surface. Join the sides and shelves using screws or nails. Use a drill or hammer for better control. Check the frame for stability by gently shaking it. Tighten any loose screws or nails.
Finishing Touches
Sand the edges and surfaces to make them smooth. Paint or stain the wood to protect it and add color. Let the finish dry completely before placing items. Add small pads under the feet to protect floors. Your bookshelf is ready to use.
Painting And Finishing Ideas
Painting and finishing a cheap bookshelf can transform its look. The right finish protects wood and adds style. Simple techniques can give a fresh and polished appearance. Choose options that suit your budget and skill level. Below are ideas to make your bookshelf stand out.
Budget-friendly Paints
Latex paint is affordable and easy to use. It dries fast and cleans up with water. Chalk paint offers a matte, vintage look without much prep. Spray paint works well for small shelves or detailed parts. Always buy sample sizes to test colors first. Use primer to help paint stick better.
Staining Techniques
Stain enhances wood grain and adds warmth. Apply with a cloth or brush for even coverage. Wipe off excess stain quickly to avoid blotches. Use light coats for a natural look or dark coats for richness. Gel stains work well on vertical surfaces and give control. Allow stain to dry fully before finishing.
Protective Coatings
Clear varnish seals paint or stain and protects against damage. Polyurethane is durable and water-resistant, great for busy areas. Use satin or matte finishes for a subtle shine. Apply thin coats and sand lightly between layers. Wax polish adds a soft, smooth feel but needs reapplying. Protective coatings extend your bookshelf’s life.

Credit: www.instructables.com
Space-saving Shelf Hacks
Saving space is important when making a cheap bookshelf. Small rooms need smart ideas to store books and items. Using space-saving shelf hacks helps keep rooms tidy and neat. These tricks fit more books without taking extra space.
Vertical Storage Tricks
Use vertical space to hold many books. Tall shelves take less floor area. Stack books upright to save room. Put shelves on empty walls to use space well. Try narrow shelves between doors or corners. Vertical storage keeps books easy to reach and see.
Multi-functional Shelves
Shelves can do more than hold books. Use shelves with hooks to hang bags or keys. Add a small desk shelf for writing or work. Choose shelves with baskets to store small items. Multi-functional shelves save space and keep things organized. They make the room look clean and neat.
Maintaining Your Bookshelf
Maintaining your bookshelf helps it last longer and look good. Regular care keeps dust and dirt away. Small damages can be fixed early. This saves time and money.
Cleaning Tips
Use a soft cloth to dust shelves often. Avoid wet cloths on wood surfaces. A dry or slightly damp cloth works best. Clean spills immediately to prevent stains. Use gentle soap for tough spots. Never use harsh chemicals that can damage the finish.
Repairing Minor Damage
Check for scratches or small cracks regularly. Use wood filler to fix small holes. Sand the area lightly after it dries. Touch up with matching paint or stain. Tighten loose screws or nails to keep shelves stable. Fixing damage early stops bigger problems later.
Credit: www.youtube.com
Frequently Asked Questions
What Materials Are Best For A Cheap Bookshelf?
Plywood and MDF are affordable and sturdy materials. They offer good durability and easy customization. Avoid expensive hardwood for budget builds.
How Can I Save Money Building A Bookshelf?
Use reclaimed wood or pallets to cut costs. Choose simple designs that require fewer tools and materials. Shop sales for discounted supplies.
What Tools Do I Need For A Cheap Bookshelf?
Basic tools include a saw, drill, measuring tape, and screwdriver. These are sufficient for most simple bookshelf projects.
How Long Does It Take To Make A Cheap Bookshelf?
Most DIY bookshelves take 2-4 hours to build. Time depends on design complexity and your experience level.
Conclusion
Making a cheap bookshelf is simple and fun. You only need basic tools and materials. This project saves money and adds a personal touch to your space. You can customize the size and color to fit your room. A DIY bookshelf also gives you a sense of pride.
Try building one today and enjoy your new, affordable storage solution.