Are you looking for a smart and affordable way to organize your clothes without buying an expensive wardrobe? Turning an Ikea bookshelf into a closet might be the perfect solution for you.
Imagine having a stylish, custom storage space that fits your room and budget perfectly. In this guide, you’ll discover simple steps to transform a basic bookshelf into a functional closet that keeps your clothes neat and easy to find. Ready to take control of your space and make your daily routine easier?
Keep reading, because this idea could change the way you store your clothes forever.
Credit: homeandhallow.com
Choosing The Right Bookshelf
Choosing the right bookshelf is the first step to making a closet from an Ikea bookshelf. The perfect bookshelf fits your space and holds your clothes well. Consider size, material, and style to find the best one for your needs. These factors help create a closet that looks good and lasts long.
Size And Dimensions
Measure your space carefully before picking a bookshelf. Check height, width, and depth to ensure it fits well. A bookshelf too big or small can cause problems. Make sure it fits the room and holds your clothes comfortably. Think about the number of shelves you need. More shelves mean more storage options.
Material And Durability
Choose a bookshelf made from strong materials. Solid wood or sturdy MDF lasts longer and holds weight better. Avoid cheap particleboard that may break under heavy clothes. Durable material keeps your closet stable and safe. Look for shelves that support hanging rods or baskets. A strong bookshelf holds up better every day.
Style And Design Options
Pick a bookshelf style that matches your room’s look. Simple, clean designs blend with most decor. Some have doors or drawers for extra storage. Open shelves give quick access to clothes. Choose colors and finishes that suit your space. A stylish bookshelf makes your closet look neat and inviting.
Gathering Tools And Materials
Creating a closet from an Ikea bookshelf is a smart and fun project. It starts with gathering the right tools and materials. Having everything ready makes the process smooth and less stressful. This section lists what you need before starting your project.
Essential Tools Checklist
- Electric drill with drill bits
- Screwdriver set (Phillips and flathead)
- Measuring tape
- Level tool
- Hammer
- Utility knife
- Pencil for marking
- Safety goggles
- Work gloves
Additional Materials Needed
- Ikea bookshelf (choose size based on space)
- Wood screws
- Closet rods or hanging bars
- Brackets for support
- Wood panels or boards (for extra shelves or dividers)
- Sandpaper
- Paint or wood finish (optional)
- Wall anchors (if attaching to wall)
Safety Precautions
Wear safety goggles to protect your eyes from dust and debris. Gloves protect your hands from splinters and sharp edges. Use tools carefully and follow the instructions. Keep your workspace clean to avoid accidents. Work in a well-lit area to see clearly. Take breaks to avoid fatigue and stay focused.
Preparing The Bookshelf
Preparing your Ikea bookshelf is a key step before turning it into a closet. This process makes sure the shelf is strong and looks good. Taking time here saves problems later. Follow these simple steps to get your bookshelf ready.
Disassembling Parts
Start by taking apart removable pieces. Remove shelves and any back panels carefully. Keep screws and small parts safe. This helps in customizing the shelf for your closet needs. It also makes sanding and painting easier.
Sanding And Cleaning
Use fine sandpaper to smooth all surfaces. Sanding helps paint or stain stick better. Wipe away dust with a damp cloth. Clean shelves look nicer and last longer. Make sure the bookshelf is dry before moving on.
Painting Or Staining Options
Choose paint or stain that fits your room style. Paint gives a fresh, clean look. Stain shows the wood grain for a natural feel. Apply a primer before painting for better results. Let each coat dry fully before adding another.

Credit: www.youtube.com
Adding Closet Features
Adding closet features to your Ikea bookshelf transforms it into a practical storage space. Thoughtful additions help organize clothes and accessories neatly. These features make the closet functional and easy to use every day.
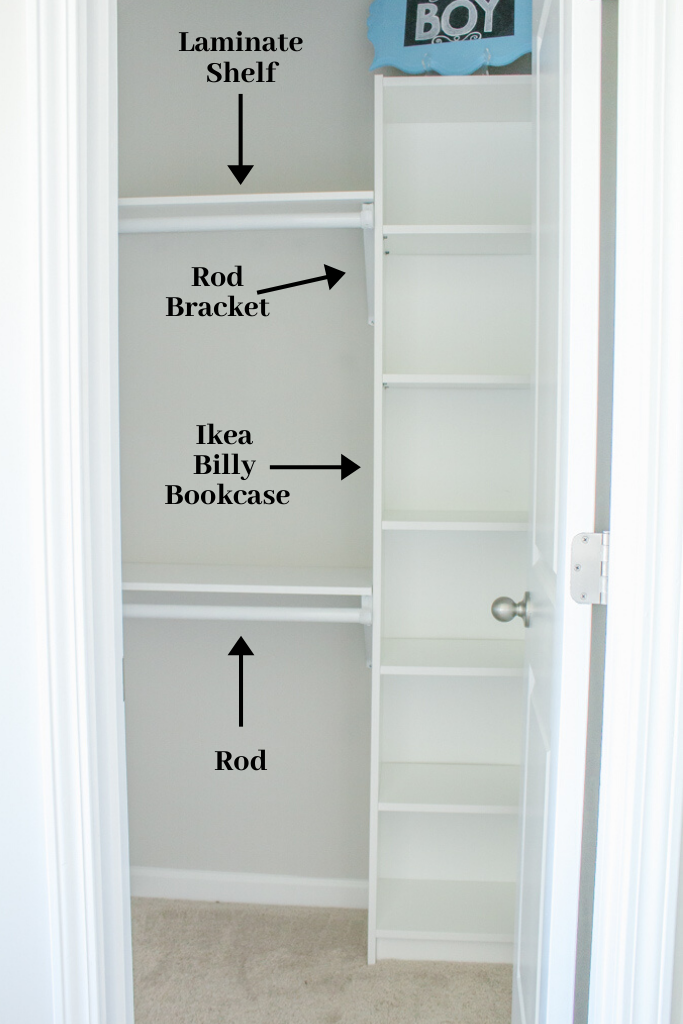
Installing Closet Rods
Closet rods create space for hanging clothes. Measure the width inside the bookshelf first. Use sturdy brackets to hold the rod firmly. Place the rod at a height that fits your clothing. Rods work well for shirts, jackets, and dresses.
Adding Shelves And Dividers
Extra shelves increase storage space inside the closet. Use adjustable shelves to fit different items. Dividers keep stacks of clothes tidy and separated. They prevent piles from toppling over. Shelves help store folded clothes, shoes, and boxes.
Incorporating Hooks And Hangers
Hooks add spots for hanging bags, belts, or scarves. Install hooks on the sides or inside the doors. Hangers provide a way to organize ties and jewelry. These small features use space efficiently. They keep accessories visible and easy to grab.
Maximizing Storage Space
Maximizing storage space in your Ikea bookshelf closet is key to keeping things neat. Good use of space means easier access and a clean look. Small changes can make a big difference in how much you can store. Organizing well also saves time when finding items.
Using Bins And Baskets
Bins and baskets help keep small items tidy and easy to find. Choose clear or labeled bins to know what’s inside without opening them. Baskets add texture and style while hiding clutter. Stackable bins make use of vertical space between shelves.
Organizing By Category
Group similar items together to avoid mess and confusion. Separate clothes, shoes, and accessories into different sections. This method keeps your closet organized and speeds up finding what you need. Use dividers or small boxes for very small items.
Utilizing Door Space
The inside of the bookshelf doors offers extra storage options. Attach hooks or small racks for hanging belts, scarves, or jewelry. Use slim pockets or holders for slim items like ties or makeup. This space often goes unused but can hold many small items.
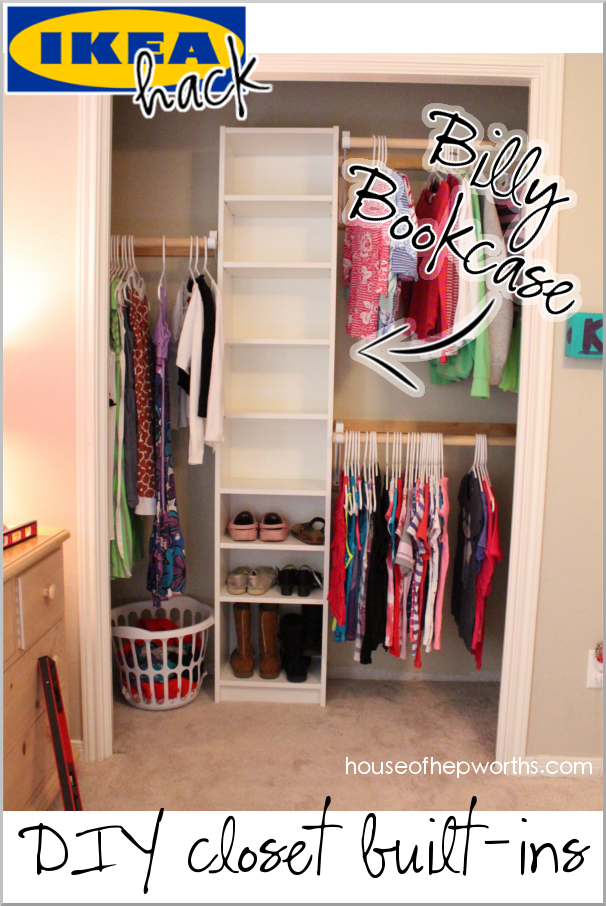
Credit: www.houseofhepworths.com
Finishing Touches
Finishing touches make your Ikea bookshelf closet look complete and stylish. These final details improve both function and appearance. They help your closet blend well with your room’s style.
Small changes can make a big difference. Choose options that suit your space and needs. Let’s explore some easy ways to finish your closet.
Adding Doors Or Curtains
Doors create a neat, hidden look for your closet. You can use sliding doors or simple hinges. Choose a style that fits your room size and design.
Curtains offer a soft, flexible option. Pick light fabric for easy access. Curtains also add color or pattern to your closet area.
Decorative Elements
Decorations add personality to your closet space. Use knobs or handles that match your room’s theme. Stickers or paint can personalize the bookshelf surface.
Adding baskets or boxes keeps things tidy and attractive. These also help store small items neatly. Choose colors that blend well with your walls.
Lighting Solutions
Good lighting makes your closet easier to use. Install LED strip lights along the shelves for clear view. Battery-operated lights are simple and do not need wires.
Soft, warm lights create a cozy feeling. Bright lights work well for finding items quickly. Pick lighting that suits your daily routine.
Maintenance Tips
Keeping your Ikea bookshelf closet in good shape makes it last longer. A little care helps it stay neat and useful. Follow these simple maintenance tips to keep your closet organized and fresh.
Regular Cleaning
Dust your bookshelf closet often. Use a soft cloth to wipe shelves and corners. Clean spills immediately to avoid stains. Vacuum nearby floor space to reduce dirt buildup.
Preventing Wear And Tear
Handle shelves gently when placing or removing items. Avoid overloading shelves with heavy objects. Use shelf liners to protect surfaces. Tighten screws and fittings regularly to keep stability.
Updating Storage As Needed
Change your storage setup as your needs change. Add baskets or bins to organize small items. Remove unused items to free space. Rearrange shelves to fit different clothes or accessories.
Frequently Asked Questions
How Do I Choose The Right Ikea Bookshelf For A Closet?
Select a sturdy bookshelf with adjustable shelves. Consider height, width, and depth to fit your space and storage needs. Ensure it matches your room’s style for a seamless look. Popular choices include the Ikea Billy or Kallax series for their versatility.
What Tools Are Needed To Convert An Ikea Bookshelf?
Basic tools include a drill, screwdriver, measuring tape, and level. You may also need screws, brackets, and hanging rods. Optional tools: paintbrush and sandpaper for customization. Having the right tools ensures a smooth and safe closet transformation.
Can I Add Hanging Space To An Ikea Bookshelf Closet?
Yes, install a tension rod or a mounted closet rod inside the bookshelf. Use brackets to secure rods for hanging clothes. This adds functional hanging space without compromising shelf storage, making your DIY closet more versatile and efficient.
How Do I Customize The Bookshelf Closet Design?
Paint or wallpaper the back panel for style. Add baskets or bins for organized storage. Use hooks or small shelves for accessories. Personalizing the design enhances aesthetics and functionality, turning a basic bookshelf into a stylish closet.
Conclusion
Creating a closet from an Ikea bookshelf saves space and money. It fits small rooms and can hold many clothes. You only need simple tools and a bit of time. Personalize it with colors or hooks to match your style.
This idea turns a basic shelf into a useful closet. Try this easy project to organize your clothes better. You will enjoy a neat and tidy room. Give it a go and see the difference yourself.
