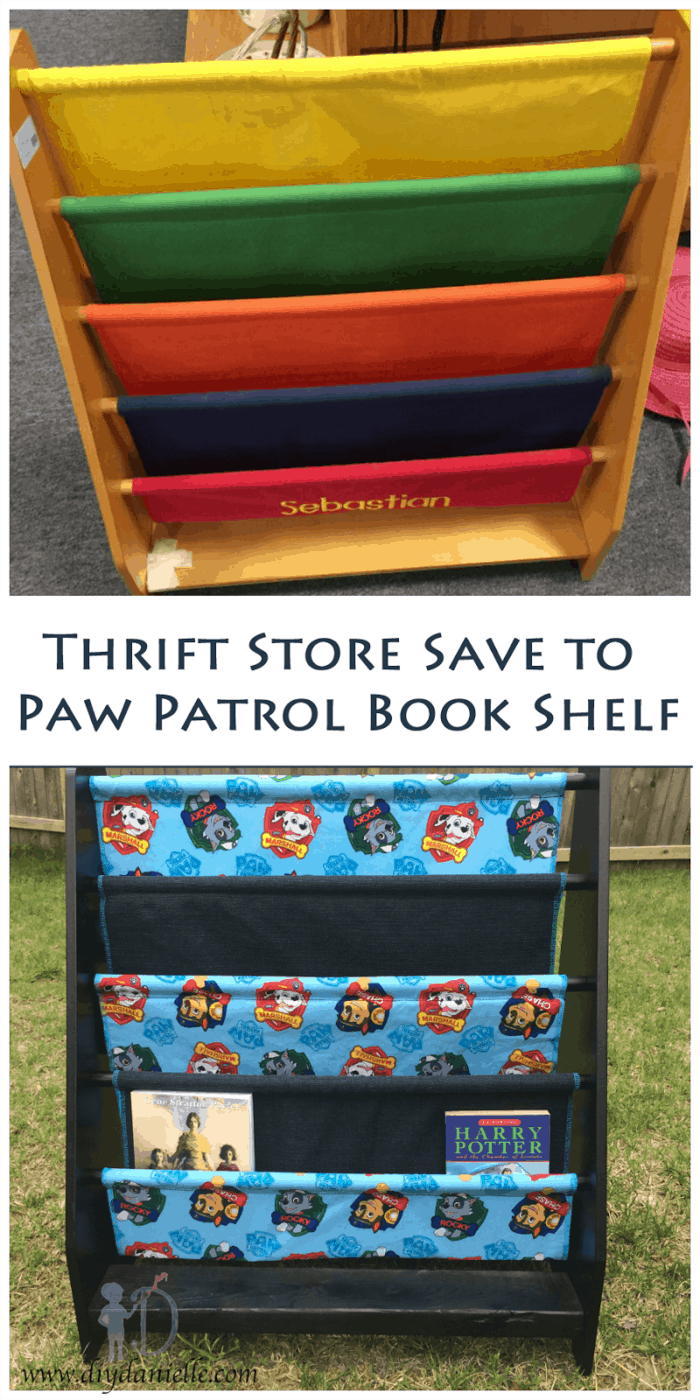
Are you looking for a simple and stylish way to organize your books without heavy furniture? Making a fabric bookshelf might be exactly what you need.
It’s easy to create, lightweight, and adds a cozy touch to any room. Imagine having a shelf that fits your space perfectly and shows off your favorite reads. In this guide, you’ll discover step-by-step how to make your own fabric bookshelf quickly and affordably.
Keep reading, and you’ll have a unique storage solution that’s both practical and beautiful.
Choosing The Right Fabric
Choosing the right fabric is key when making a fabric bookshelf. The fabric must be strong and hold its shape. It should also match your room’s style. Picking the right fabric helps your bookshelf last longer and look good.
Types Of Fabric For Durability
Choose fabrics that are thick and tough. Canvas and denim are great choices. They resist tears and wear. Polyester blends also work well. These fabrics hold up under weight. Avoid thin or stretchy materials. They may sag or rip easily.
Selecting Colors And Patterns
Pick colors that match your room’s theme. Solid colors give a clean, simple look. Patterns add style and hide stains. Dark colors hide dirt better than light ones. Choose patterns that fit the room’s mood. Bright or soft colors can change the feel.
Fabric Care Tips
Clean your fabric regularly to keep it fresh. Use a gentle vacuum or brush. Spot clean stains quickly with mild soap. Avoid harsh chemicals that damage fabric. Keep the bookshelf away from direct sunlight. This helps prevent colors from fading.
Gathering Materials And Tools
Gathering the right materials and tools is the first step to make a fabric bookshelf. This step sets the base for a smooth and enjoyable project. Having everything ready saves time and avoids interruptions. It also helps ensure the bookshelf is sturdy and looks good.
Focus on basic supplies first. These are the things you need to start and finish the bookshelf. Later, you can add extra tools to make your project unique or easier.
Essential Supplies List
- Strong fabric, like canvas or denim
- Wooden dowels or rods for support
- Measuring tape for accurate sizing
- Scissors or rotary cutter to cut fabric
- Fabric glue or sewing kit
- Metal rings or hooks for hanging
- Heavy-duty thread if sewing
- Marker or chalk for marking fabric
- Optional: cardboard or thin plywood for shelf bases
Optional Tools For Customization
- Fabric paint or markers to decorate
- Iron-on patches or appliques
- Heat press or iron for setting designs
- Velcro strips for removable shelves
- Additional wooden rods for extra shelves
- Staple gun for quick fabric attachment
- Ruler or straight edge for precise cuts
Measuring And Cutting Fabric
Measuring and cutting fabric is the first step to make a fabric bookshelf. Accuracy here saves time and materials. It ensures your bookshelf pieces fit perfectly. Careful measuring avoids mistakes and wasted fabric. Cutting with clean edges helps the fabric look neat and professional.
Taking Accurate Measurements
Start with a measuring tape or ruler. Measure the fabric for each bookshelf part carefully. Write down each measurement to avoid confusion. Add extra fabric for seams or folding. Double-check each number before cutting. Measure twice, cut once. Use a flat surface to keep fabric steady during measuring.
Cutting Techniques For Clean Edges
Use sharp fabric scissors or a rotary cutter for clean cuts. Cut slowly along the measured lines to avoid jagged edges. Keep the fabric flat and taut while cutting. Avoid lifting fabric to prevent uneven cuts. Mark cutting lines with tailor’s chalk or fabric markers. Trim small threads after cutting for a tidy finish.
Credit: diydanielle.com
Constructing The Bookshelf Frame
Constructing the bookshelf frame is the first step in making a fabric bookshelf. A strong frame supports the fabric shelves and holds the books safely. This part requires careful planning and simple tools. Follow clear steps to build a sturdy base for your project.
Start by choosing the right materials. Then, put the pieces together with care. This ensures your bookshelf stays stable and looks neat.
Choosing Frame Materials
Wood is the best choice for a fabric bookshelf frame. It is easy to cut and strong enough to hold weight. Pine, plywood, or hardwood are good options. Avoid soft or thin wood that may bend or break.
Metal rods can also work but need special tools to cut and join. Plastic pipes are lightweight but less durable. Choose materials that fit your budget and skill level.
Assembling The Frame
Cut the wood pieces to your desired size. You will need four legs and several horizontal supports. Use a saw and measure twice to avoid mistakes.
Join the pieces with screws or nails. Screws hold better and can be tightened if needed. Use a drill to make pilot holes before screwing. This prevents the wood from splitting.
Check the frame for stability. It should stand firm without wobbling. Sand any rough edges to avoid splinters. The frame is now ready for the fabric shelves.
Attaching Fabric To Frame
Attaching fabric to the frame is a key step in making a fabric bookshelf. It gives the shelf a clean, finished look. The fabric also adds strength and style. The process involves stretching the fabric tightly and securing it firmly to the frame. Proper attachment keeps the fabric smooth and prevents sagging over time.
Stretching And Securing Fabric
Start by cutting the fabric larger than the frame. This extra fabric helps with wrapping around edges. Lay the fabric flat on a clean surface. Place the frame on top. Pull one side of the fabric tight across the frame. Secure this side first. Then pull the opposite side tight and secure it. Repeat for the other two sides. Check for wrinkles or loose spots. Adjust the tension as needed. The fabric should feel firm but not stretched too much. This keeps the fabric smooth and neat.
Using Staples And Adhesives
Staples are the most common tool for attaching fabric. Use a staple gun to fasten the fabric to the wooden frame. Place staples every few inches for strong hold. Avoid stapling too close to edges to prevent tears. For extra hold, use fabric glue or spray adhesive. Apply glue on the frame before stretching the fabric. Press the fabric firmly to stick it well. Combine staples and glue for the best results. This ensures the fabric stays tight and secure for a long time.
Adding Shelves And Supports
Adding shelves and supports is the key step in building a fabric bookshelf. This step shapes the structure and strength. Shelves hold the books. Supports keep shelves steady and safe.
Selecting Shelf Materials
Choose shelves that are light but strong. Wood or thick plastic boards work well. Thin boards may bend under weight. Avoid heavy materials that are hard to handle. Fabric shelves need sturdy bases to hold books.
Measure the space carefully before buying shelves. Pick sizes that fit inside the fabric frame. Round or smooth edges prevent fabric tears. Keep the shelf surface flat to hold books evenly.
Installing Shelf Supports
Support bars or rods keep shelves from falling. Use metal or wooden supports for durability. Attach supports to the frame securely. Loose supports cause shelves to wobble.
Place supports evenly along the shelf length. This spreads the weight and prevents sagging. Use screws or strong adhesive for fixing supports. Check stability before placing books on shelves.
Finishing Touches
Finishing touches bring your fabric bookshelf to life. They make it look neat and stylish. These final steps protect the fabric and add personality. Small details can create a big impact.
Decorative Elements
Choose buttons, ribbons, or patches to decorate the fabric. Pick colors that match your room or your favorite style. Sew or glue these items securely. Use fabric paint for unique patterns or words. Keep decorations simple to avoid clutter.
Protecting The Fabric
Use a fabric protector spray to guard against stains and spills. Test the spray on a small area first. Let the fabric dry completely before placing items on the shelf. Avoid harsh cleaners that might damage the fabric. Regularly dust your bookshelf to keep it fresh.
Credit: diydanielle.com
Maintaining Your Fabric Bookshelf
Maintaining your fabric bookshelf keeps it looking fresh and lasting longer. Fabric shelves can collect dust and stains over time. Regular care prevents damage and keeps the fabric strong. Simple steps help your bookshelf stay neat and inviting.
Cleaning Tips
Dust your fabric bookshelf weekly with a soft cloth or brush. Use a vacuum cleaner with a brush attachment for deep cleaning. Spot clean stains immediately using mild soap and water. Dab gently; do not rub hard to avoid fabric damage. Allow the fabric to air dry completely before placing items back.
Repairing Minor Damage
Check your fabric bookshelf for small tears or loose threads regularly. Use a needle and thread to sew small holes carefully. Trim any loose threads to prevent further unraveling. For stubborn stains or damage, consider using fabric glue or patches. Handle repairs early to avoid bigger problems later.

Credit: www.icanteachmychild.com
Frequently Asked Questions
What Materials Are Needed To Make A Fabric Bookshelf?
You need sturdy fabric, wooden dowels, strong thread, scissors, and a sewing machine. Optional items include fabric glue and measuring tape. These materials ensure durability and easy assembly of your fabric bookshelf.
How Do I Ensure My Fabric Bookshelf Is Sturdy?
Use thick, durable fabric and reinforce seams with double stitching. Add wooden dowels inside the shelves for support. Proper tension and secure attachments keep the bookshelf stable and reliable.
Can I Customize The Size Of The Fabric Bookshelf?
Yes, measure your available space before cutting fabric. Adjust the width and height according to your needs. Custom sizing helps fit your bookshelf perfectly in any room.
Is Sewing Experience Required To Make A Fabric Bookshelf?
Basic sewing skills help but are not mandatory. You can use fabric glue or no-sew methods for simple designs. Tutorials and templates make the process easier for beginners.
Conclusion
Creating a fabric bookshelf is simple and fun. You can choose colors and patterns you like. It saves space and keeps your books tidy. This project fits small rooms or apartments well. Plus, it is light and easy to move.
Try making one to add a personal touch to your space. Enjoy your new, cozy storage solution!
