Looking for a way to add charm and extra storage to your space? Building a simple wooden bookshelf might be just what you need.
Imagine having a sturdy, beautiful shelf that you made yourself—perfect for your favorite books, plants, or decorations. You don’t need special skills or expensive tools to create it. In this guide, you’ll discover easy steps that anyone can follow. Ready to turn plain wood into something useful and stylish?
Let’s get started!
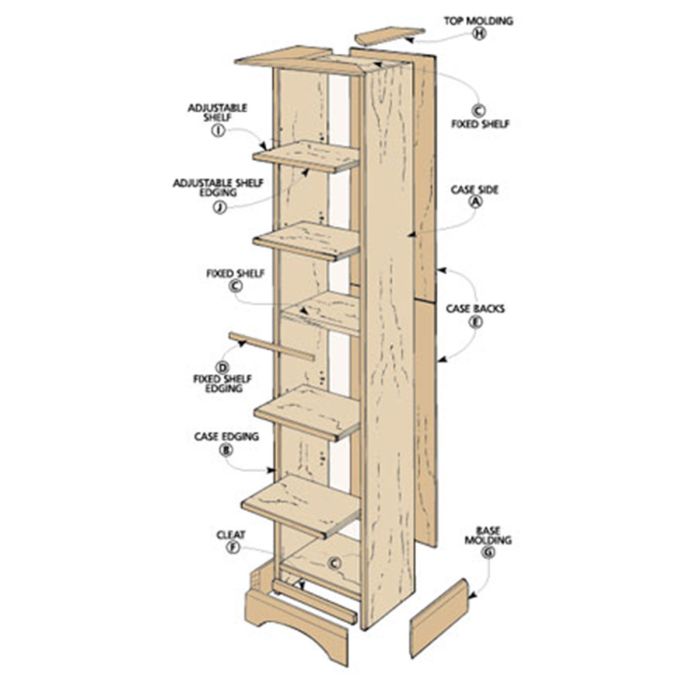
Credit: www.woodpeck.com
Materials And Tools Needed
Building a simple wooden bookshelf is a fun and useful project. The right materials and tools make the process smooth and easy. This section covers everything you need to start your bookshelf build. Choose good wood, have the right tools, and gather extra supplies.
Wood Selection
Select wood that is strong and easy to work with. Pine is a popular choice. It is affordable and light. Oak is harder and lasts longer but costs more. Choose wood boards that are smooth and free of cracks. The thickness should be about 3/4 inch for stability. Make sure the wood is dry to avoid warping later.
Required Tools
Basic tools make woodworking simpler. A saw is needed to cut the wood pieces. A power drill helps make holes and drive screws fast. Sandpaper smooths rough edges and surfaces. A tape measure is key for accurate cuts. A carpenter’s square ensures right angles. A screwdriver might be needed for final adjustments.
Additional Supplies
Besides wood and tools, some supplies help build better. Wood screws hold the pieces together firmly. Wood glue adds extra strength. Wood filler fixes any small gaps or holes. Paint or wood stain protects and improves the look. Brushes or rags apply finishes evenly. Safety gear like gloves and goggles keep you safe.
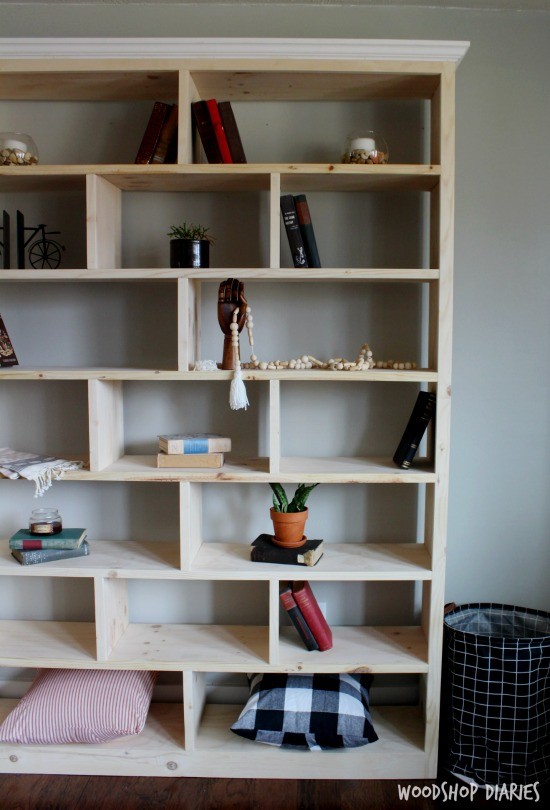
Credit: www.woodshopdiaries.com
Planning Your Bookshelf
Planning your wooden bookshelf is the first step to a successful project. Good planning saves time and reduces errors. It helps you build a shelf that fits your space and needs perfectly.
Choosing The Size
Measure the space where the bookshelf will go. Think about how many books or items you want to store. Decide on the height, width, and depth. Keep the size balanced with the room size. A shelf too big or small can look odd.
Design And Style Options
Pick a design that matches your room’s style. Simple straight lines work well for modern looks. Curved edges or decorative details fit classic styles. Consider open shelves for easy access or closed ones for dust protection. Choose wood color and finish carefully.
Safety Considerations
Make sure the bookshelf is strong and stable. Use sturdy wood and proper joints. Avoid sharp edges to prevent injuries. Anchor tall shelves to the wall to stop tipping. Think about weight limits for each shelf. Safety protects you and your family.
Cutting The Wood
Cutting the wood is the first step in building your wooden bookshelf. It shapes the pieces that will come together to form the shelves and sides. Careful cutting ensures the bookshelf fits well and looks neat.
Take your time with each cut. Precise cuts make the assembly easier and the final product stronger. Use the right tools and follow safety rules to avoid mistakes and injuries.
Measuring And Marking
Start by measuring the wood pieces carefully. Use a tape measure for accuracy. Mark the cutting lines clearly with a pencil. Double-check the measurements before cutting. Mark both ends of the board to keep straight lines.
Cutting Techniques
Choose a saw that fits your skill level and project size. A hand saw works well for small cuts. A circular saw is faster for longer boards. Cut slowly and steadily along the marked lines. Keep your hands away from the blade at all times.
Sanding Edges
After cutting, sand the edges to smooth rough surfaces. Use medium-grit sandpaper for the first pass. Then, switch to fine-grit sandpaper for a smooth finish. Sand in the direction of the wood grain. This step prevents splinters and improves the look of your bookshelf.
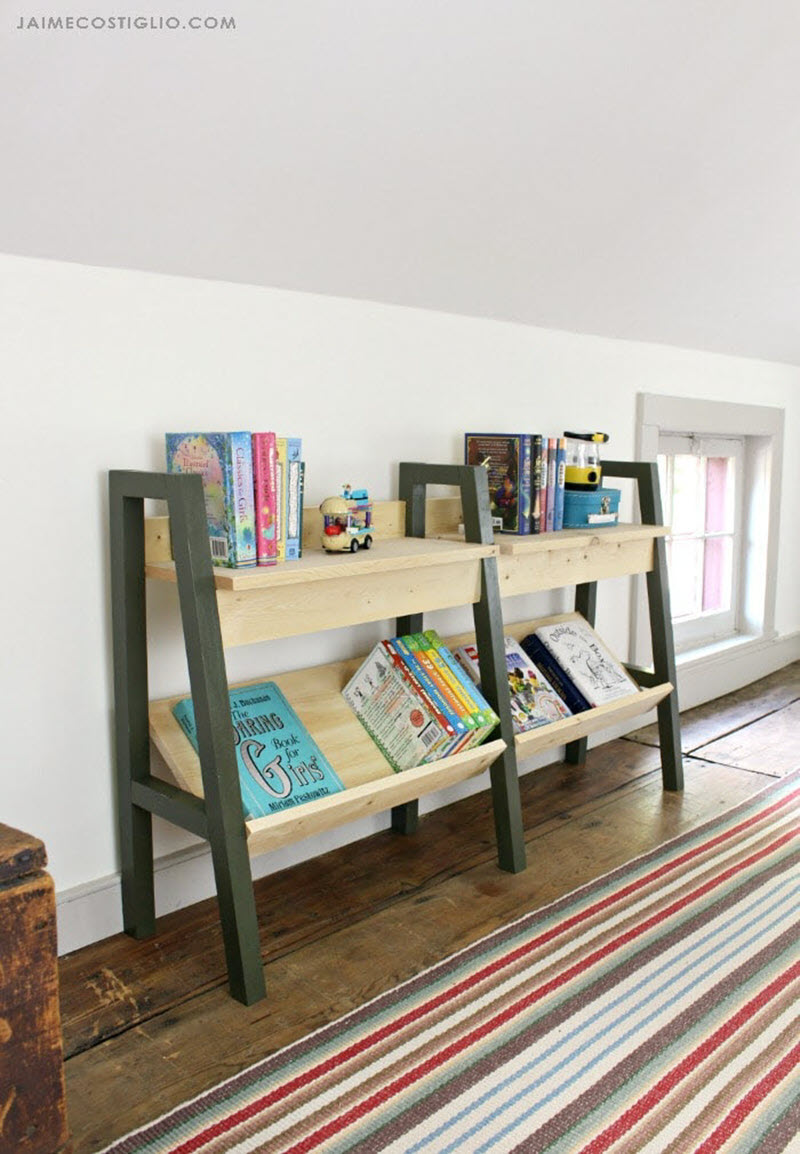
Credit: jenwoodhouse.com
Assembling The Frame
Finishing touches bring your wooden bookshelf to life. They protect the wood and enhance its look. These steps make your project look neat and last longer.
Applying Paint Or Stain
Choose paint or stain based on your style. Paint adds color and hides wood grain. Stain highlights the natural beauty of the wood. Apply thin, even coats with a brush or cloth. Let each coat dry fully before adding another. This prevents drips and uneven color.
Sealing The Surface
Seal the wood to protect it from moisture and scratches. Use a clear sealant like polyurethane or varnish. Apply with a clean brush in long, smooth strokes. Allow the first coat to dry, then lightly sand. Add a second coat for better durability. This step keeps your bookshelf looking fresh for years.
Adding Decorative Elements
Decorate your bookshelf to match your room’s style. Consider adding trim, decals, or stencils for extra flair. Small knobs or handles can give it a unique touch. Keep decorations simple to not overwhelm the design. These little details make your bookshelf special and personal.
Finishing Touches
Maintaining your wooden bookshelf helps it last longer and look better. Regular care keeps the wood strong and clean. Simple habits protect your shelf from damage and wear. Follow these tips to keep your bookshelf in top shape.
Cleaning Methods
Dust your bookshelf often with a soft cloth. Use a dry cloth or a microfiber duster. Avoid wet cloths that can soak the wood. For sticky spots, dampen a cloth slightly with water. Wipe gently and dry the area quickly. Avoid harsh chemicals that can harm the wood finish.
Preventing Damage
Keep the shelf away from direct sunlight to stop fading. Avoid placing heavy items on thin shelves to prevent bending. Use coasters or pads under decorations to protect the surface. Control room humidity to stop wood from cracking or swelling. Handle the shelf carefully during moves to prevent scratches.
Periodic Inspections
Check your bookshelf every few months for loose screws or nails. Tighten any loose parts to keep the shelf stable. Look for signs of wood damage like cracks or warping. Fix small issues early to prevent bigger problems. Regular checks help your bookshelf stay safe and sturdy.
Frequently Asked Questions
What Materials Are Needed To Build A Wooden Bookshelf?
You need wood planks, screws, wood glue, sandpaper, and paint or stain. Choose quality wood like pine or oak for durability. Also, gather tools such as a saw, drill, screwdriver, and measuring tape for precise construction.
How Long Does It Take To Make A Simple Bookshelf?
A basic bookshelf typically takes 2 to 4 hours. Time depends on your skill level and tools available. Preparation and drying time for paint or stain may extend the total project duration.
What Are The Best Wood Types For Bookshelves?
Pine, oak, maple, and plywood are popular choices. Pine is affordable and easy to work with. Oak and maple offer strength and beautiful grain but cost more. Choose plywood for budget-friendly, sturdy shelves.
How Do I Ensure My Bookshelf Is Sturdy?
Use quality wood and secure joints with screws and glue. Properly align shelves and add support brackets if needed. Sand edges smoothly and avoid overloading shelves to maintain stability.
Conclusion
Building a simple wooden bookshelf is easier than you think. With basic tools and wood, you can create useful storage. Follow the steps carefully and take your time. This project adds charm and function to any room. Enjoy the pride of making something with your own hands.
Start small, and you will improve with practice. Now, your books and items have a neat place. Try this project and see how rewarding it feels. Simple, strong, and practical – a perfect addition to your home.