
Are you looking for a simple way to organize your favorite books without taking up too much space? Making a tiny bookshelf could be the perfect solution for you.
Imagine having a neat, stylish spot for your books right within arm’s reach, crafted by your own hands. In this guide, you’ll discover easy steps to build your own tiny bookshelf that fits any room or style. Keep reading, and by the end, you’ll have the skills to create something both useful and charming for your home.

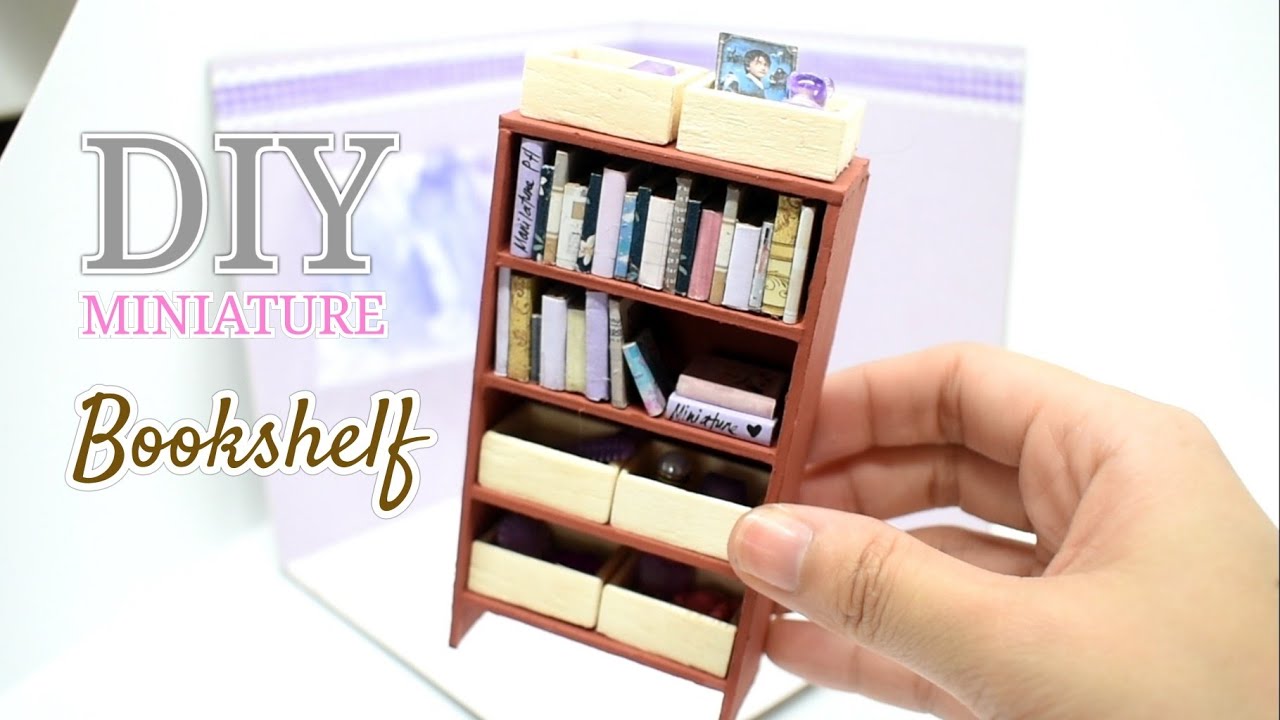
Credit: www.instructables.com
Choosing The Right Materials
Choosing the right materials is key to making a tiny bookshelf that lasts. The materials affect the shelf’s strength and look. Picking good wood and tools makes the project easier and more fun. Use materials that suit your skill and style. Focus on quality to build a shelf you will enjoy.
Selecting Wood Types
Wood choice changes the shelf’s appearance and durability. Pine is soft, easy to cut, and affordable. Oak is harder, stronger, and has a nice grain. Plywood is smooth and stable but less natural looking. Choose wood that matches your budget and skill level. Avoid wood with cracks or knots that weaken the shelf.
Essential Tools Needed
Tools make the building process smooth and safe. A saw cuts wood pieces to size. A drill helps attach parts with screws. Sandpaper smooths rough edges for safety and looks. A measuring tape ensures correct dimensions. Use clamps to hold pieces steady while working. These tools keep your work clean and precise.
Gathering Additional Supplies
Besides wood and tools, some supplies improve your shelf. Screws hold parts firmly together. Wood glue adds extra strength. Paint or varnish protects and beautifies the wood. Brushes or rags apply the finish evenly. Gather all supplies before starting to avoid interruptions. Preparation helps the project go faster and easier.
Planning Your Bookshelf Design
Planning your tiny bookshelf design is the first step to a successful project. This stage helps you organize ideas and avoid mistakes. A clear plan saves time and materials. Focus on space, size, and style before building.
Measuring Your Space
Start by measuring the area where the bookshelf will go. Use a tape measure for accuracy. Write down the height, width, and depth available. Check for any obstacles like heaters or sockets. Knowing exact space helps fit the shelf perfectly.
Deciding Shelf Dimensions
Choose the size of each shelf based on the space and books you own. Make shelves tall enough for your tallest books. Think about shelf depth for bigger books or decorations. Keep some space between shelves for easy access.
Sketching The Layout
Draw a simple sketch of your bookshelf design. Include the number of shelves and their positions. Use graph paper or a drawing app for neat lines. This visual guide helps you see the final look. Adjust the layout before cutting any wood.
Cutting And Preparing Wood Pieces
Cutting and preparing wood pieces is an important step in making a tiny bookshelf. This step shapes the wood parts that will form the bookshelf. Proper cutting and preparation help the pieces fit well together and create a strong shelf.
Take your time during this step. Careful work now saves effort later. Follow safety rules to avoid accidents. Use the right tools for clean cuts and smooth edges.
Marking Cutting Lines
Start by measuring the wood pieces carefully. Use a pencil and ruler to mark the cutting lines. Draw clear, straight lines on the wood. Double-check measurements before cutting. Accurate lines help you cut the wood exactly where needed.
Safe Cutting Techniques
Wear safety glasses and gloves before cutting. Use a saw suitable for your wood type and size. Hold the wood steady with clamps or a workbench. Cut slowly and follow the marked lines. Keep fingers away from the blade. Stop if the saw feels stuck or uneven.
Sanding Edges Smooth
After cutting, edges may be rough or sharp. Use sandpaper or a sanding block to smooth the edges. Sand in one direction to avoid splinters. Check for any rough spots and sand again if needed. Smooth edges make the bookshelf safe and neat.
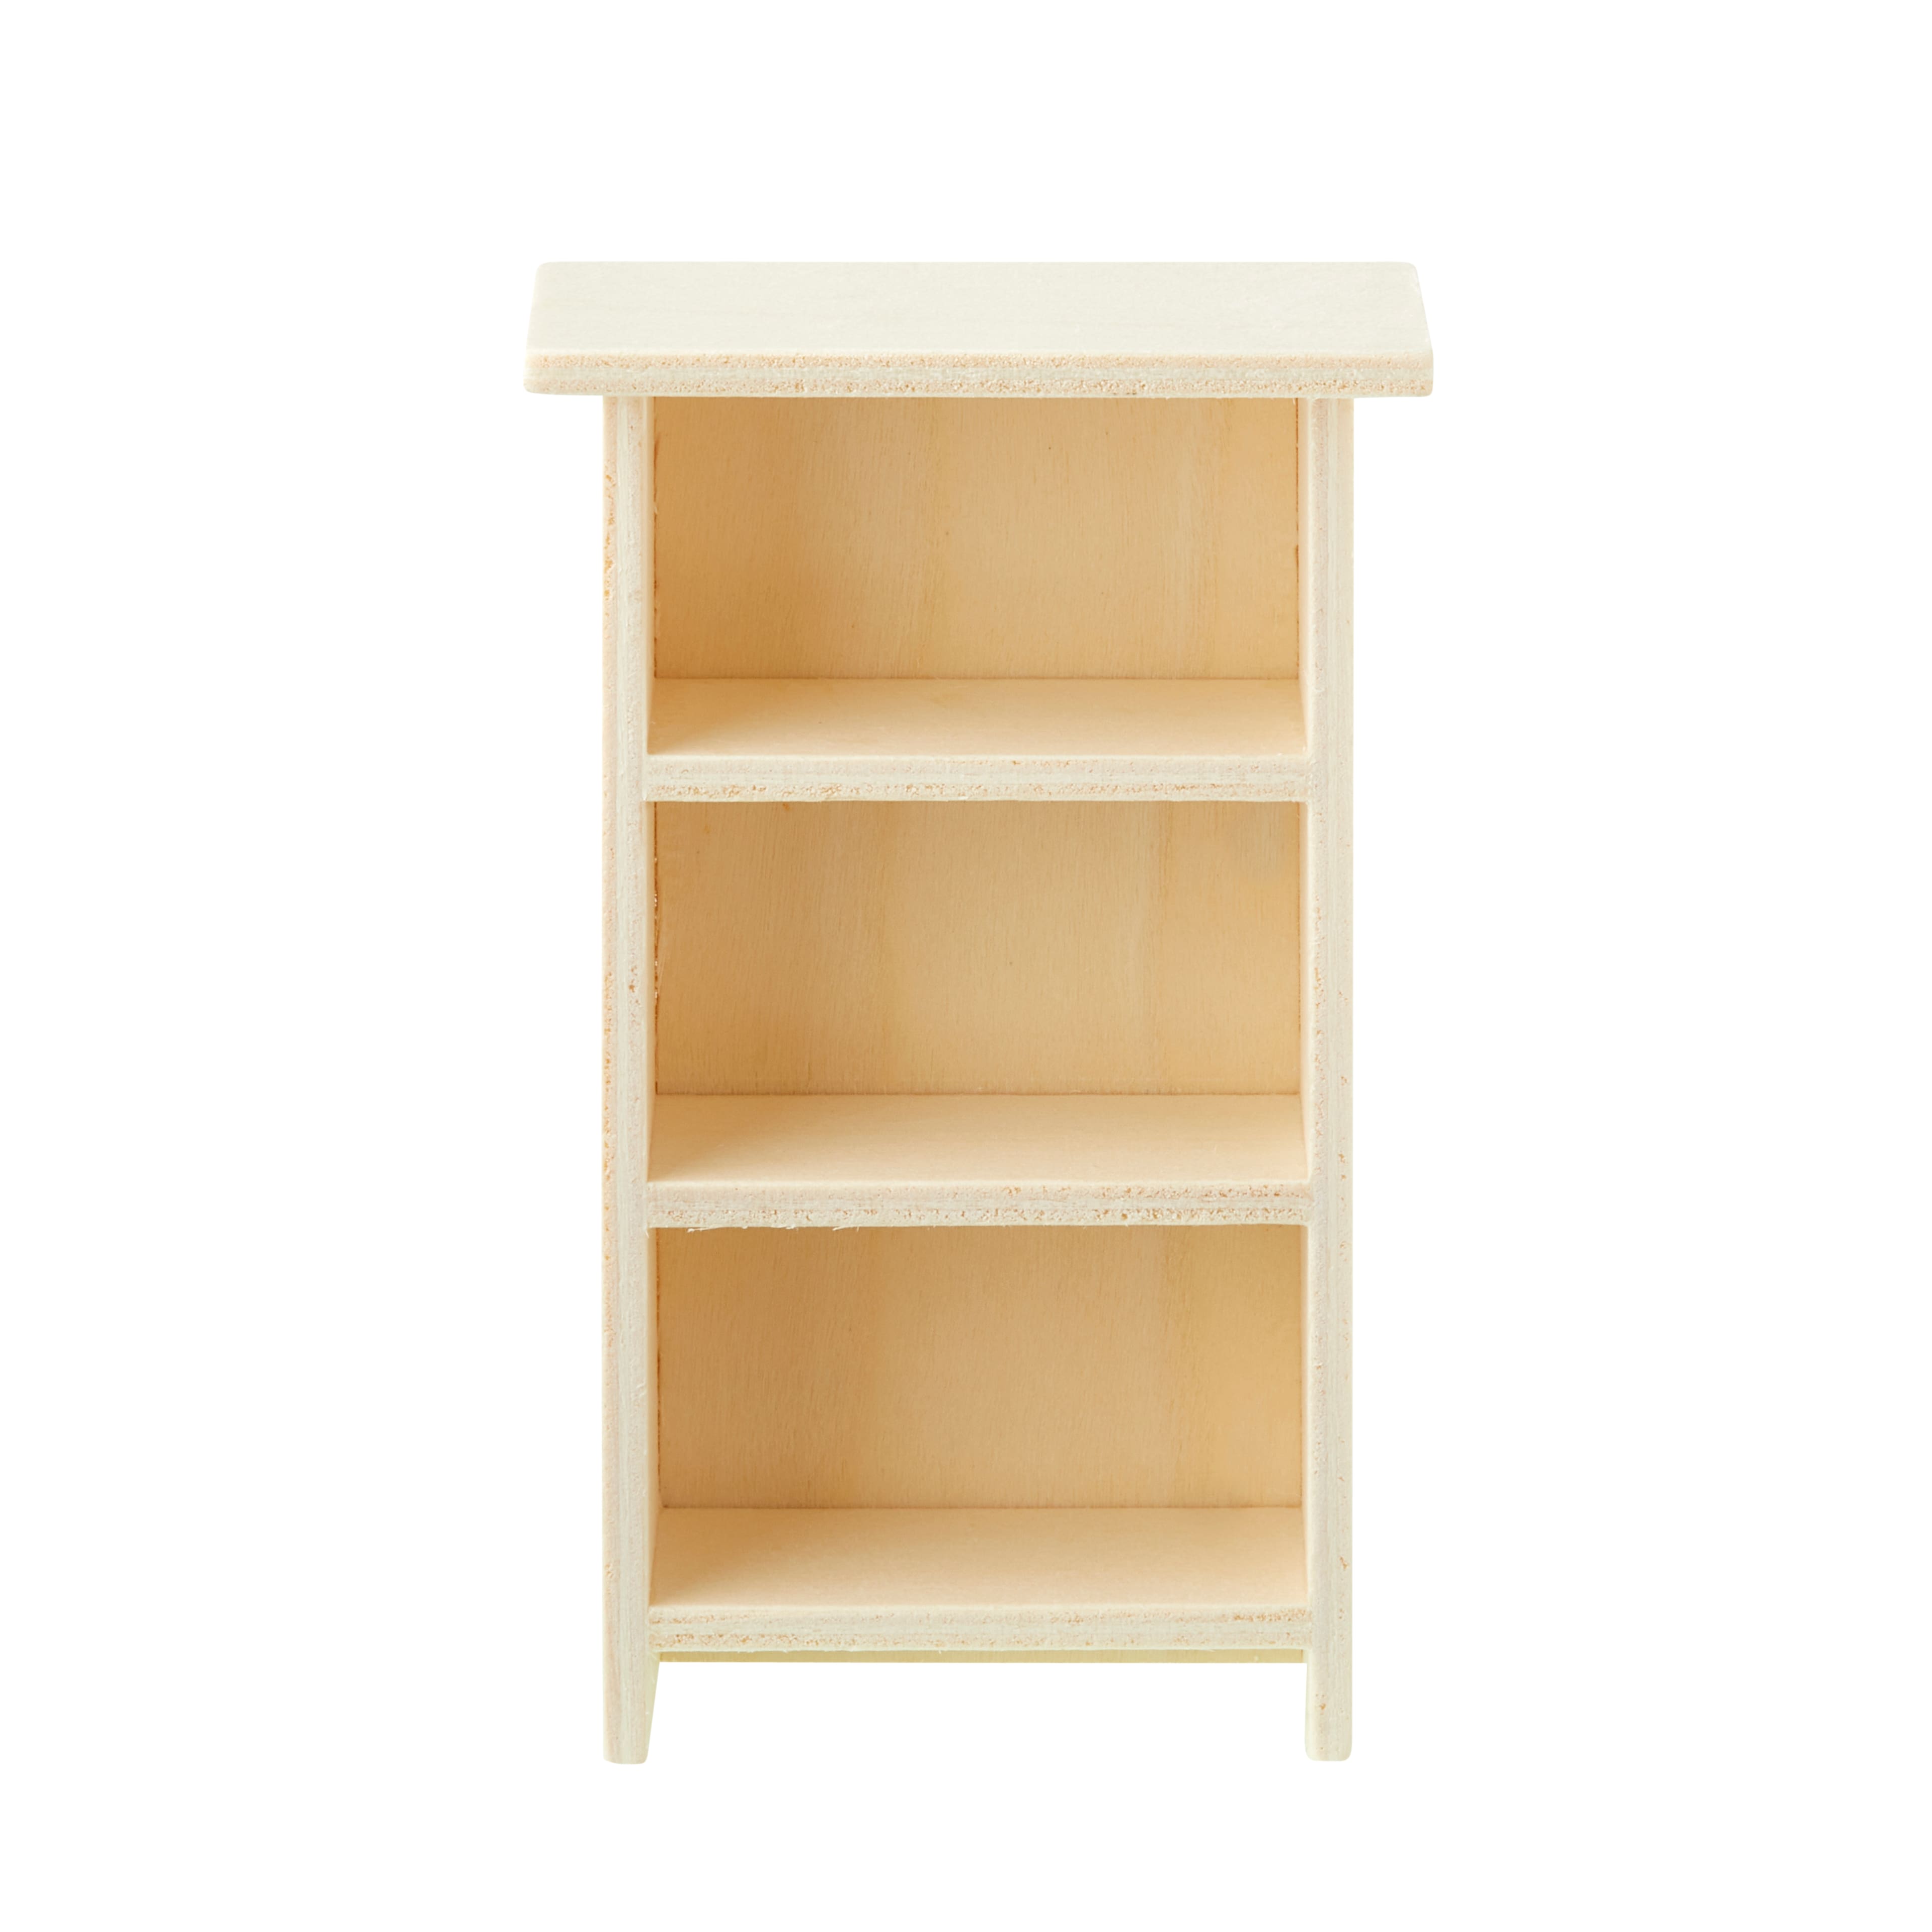
Credit: www.youtube.com
Assembling The Bookshelf Frame
Assembling the bookshelf frame is the key step in building your tiny bookshelf. This part holds the entire structure together. Take your time to ensure each piece fits perfectly. A strong frame means a durable bookshelf that lasts long.
Joining The Sides And Shelves
Start by placing the side panels upright. Align the shelves between these sides at the desired heights. Use clamps or have someone hold the pieces steady. Check that the edges are flush to avoid gaps. Proper alignment makes the bookshelf look neat and sturdy.
Using Nails And Screws
Use nails or screws to attach the shelves to the sides. Screws offer a stronger hold and can be removed if needed. Nails work well for quick assembly but may loosen over time. Drill pilot holes before inserting screws to prevent wood splitting. Drive the screws or nails straight for better grip.
Ensuring Stability
Check the frame for any wobbling or gaps. Add corner braces or wood glue for extra strength. Tighten all screws and nails firmly. Place the frame on a flat surface to test balance. A stable frame keeps books safe and prevents tipping.
Finishing Touches
The finishing touches bring your tiny bookshelf to life. They protect the wood and add style. Taking time here makes your project last longer and look better.
Applying Paint Or Stain
Choose paint or stain that fits your room’s style. Paint offers bright colors and covers wood grain. Stain shows the natural wood pattern and adds warmth. Use a brush or cloth for even coverage. Let each coat dry fully before adding another.
Adding Protective Coating
A clear protective coat seals your paint or stain. It guards against scratches, moisture, and dust. Polyurethane or varnish works well for bookshelves. Apply thin layers and let each dry well. This step keeps your shelf looking new for years.
Installing Wall Mounts If Needed
Wall mounts help save space and add safety. Choose mounts that fit your shelf size and weight. Measure and mark the wall carefully for balanced support. Use a level to keep the shelf straight. Secure mounts tightly to avoid accidents.
Maximizing Small Space Storage
Maximizing small space storage is key when making a tiny bookshelf. Small areas need smart solutions to hold books and items. A well-designed tiny bookshelf can save room and look nice. This section shows easy ways to use every inch for storage. These ideas help keep your space neat and stylish.
Organizing Books Creatively
Stack books both vertically and horizontally to save space. Group books by size or color for a tidy look. Use bookends to keep books standing without falling. Mix tall and short stacks to add visual interest. Rotate books with favorite titles facing out for easy access.
Incorporating Decorative Items
Add small plants or candles to break up book rows. Place photos or art pieces for a personal touch. Use small baskets to hold tiny items like keys or notes. Mix decorations with books to create a balanced display. Keep decor simple to avoid clutter on the shelf.
Using Vertical Space Efficiently
Build shelves that reach up to the ceiling to add height. Use wall-mounted shelves above the tiny bookshelf to hold more. Hang hooks nearby to store bags or headphones. Stack items vertically instead of spreading them out wide. Use thin shelves to fit into tight wall spaces.
Credit: canada.michaels.com
Frequently Asked Questions
What Materials Are Needed To Make A Tiny Bookshelf?
To make a tiny bookshelf, you need wood planks, nails, wood glue, sandpaper, and paint or stain. Basic tools include a saw, hammer, and measuring tape. These materials ensure a sturdy and attractive finished product.
How Much Time Does Building A Tiny Bookshelf Take?
Building a tiny bookshelf typically takes 2 to 4 hours. Time varies based on skill level and complexity. Planning and preparation speed up the process and improve results.
Can Beginners Easily Build A Tiny Bookshelf?
Yes, beginners can build a tiny bookshelf with simple instructions. The project requires basic tools and skills. It’s a great way to start woodworking and create functional decor.
How Do I Customize My Tiny Bookshelf Design?
Customize by changing size, shape, and paint colors. Add shelves or decorative trim for uniqueness. Personal touches make your bookshelf fit your space and style perfectly.
Conclusion
Making a tiny bookshelf is simple and fun. You only need a few tools and some wood. Follow the steps carefully to build your own shelf. It fits small spaces and holds your favorite books. This project helps you save money and learn new skills.
Try different designs to match your style. Enjoy the pride of creating something useful. Start your tiny bookshelf today and organize your space nicely.
