Are you tired of cluttered bathroom counters and searching for your everyday essentials? Imagine having a sleek, organized space right at your fingertips—where everything you need is neatly stored and easy to find.
Making your own vanity medicine cabinet is easier than you think, and it can completely transform your bathroom’s look and feel. In this guide, you’ll discover simple steps to build a stylish and functional cabinet tailored just for you. Ready to take control of your space and add a personal touch to your bathroom?
Let’s get started!
Choosing The Right Cabinet
Choosing the right cabinet is key to a great vanity medicine cabinet. It affects how well it fits your space and matches your bathroom’s look. Think about size, materials, and style before buying.
Size And Space Considerations
Measure the wall space where the cabinet will go. Choose a size that fits well without crowding. Consider the depth so it does not stick out too much. Think about how much storage you need inside.
Materials And Finishes
Pick materials that resist moisture and last long. Wood, metal, and plastic all have good options. Choose a finish that is easy to clean and won’t fade. A smooth finish helps avoid dust buildup.
Style Matching Your Bathroom
Match the cabinet style to your bathroom décor. Look for colors and shapes that blend well. A modern cabinet suits a sleek bathroom, while a rustic one fits a classic look. Consistency creates a balanced space.

Credit: athomewithashley.com
Gathering Tools And Supplies
Gathering the right tools and supplies is the first step in making a vanity medicine cabinet. Having everything ready saves time and keeps the project smooth. It also helps avoid mistakes and frustration during work. Below are the key items you will need to start your project.
Essential Tools List
- Measuring tape for accurate dimensions
- Level to ensure straight installation
- Power drill for making holes and driving screws
- Screwdriver set for assembling parts
- Stud finder to locate wall studs
- Jigsaw or handsaw for cutting wood or drywall
- Hammer for nails and adjustments
- Sandpaper for smoothing surfaces
- Pencil for marking measurements
Recommended Materials
- Plywood or MDF board for cabinet structure
- Mirror glass for the cabinet door
- Hinges and screws for attaching the door
- Wood glue for extra strength
- Paint or stain for finishing
- Cabinet knobs or handles
- Wall anchors for secure mounting
Safety Gear
- Safety goggles to protect your eyes
- Dust mask to avoid inhaling particles
- Work gloves to protect your hands
- Ear protection if using loud power tools
Preparing The Installation Area
Preparing the installation area is the first step to a smooth vanity medicine cabinet setup. This phase ensures the cabinet fits well and stays secure on the wall. Careful preparation saves time and prevents mistakes later.
Measuring Wall Space
Start by measuring the available wall space carefully. Use a tape measure to get the width and height. Write down the numbers to avoid forgetting. Measure twice to be sure. This helps pick the right cabinet size and avoid fitting problems.
Locating Studs
Find the wall studs before installation. Studs hold the cabinet firmly and safely. Use a stud finder tool for accuracy. Move it along the wall slowly. Mark the stud edges with a pencil. Knowing stud locations avoids weak spots and damage.
Marking Placement
Mark where the cabinet will go on the wall. Use a level to draw straight horizontal and vertical lines. Place the cabinet marks at the right height and position. Double-check measurements before drilling. Clear marks guide you during installation and keep the cabinet balanced.
Credit: www.betterbath-kitchens.com
Building The Cabinet Frame
Building the cabinet frame is the first major step in making a vanity medicine cabinet. This frame will hold everything together. It must be strong and fit your space perfectly. Taking time to build the frame carefully makes the whole project easier and the final product better.
Cutting Wood Pieces
Start by measuring the space for your cabinet. Use a tape measure for accuracy. Mark your wood pieces with a pencil. Cut the wood using a saw. Cut the sides, top, bottom, and shelves. Make sure each piece matches your measurements exactly. Clean the edges with a file or sandpaper.
Assembling The Frame
Lay out all the wood pieces on a flat surface. Join the sides to the top and bottom pieces. Use wood glue on the edges for extra hold. Secure the joints with nails or screws. Check the frame for square corners. Adjust if needed before the glue dries. Attach the shelves inside the frame at your chosen height.
Sanding And Finishing
Sand the entire frame using medium-grit sandpaper. Smooth all surfaces and edges. This step removes splinters and rough spots. Wipe away dust with a cloth. Apply a wood finish or paint. Let it dry completely before moving on. A nice finish protects the wood and looks good.
Adding Shelves And Doors
Adding shelves and doors transforms your vanity medicine cabinet into a practical and stylish storage space. Shelves help organize items neatly. Doors keep everything hidden and dust-free. Both improve the cabinet’s look and function.
Installing Adjustable Shelves
Start by measuring the inside width of your cabinet. Choose shelf brackets that fit the size. Drill holes at even intervals on both sides. Place the brackets into the holes. Slide the shelves onto the brackets. Adjustable shelves let you change space height. This helps store tall or small items easily.
Hanging Cabinet Doors
Pick doors that match your cabinet’s style. Attach hinges to the doors first. Mark hinge positions on the cabinet frame. Screw the hinges firmly into place. Test the door movement for smooth opening. Adjust hinge screws if doors don’t close well. Properly hung doors add a clean finish.
Adding Handles And Knobs
Choose handles or knobs that fit your design. Mark spots for screws on the door front. Drill holes carefully at the marks. Attach handles or knobs with screws from behind. Tighten screws to secure them. Handles make opening doors easy and add charm.

Credit: stylebyemilyhenderson.com
Mounting The Cabinet
Mounting the vanity medicine cabinet is a key step in your project. This process ensures the cabinet stays safe and looks great on your wall. Careful mounting prevents damage and keeps everything aligned.
Securing To The Wall
First, find the wall studs using a stud finder. Mark their locations clearly. Use screws that fit the cabinet’s mounting holes. Drill pilot holes into the studs. Then, hold the cabinet against the wall and screw it in place. Tighten the screws firmly but avoid over-tightening. This keeps the cabinet secure without damaging the wall or cabinet.
Leveling The Cabinet
Use a spirit level on top of the cabinet. Check if it is perfectly horizontal. If not, adjust the cabinet slightly by loosening screws. Add small shims behind the cabinet if needed. Re-tighten the screws once the cabinet is level. This step makes sure the door opens smoothly and looks balanced.
Final Adjustments
Open and close the cabinet door several times. Check for any wobble or uneven gaps. Tighten any loose screws you find. Clean the cabinet surface to remove dust or fingerprints. Now your vanity medicine cabinet is mounted and ready for use. It looks neat and stays firmly in place.
Customizing And Organizing
Customizing and organizing your vanity medicine cabinet makes it both useful and stylish. Tailor it to fit your needs and space. A well-organized cabinet saves time and reduces clutter. Small touches can create a big difference. Let’s explore simple ways to enhance your cabinet.
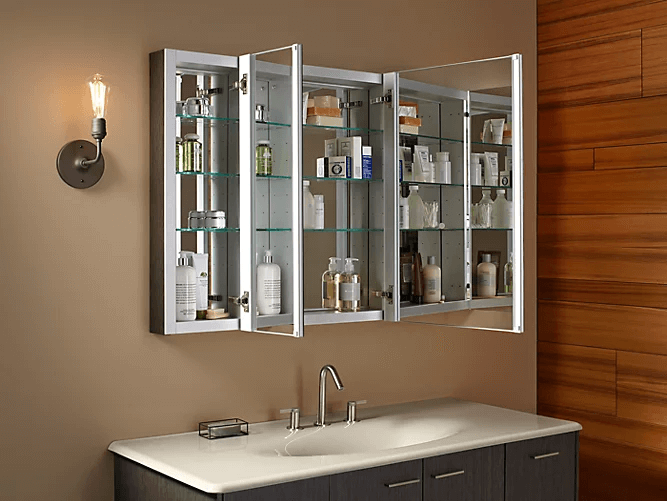
Adding Mirrors Or Lighting
Mirrors expand the space visually and add function. Attach a mirror inside the door for quick checks. Choose a size that fits well without crowding. Lighting brightens the cabinet and helps find items easily. Use LED strips or small battery lights. Place them near shelves or mirrors for best effect.
Using Organizers And Trays
Organizers keep items neat and easy to reach. Use small trays for cosmetics and jewelry. Dividers work well for separating medicines and skincare products. Clear containers help spot what you need fast. Stackable bins save space and keep things tidy. Choose sizes that fit your cabinet shelves perfectly.
Maintaining Your Cabinet
Keep your cabinet clean and clutter-free. Regularly remove expired medicines and empty containers. Wipe shelves with a damp cloth to avoid dust build-up. Check lighting and mirrors for damage or dirt. Organizing often prevents mess and keeps your cabinet fresh. A little care keeps it working well for years.
Frequently Asked Questions
What Materials Are Needed For A Vanity Medicine Cabinet?
You need wood or MDF, hinges, screws, a mirror, paint, and wall anchors. Quality materials ensure durability and a polished look.
How Do You Measure Space For A Vanity Medicine Cabinet?
Measure the wall width, height, and depth where you want the cabinet. Accurate measurements ensure a perfect fit and easy installation.
Can I Install A Vanity Medicine Cabinet Myself?
Yes, with basic tools and DIY skills, you can install it. Follow instructions carefully for safety and proper mounting.
How To Organize Items Inside A Vanity Medicine Cabinet?
Use shelves and small containers to separate products. Keep daily-use items at eye level for convenience and easy access.
Conclusion
Creating a vanity medicine cabinet can be simple and fun. You only need basic tools and some patience. This project helps organize your bathroom neatly. It saves space and keeps items easy to find. With a little effort, you get a useful and stylish cabinet.
Try different designs to fit your room and taste. Enjoy a cleaner, tidier bathroom every day. Start your project today and see the difference it makes.