Imagine turning your plain wall into a stunning bookshelf that not only saves space but also adds charm to your room. You don’t need to be a professional carpenter or spend a fortune to do this.
With a few simple steps, you can create a beautiful and practical bookshelf that fits your style perfectly. Ready to transform your space and showcase your favorite books like never before? Keep reading, and you’ll discover how easy and rewarding this project can be.
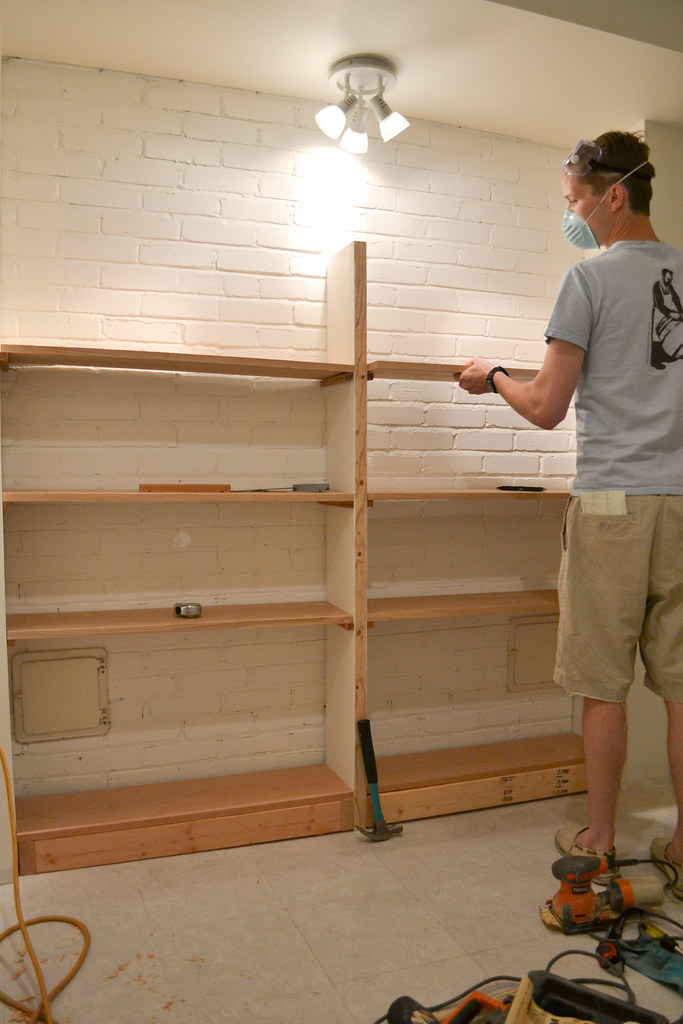
Credit: www.thingsimadetoday.com
Choosing The Right Wall
Choosing the right wall is the first step to create a functional and beautiful bookshelf. The wall must support the weight of your books and fit well in the room. Taking time to pick the best spot ensures your bookshelf lasts long and looks great.
Assessing Wall Strength
Check if the wall is strong enough to hold heavy shelves and books. Walls with studs or solid materials work best. Avoid thin drywall or hollow walls. Use a stud finder to locate the studs for secure mounting. This prevents damage and keeps the shelf steady.
Measuring Available Space
Measure the wall height and width carefully. Note any obstacles like windows, doors, or vents. Make sure there is enough room for the shelves and walking space. Proper measurements help you plan shelf size and layout. This saves time and avoids mistakes.
Considering Room Layout
Think about how the bookshelf fits with your furniture and room use. Choose a wall that does not block light or pathways. A bookshelf near your reading chair is practical. The right location makes your space cozy and organized.
Picking Materials And Tools
Transforming a wall into a bookshelf starts with choosing the right materials and tools. This step is crucial to ensure your project is strong and looks great. Picking good wood and having the right tools makes the job easier and the final shelf safer.
Selecting Wood Types
Choose wood that is strong and smooth. Pine is affordable and easy to work with. Oak is harder and lasts longer but costs more. Plywood offers good strength and resists warping. Avoid soft woods that bend easily. The wood should fit your budget and style.
Essential Tools List
You need a few basic tools to build a bookshelf. A saw cuts wood to size. A drill helps make holes and insert screws. A level keeps shelves straight. Sandpaper smooths rough edges. A measuring tape ensures correct dimensions. Have screws and brackets ready too.
Safety Equipment
Protect yourself during the build. Wear safety goggles to guard your eyes. Use gloves to protect your hands from splinters. A dust mask stops you from breathing sawdust. Ear protection helps if tools are loud. Safety is key for a smooth project.
Designing Your Bookshelf
Designing your bookshelf is an important step in turning a wall into a functional space. It helps you use the area well and keeps your books organized. A good design fits your needs and matches the room’s look.
Careful planning makes sure the shelves hold your books safely. It also adds a nice touch to your room. Let’s explore how to design your bookshelf step by step.
Determining Shelf Dimensions
Start by measuring the wall space you want to use. Think about the height and width that fit your room. Shelves should be deep enough for your books, usually around 10 to 12 inches. Leave some space between shelves for taller books. Use a tape measure and write down the numbers.
Planning Shelf Placement
Decide how many shelves you need based on your book collection. Space shelves evenly or mix heights for different book sizes. Make sure shelves are easy to reach. Think about leaving some open space for decorations or plants. Draw a simple sketch to plan where each shelf will go.
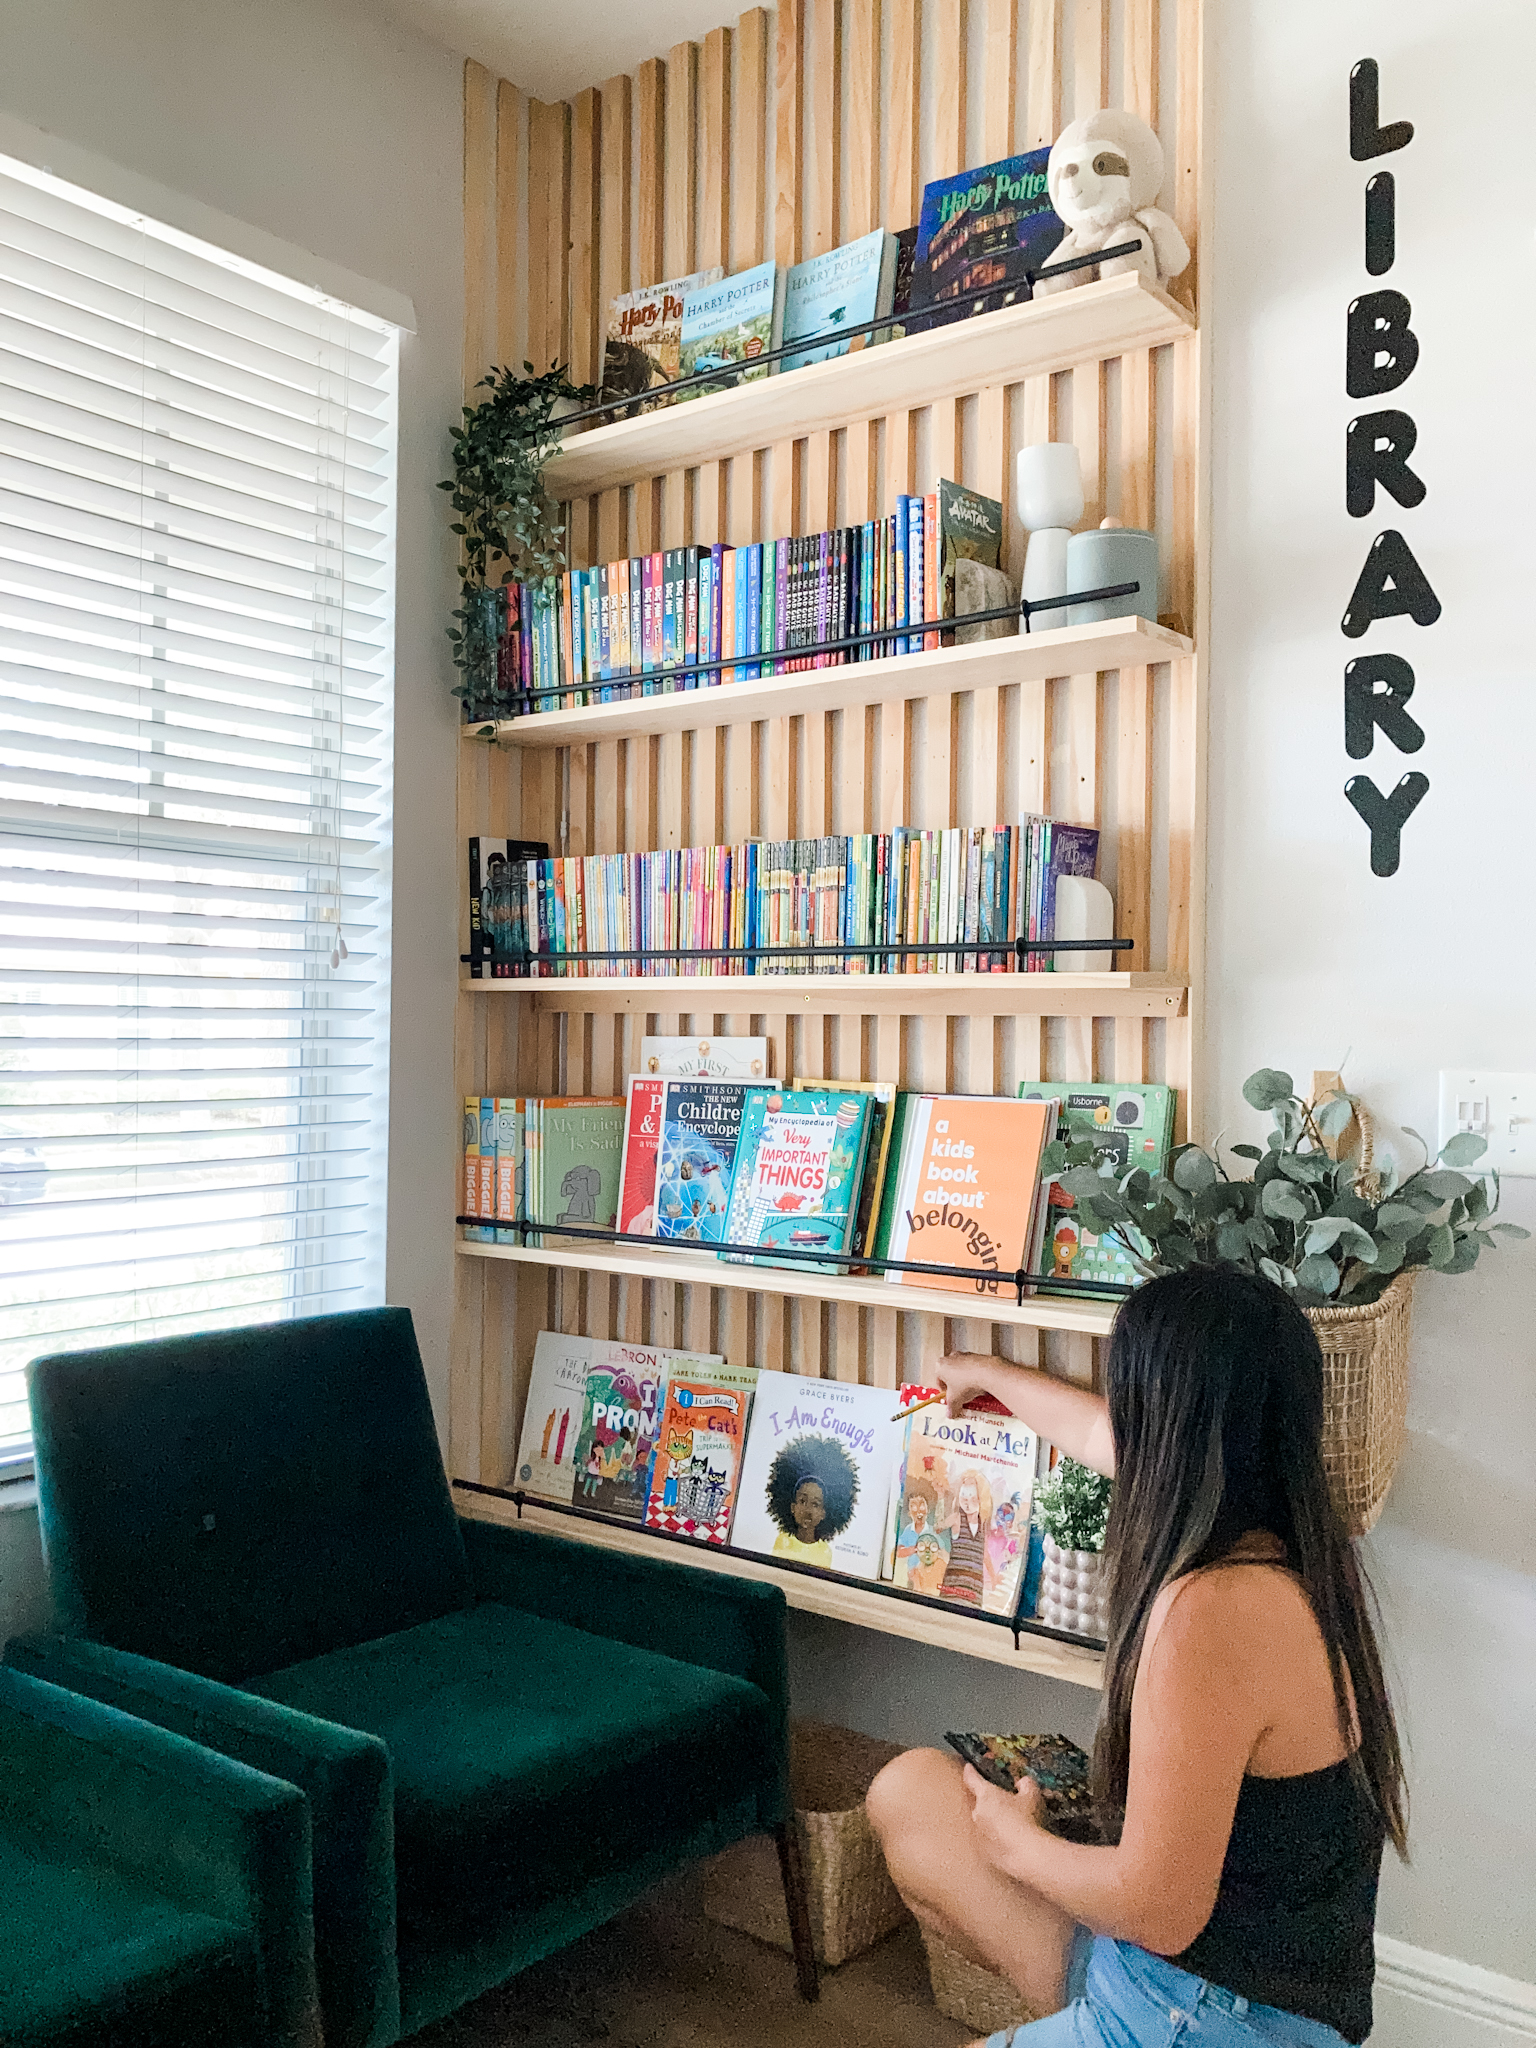
Incorporating Style Elements
Choose materials that match your room style, like wood or metal. Paint or stain shelves to fit your color scheme. Add trim or molding for a polished look. Consider lighting to highlight your books. Style touches make your bookshelf more than just storage.
Preparing The Wall
Preparing the wall is the first step in turning it into a bookshelf. This step ensures the shelf will be safe and strong. Careful preparation makes the installation smooth and lasting. A clean, well-marked wall helps you place shelves exactly where you want them.
Cleaning And Marking
Start by cleaning the wall. Remove dust, dirt, and grease spots. A clean surface helps the shelves stick better. Use a damp cloth and mild soap for cleaning.
After cleaning, mark where you want the shelves. Use a pencil and a level tool. Draw straight lines to guide your installation. Clear markings avoid mistakes and uneven shelves.
Locating Studs
Find the studs behind the wall. Studs provide strong support for heavy shelves. Use a stud finder or tap the wall gently to find solid spots. Mark each stud location clearly.
Knowing stud positions helps you fix shelves securely. Avoid placing shelves only on drywall. Studs keep the shelves from falling under weight.
Installing Wall Anchors
Use wall anchors if you cannot attach shelves to studs. Anchors hold shelves firmly on drywall. Choose anchors that fit the shelf size and weight.
Follow the anchor instructions carefully. Drill holes, insert anchors, and tighten screws properly. This step boosts shelf strength and safety.
Building The Bookshelf
Building the bookshelf is the heart of turning a wall into a storage space. This stage involves preparing wood pieces, putting shelves together, and fixing them on the wall. Each step needs care to ensure the shelves hold books safely and look good.
Cutting Wood Pieces
Start by measuring the wall space carefully. Cut wooden boards to match these measurements. Use a saw to make straight, clean cuts. Sand the edges to avoid splinters. This step sets the foundation for sturdy shelves.
Assembling Shelves
Lay the cut pieces flat on a clean surface. Join the boards using wood glue or screws. Check that each shelf is level and square. Wait for the glue to dry fully before moving on. Proper assembly keeps shelves strong and neat.
Mounting Shelves On Wall
Mark the wall where shelves will go. Use a stud finder to locate wall studs for support. Drill holes and insert anchors if needed. Screw brackets or supports into the wall securely. Place shelves on brackets and check they are steady.
Finishing Touches
Finishing touches bring your wall bookshelf to life. This step makes the bookshelf look complete and neat. Small details create a big difference in appearance and function. Let’s explore how to finish your project with care.
Sanding And Painting
Sanding smooths the wood surface. It removes rough spots and splinters. Use fine-grit sandpaper for a soft finish. Wipe dust away with a clean cloth.
Choose paint or stain to match your room. Paint adds color and protects the wood. Stain shows the natural wood grain. Apply thin coats for an even look. Let each coat dry before adding the next.
Adding Decorative Elements
Decorations add personality to your bookshelf. Try small plants or picture frames on the shelves. Use bookends to keep books tidy and stylish. Add LED lights under each shelf for a soft glow. Keep decorations simple to avoid clutter.
Organizing Books And Items
Sort books by size or color for a neat look. Place frequently used books at eye level. Mix books with decorative objects for balance. Avoid overloading shelves to keep them strong. Leave space between items to make the shelf breathe.
Maintenance Tips
Maintaining your wall bookshelf keeps it looking fresh and sturdy. Regular care helps avoid damage and keeps your books safe. Simple steps can extend the life of your shelf and enhance its appearance.
Cleaning And Dusting
Dust builds up quickly on shelves and books. Use a soft cloth or a feather duster to clean. Wipe the shelves gently to avoid scratches. Clean at least once a week to stop dust from settling. For stubborn dirt, use a damp cloth but dry immediately.
Inspecting For Damage
Check your bookshelf often for loose screws or cracks. Look for any sagging or warping in the wood. Tighten screws and fix small cracks early to prevent bigger problems. Early repairs keep your shelf safe and strong.
Upgrading Shelf Design
Change shelf height to fit new book sizes. Add extra shelves if you need more space. Use brackets or supports for heavier books. Painting or staining the shelf refreshes its look. Small upgrades improve function and style easily.
Credit: xomyhome.com

Credit: www.11magnolialane.com
Frequently Asked Questions
What Materials Are Needed To Make A Wall Into A Bookshelf?
You need wood planks, brackets, screws, anchors, a drill, level, measuring tape, and paint or stain. Choose sturdy materials for durability. Proper tools ensure a safe and attractive bookshelf.
How Do I Measure The Wall For A Bookshelf?
Measure the wall width and height where the bookshelf will go. Consider spacing for shelves and the size of books. Accurate measurements help in cutting materials and planning shelf placement.
Can I Build A Bookshelf On Any Wall Type?
Most walls can support bookshelves, but stud walls are best. Avoid drywall without studs unless using strong anchors. Confirm wall strength to safely hold the shelf weight.
How To Install Shelves Evenly On A Wall Bookshelf?
Use a level and measuring tape to mark shelf positions. Mark drill points carefully and install brackets at the same height. This ensures shelves are straight and evenly spaced.
Conclusion
Transforming a wall into a bookshelf adds style and function. It saves space and keeps books organized. You only need basic tools and simple steps. Personalize shelves to fit your room and taste. This project brings a fresh look to any space.
Enjoy your new, easy-to-make bookshelf every day. Start now and see the difference it makes.