Are you looking to add more storage and style to your space without spending a fortune? Making a basic bookshelf yourself is easier than you might think.
Imagine having a sturdy, custom-made shelf that fits perfectly in your room and holds your favorite books, plants, or decorations. In this guide, you’ll discover simple steps that anyone can follow to build a bookshelf from scratch. Whether you’re new to DIY or just want a quick project, this article will give you clear instructions and helpful tips to get the job done right.
Ready to create something useful and beautiful with your own hands? Let’s get started!

Credit: www.kayunga.go.ug
Materials And Tools
Building a basic bookshelf needs the right materials and tools. Choosing good wood and having proper tools make the project easier. Safety gear protects you while working. This section covers all you need before starting.
Wood Selection
Pick wood that is strong and smooth. Pine and plywood work well for beginners. Pine is easy to cut and affordable. Plywood offers good strength and flat surfaces. Avoid wood with many knots or cracks. Smooth wood makes painting or staining easier.
Required Tools
Have these tools ready for your bookshelf project. A saw cuts wood to the right size. A drill makes holes for screws. Sandpaper smooths rough edges. A measuring tape ensures accurate cuts. A screwdriver helps to fasten screws tightly. A square helps keep corners straight and even.
Safety Gear
Wear safety glasses to protect your eyes from dust and wood chips. Use gloves to keep your hands safe from splinters. A dust mask stops you from breathing in sawdust. Work in a clean, well-lit area to avoid accidents. Safety first, always.
Credit: www.diypete.com
Planning Your Bookshelf
Planning your bookshelf is the first step to a successful build. It helps you organize ideas and avoid mistakes. Good planning saves time and materials.
Think about where you want to place your bookshelf. Also, consider how many books or items you want to store. This makes the whole project easier.
Choosing Dimensions
Measure the space where you want the bookshelf. Keep in mind the height, width, and depth. Make sure it fits well without crowding the room. Also, think about the size of your books. This helps decide shelf height and spacing.
Design Options
Decide on the style of your bookshelf. It can be simple or have more shelves. You can choose open shelves or ones with doors. Think about the material too, like wood or metal. The design should match your room’s look.
Preparing A Sketch
Draw a simple sketch of your bookshelf. Mark the measurements clearly. Show where each shelf will go. This sketch guides you during building. It helps avoid errors and keeps you on track.
Cutting The Wood
Cutting the wood is the first major step in building your bookshelf. It shapes all the parts you will need. Accurate cuts make assembly easier and the shelf stronger. Take your time to measure well and cut safely. This ensures your bookshelf will look neat and last long.
Measuring And Marking
Start by measuring each piece of wood carefully. Use a tape measure for exact length. Mark the cut lines clearly with a pencil. Double-check every measurement before cutting. Mark both sides of the wood for a straight cut. Use a square tool to keep lines straight and even.
Safe Cutting Techniques
Always wear safety glasses to protect your eyes. Use a stable surface to hold the wood steady. Cut slowly and follow the marked lines closely. Keep your hands away from the blade at all times. Use clamps to secure wood pieces when possible. Turn off power tools before adjusting or changing blades. Safety first keeps the project smooth and injury-free.
Assembling The Frame
Assembling the frame is the first major step in building your bookshelf. This part creates the strong base and sides needed for the shelves. A solid frame keeps your bookshelf sturdy and balanced.
Take your time with each step. Careful assembly ensures your bookshelf lasts longer and holds more weight.
Joining Side Panels
Start by joining the two side panels. Place them upright and parallel to each other. Use wood glue along the edges for extra hold. Align the panels carefully before moving on. This step forms the vertical sides of your bookshelf.
Attaching Shelves
Next, attach the shelves between the side panels. Measure the spaces evenly to keep shelves level. Insert each shelf into the frame, fitting it snugly. Check that every shelf is straight and flat.
Securing With Screws
Secure the panels and shelves with screws to add strength. Use a drill to make pilot holes first. This prevents the wood from splitting. Drive screws through the sides into each shelf. Tighten screws just enough to hold firmly.
Sanding And Finishing
Sanding and finishing are important steps in building a basic bookshelf. They make the wood smooth and protect it from damage. A well-finished bookshelf looks nice and lasts longer. Follow these simple steps to get a clean, polished result.
Sanding Surfaces
Start by sanding all wooden parts with medium-grit sandpaper. This removes rough spots and splinters. Sand in the direction of the wood grain to avoid scratches. After that, use fine-grit sandpaper for a smoother finish. Wipe off dust with a clean cloth before moving on.
Applying Paint Or Stain
Choose paint or stain depending on your style. Paint covers the wood and adds color. Stain highlights the natural wood grain. Use a brush or cloth to apply evenly. Let the first coat dry completely. Apply a second coat for better coverage and color.
Adding Protective Coating
Protect your bookshelf with a clear finish. Polyurethane or varnish works well. It guards against scratches and water damage. Apply thin, even layers with a brush. Allow each layer to dry before adding the next. Sand lightly between coats for a smooth surface.

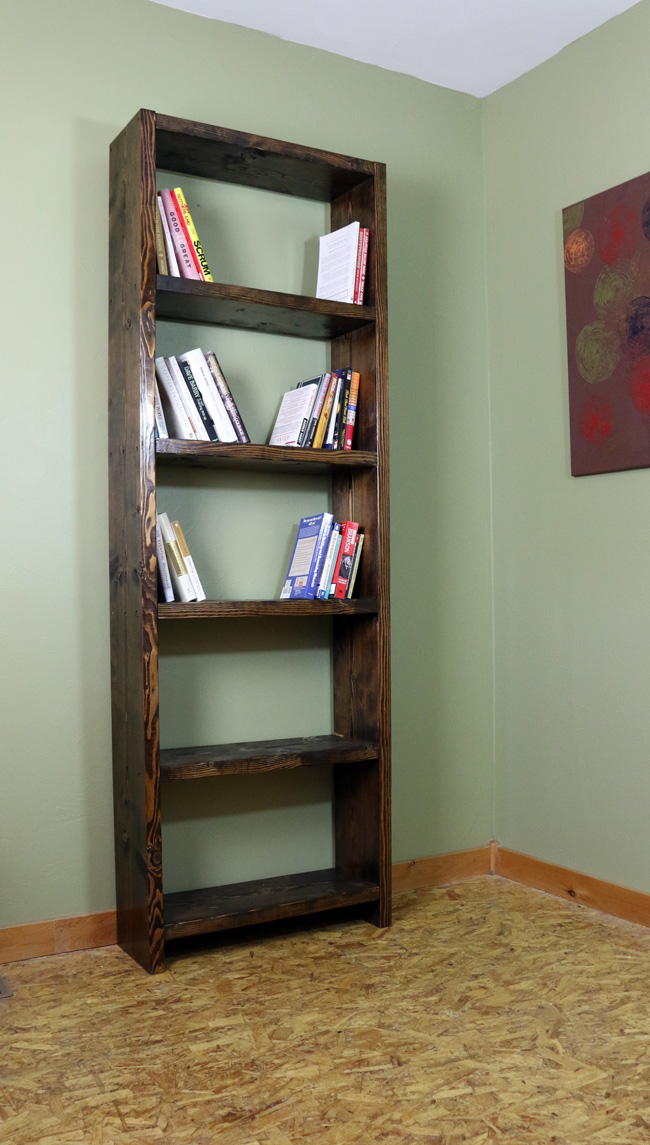
Credit: www.simplyeasydiy.com
Final Touches
Final touches bring your bookshelf to life. They ensure stability and a neat look. These steps make your project both useful and attractive. Let’s explore how to complete your bookshelf with simple actions.
Installing Back Panel
The back panel adds strength and keeps shelves square. Choose a thin plywood or hardboard sheet. Cut it to fit the back of your bookshelf. Attach it with small nails or screws along the edges. This panel stops the bookshelf from wobbling.
Adding Shelf Supports
Shelf supports hold each shelf steady and prevent sagging. Use metal brackets or wooden cleats. Fix them inside the bookshelf at shelf height. Make sure they are level and secure. This support allows your shelves to carry more weight safely.
Positioning Your Bookshelf
Place your bookshelf in a dry, flat spot. Avoid areas with direct sunlight or moisture. Check it stands firm and does not wobble. Add wall anchors for extra safety if needed. Positioning well protects your books and prolongs shelf life.
Frequently Asked Questions
What Materials Are Needed To Build A Basic Bookshelf?
You need wood planks, screws, a drill, sandpaper, wood glue, and paint or stain. Choose sturdy wood for durability.
How Long Does It Take To Make A Bookshelf?
Building a basic bookshelf usually takes 2 to 4 hours. Time depends on skill level and design complexity.
Can Beginners Build A Bookshelf Easily?
Yes, beginners can build a basic bookshelf with simple tools and clear instructions. Start with easy designs.
How Do I Ensure My Bookshelf Is Sturdy?
Use quality wood, secure joints with screws and glue, and evenly space shelves. Check stability before use.
Conclusion
Building a basic bookshelf is simple and rewarding. You only need a few tools and materials. Follow each step carefully and take your time. This project helps improve your skills and creates useful furniture. Enjoy arranging your books on your new shelf.
Keep practicing to build more complex pieces later. Making things yourself feels great and saves money. Start small and grow your confidence with every project.