Imagine having a unique bookshelf that not only holds your favorite books but also adds a touch of nature to your space. You can create this yourself—a stunning tree bookshelf that stands out and fits perfectly in your home.
It’s easier than you think, and by the end of this guide, you’ll know exactly how to build one. Ready to turn your reading corner into something truly special? Let’s get started!
Choosing The Right Tree Design
Choosing the right tree design is key to making a beautiful and functional bookshelf. The design affects how your shelf looks and fits in your room. Picking the right shape, size, and wood type creates a strong and lasting piece. It also matches your style and space needs perfectly.
Types Of Tree Shapes
Tree bookshelves come in many shapes. Some look like tall oaks with wide branches. Others mimic slender birches with straight lines. You can find round, abstract, or simple shapes too. Choose a shape that fits your room style. A busy design may suit a large room. Simple shapes work well in small spaces.
Sizing For Your Space
Measure the wall or corner for your shelf. Think about the height and width you need. A tall shelf holds many books but needs high ceilings. A small shelf fits better in tight spaces. Leave room around the shelf for easy access. Balance size with the room’s other furniture.
Selecting Wood Materials
Wood type affects shelf strength and looks. Pine is soft and easy to work with. Oak is strong and lasts a long time. Walnut has a rich color for a classy look. Choose wood that matches your budget and style. Consider wood that resists scratches and moisture.
Credit: www.contemporist.com
Gathering Tools And Supplies
Starting a tree bookshelf project needs proper tools and supplies. Gathering these items first saves time and effort later. It helps the building process go smoothly.
This section lists all necessary items. It also covers safety gear and extra materials needed. Prepare well for a better woodworking experience.
Essential Tools List
- Measuring tape for accurate dimensions
- Pencil to mark cutting lines
- Hand saw or electric saw for cutting wood
- Drill for making holes and fixing screws
- Screwdriver to secure screws tightly
- Sandpaper or sander to smooth surfaces
- Clamps to hold pieces while working
- Level to check shelf alignment
Safety Equipment
- Safety goggles to protect your eyes
- Work gloves to protect your hands
- Ear protection for loud tool noises
- Dust mask to avoid inhaling wood dust
- Closed-toe shoes for foot safety
Additional Materials
- Wood boards or planks for the shelves
- Wood screws and nails for assembly
- Wood glue for extra strength
- Wood stain or paint for finishing
- Brushes or rags for applying stain or paint
- Wood filler to fix small holes or cracks
Preparing The Wood
Preparing the wood is a key step in making your own tree bookshelf. This step ensures the wood is ready for assembly and looks great. Proper preparation helps the bookshelf last longer and stay sturdy. Take your time to work carefully with each piece.
Measuring And Cutting
Start by measuring the wood pieces accurately. Use a tape measure to mark the lengths needed. Double-check your measurements before cutting. Cut the wood with a saw, following the marks closely. Keep your cuts straight for a clean fit. Use safety gear to protect your eyes and hands.
Sanding Techniques
Sanding smooths the wood surface and edges. Use medium-grit sandpaper first to remove rough spots. Then, switch to fine-grit sandpaper for a soft finish. Sand along the wood grain to avoid scratches. Wipe away dust with a dry cloth after sanding. Smooth wood prevents splinters and helps paint or stain stick well.
Treating And Finishing
Treat the wood to protect it from damage. Apply a wood conditioner to even out stain absorption. Choose a wood stain or paint that fits your style. Use a brush or cloth to apply evenly. Let the first coat dry before adding a second. Finish with a clear sealant for durability and shine. Well-treated wood resists moisture and wear over time.
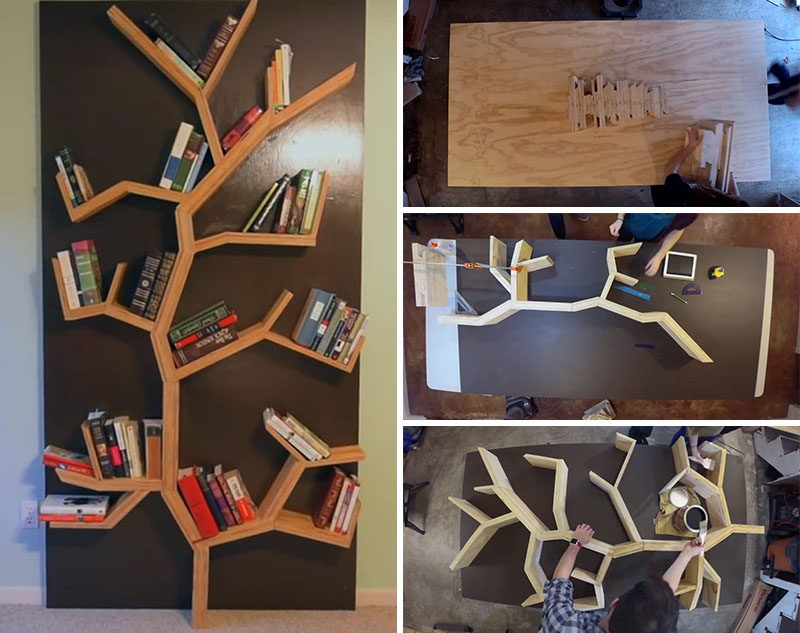
Constructing The Bookshelf Frame
Constructing the bookshelf frame is the core step in making your tree bookshelf. It forms the structure that holds everything together. A strong frame ensures your shelves stay firm and safe. This part requires careful measuring and cutting. Patience and precision help create a beautiful, sturdy frame.
Building The Trunk
Start with the trunk, the main support of your bookshelf. Use a solid wood plank or thick board. Cut it to the height you want for the bookshelf. Sand the edges smooth to avoid splinters. Attach a wide base for stability using screws. The trunk must stand straight and strong to hold the branches.
Adding Branch Shelves
Cut smaller wood pieces for the branch shelves. Shape them like tree branches for a natural look. Attach the branches at different heights on the trunk. Use a level tool to keep shelves flat. Space the shelves to fit your books and decor items. These branches create the unique design of your bookshelf.
Securing Joints And Supports
Secure every joint with wood glue and screws. This keeps the shelves stable and safe. Add extra supports under each branch if needed. Check all connections for tightness before finishing. Proper support prevents wobbling and damage. Strong joints make your tree bookshelf last longer.
Painting And Decorating
Painting and decorating your tree bookshelf brings it to life. It makes the piece unique and matches your room’s style. This step lets you show creativity and protect your work.
Choosing Paint Colors
Select colors that fit your room’s theme. Neutral tones like beige or gray work well with most decor. Bright colors add energy and make the bookshelf stand out. Think about the books and items you will place on it. Choose colors that highlight these items.
Creative Finishing Touches
Use stencils to add patterns or shapes. Try painting leaves, birds, or small branches for a natural look. You can also use sponges for a textured effect. Adding a coat of metallic paint on edges creates a subtle shine. Small details make the bookshelf special and eye-catching.
Protecting The Surface
Apply a clear sealant to protect the paint. It prevents scratches and water damage. Use a matte finish for a soft look or gloss for shine. Let each coat dry fully before adding the next. Proper protection keeps your tree bookshelf looking great for years.
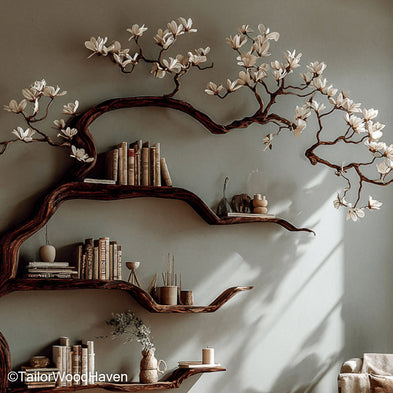
Credit: tailorwoodhaven.com
Placement And Styling Tips
Placing and styling your tree bookshelf is key to making it a beautiful part of your home. The right spot and arrangement can highlight its unique design. It also helps keep your books and items organized and attractive.
Best Room Locations
Choose a room where the bookshelf can be seen easily. Living rooms and bedrooms work well. Avoid places with too much direct sunlight to protect books from fading. Corners can make the bookshelf stand out and save space. Make sure the floor is flat and stable to hold the shelf safely.
Arranging Books And Decor
Mix books with small decorative items for a balanced look. Place taller books at the bottom and smaller ones near the top. Use plants or photo frames to add color and life. Keep some shelves less crowded to avoid a messy look. Arrange items by size or color for a neat style.
Maintaining Your Bookshelf
Dust the bookshelf weekly to keep it clean. Check for loose screws or parts and tighten them. Avoid placing heavy objects that might damage the shelves. Use a soft cloth and mild cleaner for wooden parts. Regular care helps your tree bookshelf last longer and look great.
Troubleshooting Common Issues
Building a tree bookshelf is a fun project. Some problems might pop up during or after building. This section helps you fix common issues. Follow these tips to keep your bookshelf strong and looking great.
Fixing Wobbly Shelves
Wobbly shelves can spoil your bookshelf’s look and function. Check if screws are loose or missing. Tighten all screws with a screwdriver. Add extra screws if needed for more support. Use small brackets under shelves for better hold. Make sure shelves sit flat on the supports.
Dealing With Wood Cracks
Wood cracks often appear from dryness or pressure. Fill small cracks with wood filler or glue. Press the filler in and wipe extra off. Let it dry fully before sanding smooth. For bigger cracks, use wood glue and clamps. Keep clamps tight until glue sets. Prevent cracks by keeping wood away from heat and moisture changes.
Enhancing Stability
Stable shelves hold books safely and look neat. Add a back panel to stop side-to-side movement. Fix the bookshelf to the wall using brackets or anchors. Place heavier items on lower shelves for balance. Use wider legs or base supports to improve steadiness. Check stability regularly and fix loose parts fast.

Credit: www.spryinterior.com
Frequently Asked Questions
What Materials Do I Need For A Tree Bookshelf?
You need wood planks, screws, nails, a saw, sandpaper, wood glue, and paint or stain. Choose sturdy wood like pine or oak for durability.
How Long Does It Take To Build A Tree Bookshelf?
Building a tree bookshelf typically takes 4 to 6 hours. Time varies based on design complexity and your woodworking skills.
Can I Customize The Size Of My Tree Bookshelf?
Yes, you can customize the height, width, and number of shelves. Adjust dimensions to fit your space and storage needs.
Is It Safe To Build A Tree Bookshelf Indoors?
Yes, building indoors is safe if you use proper ventilation and tools carefully. Wear safety gear to protect yourself from dust and sharp tools.
Conclusion
Creating your own tree bookshelf brings charm to any room. It adds a unique, natural touch to your space. Building it can be simple and fun with basic tools. You control the design and size to fit your needs. This project also helps you learn new skills and save money.
Enjoy the beauty and usefulness of your handmade bookshelf every day. Start today and see how rewarding DIY can be.
