Looking to add a unique touch to your home while organizing your books? Building an apple crate bookshelf might be just what you need.
It’s simple, affordable, and gives you a stylish way to display your favorite reads. In this guide, you’ll discover easy steps to turn ordinary apple crates into a charming bookshelf that fits your space perfectly. Ready to create something practical and beautiful with your own hands?
Let’s get started!
Materials Needed
Gathering the right materials is the first step to build an apple crate bookshelf. This project needs a few simple items that you can easily find. Having everything ready helps the process go smoothly and saves time.
Choosing The Right Apple Crates
Select apple crates that are sturdy and in good shape. Wood crates work best because they hold weight well. Check for cracks or loose nails before buying. The size of the crates affects the bookshelf’s final look and storage space. Choose crates of the same size for a neat finish.
Tools Required
You need basic tools to build the bookshelf. A drill or screwdriver is essential for fastening the crates. Sandpaper or an electric sander smooths rough edges. A measuring tape keeps your build accurate. A level helps keep the shelves straight. Have a hammer handy for small fixes.
Additional Supplies
Extra supplies make your bookshelf safe and strong. Wood screws or nails hold the crates together securely. Wood glue adds extra strength to joints. Paint or wood stain can protect and beautify your shelf. Felt pads under the shelf prevent floor scratches. A dust cloth keeps your work clean.
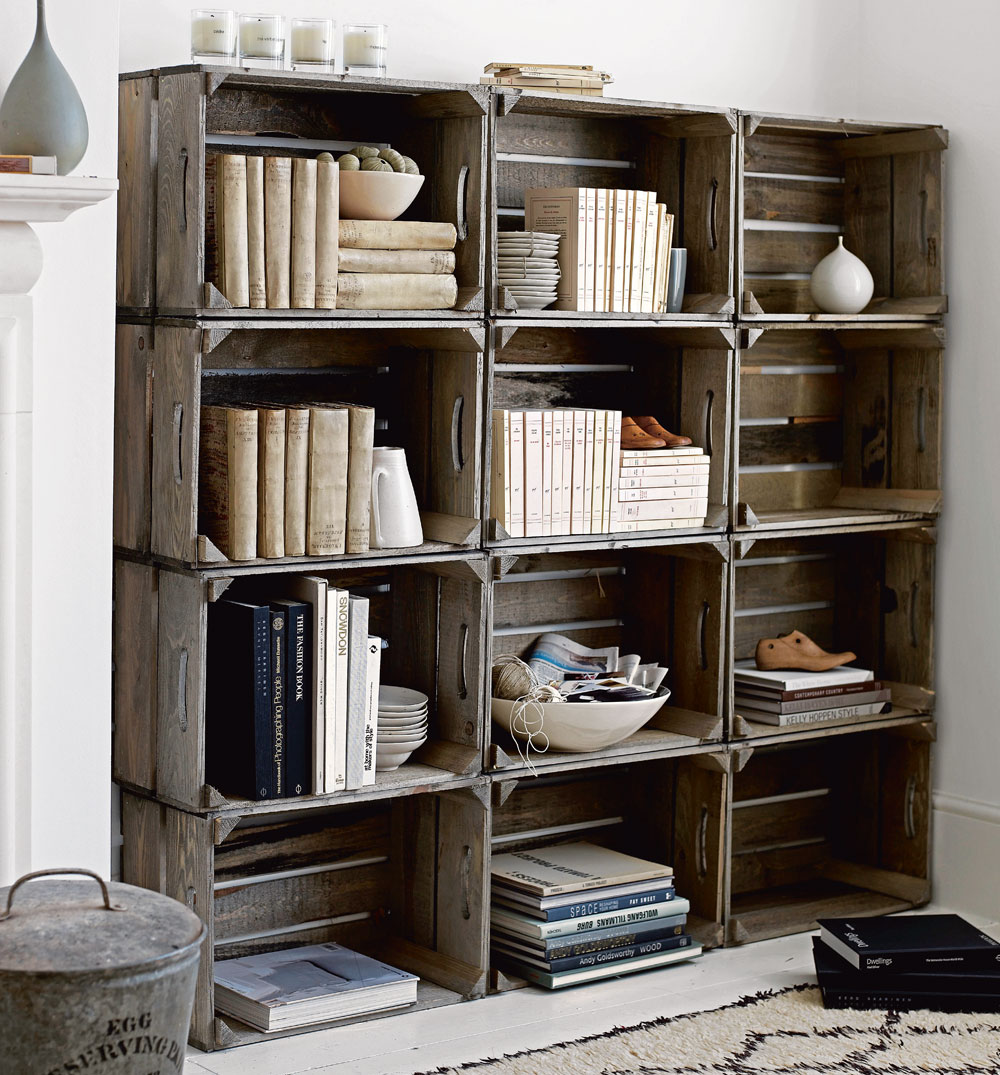
Credit: www.idealhome.co.uk
Preparing The Crates
Preparing the apple crates is an important step before building your bookshelf. Clean crates look better and last longer. Proper preparation also makes painting or staining easier. Take your time to get the crates ready for the next steps.
Cleaning And Sanding
Start by wiping the crates with a damp cloth to remove dust. Use mild soap if needed. Let the crates dry completely before sanding. Sand the wood with medium-grit sandpaper. This smooths rough surfaces and removes splinters. Sand corners and edges carefully to avoid damage.
Removing Labels And Stains
Check the crates for any labels or stickers. Peel off labels gently to avoid tearing the wood. Use a scraper for stubborn glue or paper. For stains, apply a little baking soda paste or white vinegar. Rub lightly with a cloth to lift stains. Rinse and dry the crates well after cleaning.
Optional Painting Or Staining
Painting or staining is not necessary but adds style and protection. Choose paint or stain that suits your room decor. Apply a thin, even coat with a brush. Let the first coat dry before adding a second. Staining enhances the wood grain, while paint covers it fully. Allow the crates to dry completely before use.
Designing Your Bookshelf
Designing your apple crate bookshelf sets the foundation for a strong and attractive piece. It helps you use space well and match your style. Careful design saves time and effort during building. Think about where the bookshelf will go and what it will hold.
Planning the design first makes the project clear and fun. Focus on size, shape, and how to keep it steady. These steps ensure your bookshelf looks good and lasts long.
Deciding On Size And Shape
Measure the space where you want the bookshelf. Consider height, width, and depth carefully. Choose a size that fits well without crowding the room. Think about the crates’ dimensions and how many you need. Decide if you want a tall, narrow shelf or a wide, low one. Keep the shape simple for easy building.
Layout Options
Stack crates in different ways to create unique layouts. Try vertical stacks for a classic bookshelf look. Or arrange crates side by side for a wider shelf. Mix horizontal and vertical crates for a creative design. Leave some space between crates for a light feel. Think about how many shelves you need and their height.
Planning For Stability
Stability keeps your bookshelf safe and strong. Use screws or brackets to hold crates together. Attach the shelf to the wall if it is tall or heavy. Place heavier books on lower shelves to avoid tipping. Check that the base is level and firm. Reinforce corners for extra support and durability.
Assembling The Crates
Assembling the crates is the key step in creating your apple crate bookshelf. This stage brings the design to life and ensures the shelf is sturdy. Organize the crates carefully. Secure them well. Add support to hold everything together. Follow these steps for a strong, lasting bookshelf.
Arranging The Crates
Start by placing the crates on a flat surface. Experiment with different layouts. Stack crates vertically or horizontally. Consider how many shelves you want. Keep the design balanced to prevent tipping. Leave space for books and decorations. Choose a style that fits your room.
Securing Crates Together
Use screws or nails to join the crates. Drill pilot holes first to avoid splitting wood. Attach crates at the sides where they meet. Apply wood glue for extra hold. Check alignment before tightening. Make sure all crates are firmly connected. This step keeps the bookshelf safe and solid.
Adding Support Structures
Add braces or wooden planks inside the back of the shelf. These supports stop wobbling. Attach them horizontally or diagonally. Use corner brackets for extra strength. Fix supports securely with screws. This reinforcement helps the shelf hold heavy books. A strong frame means your bookshelf lasts longer.
Finishing Touches
Finishing touches make your apple crate bookshelf look complete and last longer. These small steps protect the wood and add style. They also make the shelf easier to move or place on the floor.
Sealing And Protecting Wood
Start by sanding the wood smooth with fine-grit sandpaper. This removes rough spots and splinters. Apply a clear wood sealer or varnish to protect against moisture and dirt. Use a brush or cloth to spread it evenly. Let the first coat dry fully before adding a second coat. This keeps the wood strong and looking good over time.
Adding Decorative Elements
Decorative touches make your shelf unique. Paint the crates in soft colors or use stencils for patterns. You can add small metal handles or labels to each crate. These details give character and make the shelf stand out. Use simple designs that match your room’s style.
Installing Feet Or Casters
Feet or casters lift the shelf off the floor. They prevent damage from spills and make cleaning easier. Casters add mobility, so you can move the shelf around. Screw in sturdy feet or wheels at each corner. Choose rubber or plastic feet to protect your floor from scratches.
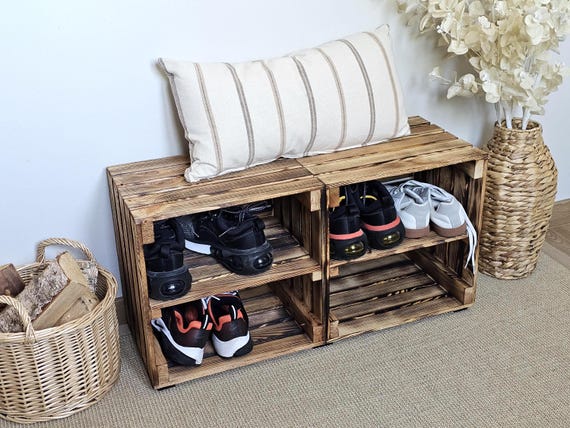
Credit: www.etsy.com
Placement And Styling
Placement and styling make your apple crate bookshelf stand out. Proper spot and neat arrangement turn it into a charming feature. Styling adds personality and fits it into your room’s look.
Choosing The Right Spot
Pick a place with enough light and space. Avoid damp or very dark corners. Near a reading chair or desk works well. Make sure it does not block walkways. A visible spot shows off your DIY work.
Organizing Books And Items
Sort books by size or theme for easy access. Mix books with small decor items for balance. Use baskets or boxes inside crates for small things. Keep heavy books at the bottom to avoid tipping. Rotate items sometimes to keep it fresh.
Complementing Your Decor
Match crate colors with your room’s palette. Add cushions or plants nearby for a cozy feel. Use simple, natural decor to enhance rustic charm. Keep styling minimal to avoid clutter. Your shelf should blend, not compete, with other furniture.

Credit: www.idealhome.co.uk
Frequently Asked Questions
What Materials Are Needed To Make An Apple Crate Bookshelf?
You need apple crates, sandpaper, wood screws, drill, wood stain or paint, and brackets. These materials ensure sturdy assembly and a polished finish.
How Do I Prepare Apple Crates For Shelving?
Start by sanding crates to smooth rough edges. Clean them thoroughly. Apply paint or stain for a polished look. Proper prep enhances durability and appearance.
Can I Customize The Size Of The Bookshelf?
Yes, arrange apple crates vertically or horizontally. Stack them to fit your space. Custom configurations allow unique and functional bookshelf designs.
How Do I Securely Attach Apple Crates Together?
Use wood screws and a drill to fasten crates. Adding brackets inside corners provides extra stability. Secure attachment prevents wobbling and ensures safety.
Conclusion
Building an apple crate bookshelf is simple and fun. It uses old crates to create useful storage. You only need a few tools and some time. This project saves money and helps the environment. Your new shelf will hold books and decorations nicely.
You can paint or decorate it as you like. Try making one for your home today. It adds charm and keeps things tidy. Enjoy your new, handmade bookshelf!
