Are you looking for a creative way to organize your books while adding a unique touch to your space? Imagine having a stylish bookshelf that you made yourself, using just paper and simple folding techniques.
Making an origami bookshelf might sound tricky, but with the right steps, you can create one easily and enjoy the satisfaction of your own handiwork. In this guide, you’ll discover how to make an origami bookshelf step by step. By the end, you’ll have a beautiful, functional piece that shows off your creativity and keeps your favorite books in order.
Ready to get started? Let’s dive in!

Credit: www.youtube.com
Materials Needed
Starting your origami bookshelf project requires the right materials. These materials ensure your bookshelf is sturdy and looks great. Choosing the correct paper and supplies makes folding easier and the final product strong.
Paper Types And Sizes
Choose thick paper for a strong bookshelf. Cardstock or origami paper with a weight of 160-200 gsm works well. Avoid thin paper; it may tear or bend easily. The size of the paper matters too. A 12×12 inch square paper is perfect for most bookshelf designs. Bigger papers create larger shelves, smaller papers make compact shelves.
Additional Supplies
Besides paper, some extra tools help in folding and finishing. A ruler and bone folder help make sharp creases. Glue or double-sided tape keeps folds from unfolding. Scissors are useful for trimming edges. A pencil helps mark folding lines lightly. Prepare a clean, flat surface to work on for the best results.
Credit: www.paperkawaii.com
Preparing Your Paper
Preparing your paper is the first step to create a neat origami bookshelf. This step ensures clean folds and accurate shapes. Good preparation saves time and reduces mistakes.
Choosing the right paper is important. Use paper that is sturdy but easy to fold. Avoid paper that is too thick or too thin. Square sheets work best for this project.
Folding Tips For Precision
Fold slowly and carefully. Sharp creases make the bookshelf stronger. Use a flat surface for folding. Press each fold firmly with your fingernail or a bone folder. Align edges exactly before pressing down.
Work in a quiet place to stay focused. Check each fold twice. Small errors can affect the final shape. Take your time with every step.
Marking And Cutting
Marking your paper helps guide your folds. Use a pencil to draw light lines. These lines should be faint and easy to erase. Avoid pressing too hard to prevent paper damage.
Cut paper only if the instructions say so. Use sharp scissors or a craft knife for clean edges. Cut on a cutting mat to protect surfaces. Smooth edges make folding easier and cleaner.
Basic Origami Folds
Basic origami folds form the foundation of every origami project. These simple techniques help shape paper into beautiful designs. Learning these folds makes creating an origami bookshelf easier and more fun.
Each fold changes the paper’s shape and structure. Understanding these folds gives better control over your model. Practice these basic folds to build confidence before starting your bookshelf.
Valley And Mountain Folds
Valley folds create a “V” shape by folding paper towards you. Imagine folding a paper strip to form a valley between two edges. This fold is simple but very useful.
Mountain folds are the opposite. You fold the paper away from you, forming a peak. It looks like a mountain ridge. These two folds often work together to create complex shapes.
Squash And Reverse Folds
Squash folds flatten a folded section by opening and pressing it down. This fold helps create flat surfaces and new shapes. It often follows a valley fold.
Reverse folds change the direction of a paper flap. You fold inside or outside along existing creases. This fold is important for shaping details like shelves and supports.
Creating The Bookshelf Base
Start by folding the paper carefully to form a strong base for the bookshelf. Make sure all edges align neatly to keep it stable. This base supports the entire structure, so take your time to get it right.
Folding The Main Frame
Start by selecting a large, sturdy sheet of paper. A square shape works best for balance.
Fold the paper in half vertically and then unfold to create a center crease. This crease guides your next folds.
Next, fold both sides toward the center crease, forming two equal panels. These panels form the main support.
Fold the bottom edge upward about one-third of the paper’s height. This forms the base of the bookshelf.
Make sure all folds are sharp and crisp. Use your fingernail or a flat tool to press the creases well.
Reinforcing The Structure
To strengthen the base, fold the corners inward. This creates triangular supports inside the frame.
Fold small flaps along the edges and tuck them inside the main frame. This locks the shape firmly.
Use extra sheets of paper to add layers to the base if needed. Layering adds strength and stability.
Press all folds firmly to secure the structure. A strong base prevents the bookshelf from collapsing.
Check that the base stands flat and steady. Adjust folds if it wobbles or leans.
Assembling The Shelves
Assembling the shelves is a key step in making your origami bookshelf. It turns flat paper into a sturdy structure. Careful folding and attaching create strong shelves that hold books well. Follow each step closely to ensure your bookshelf stands firm and looks neat.
Folding Shelf Sections
Start by folding the paper into equal sections. Use sharp creases to keep each fold clean. Fold each section along the marked lines, creating the shape of a shelf. Make sure the edges align perfectly. This precision helps the shelves fit together tightly. Repeat this for all shelf sections needed.
Attaching Shelves To The Base
Place the base on a flat surface before attaching shelves. Align each shelf section carefully with the base edges. Use glue or double-sided tape to fix the shelves in place. Press firmly to secure each connection. Allow time for the glue to dry fully. This step ensures your bookshelf stays strong and stable.

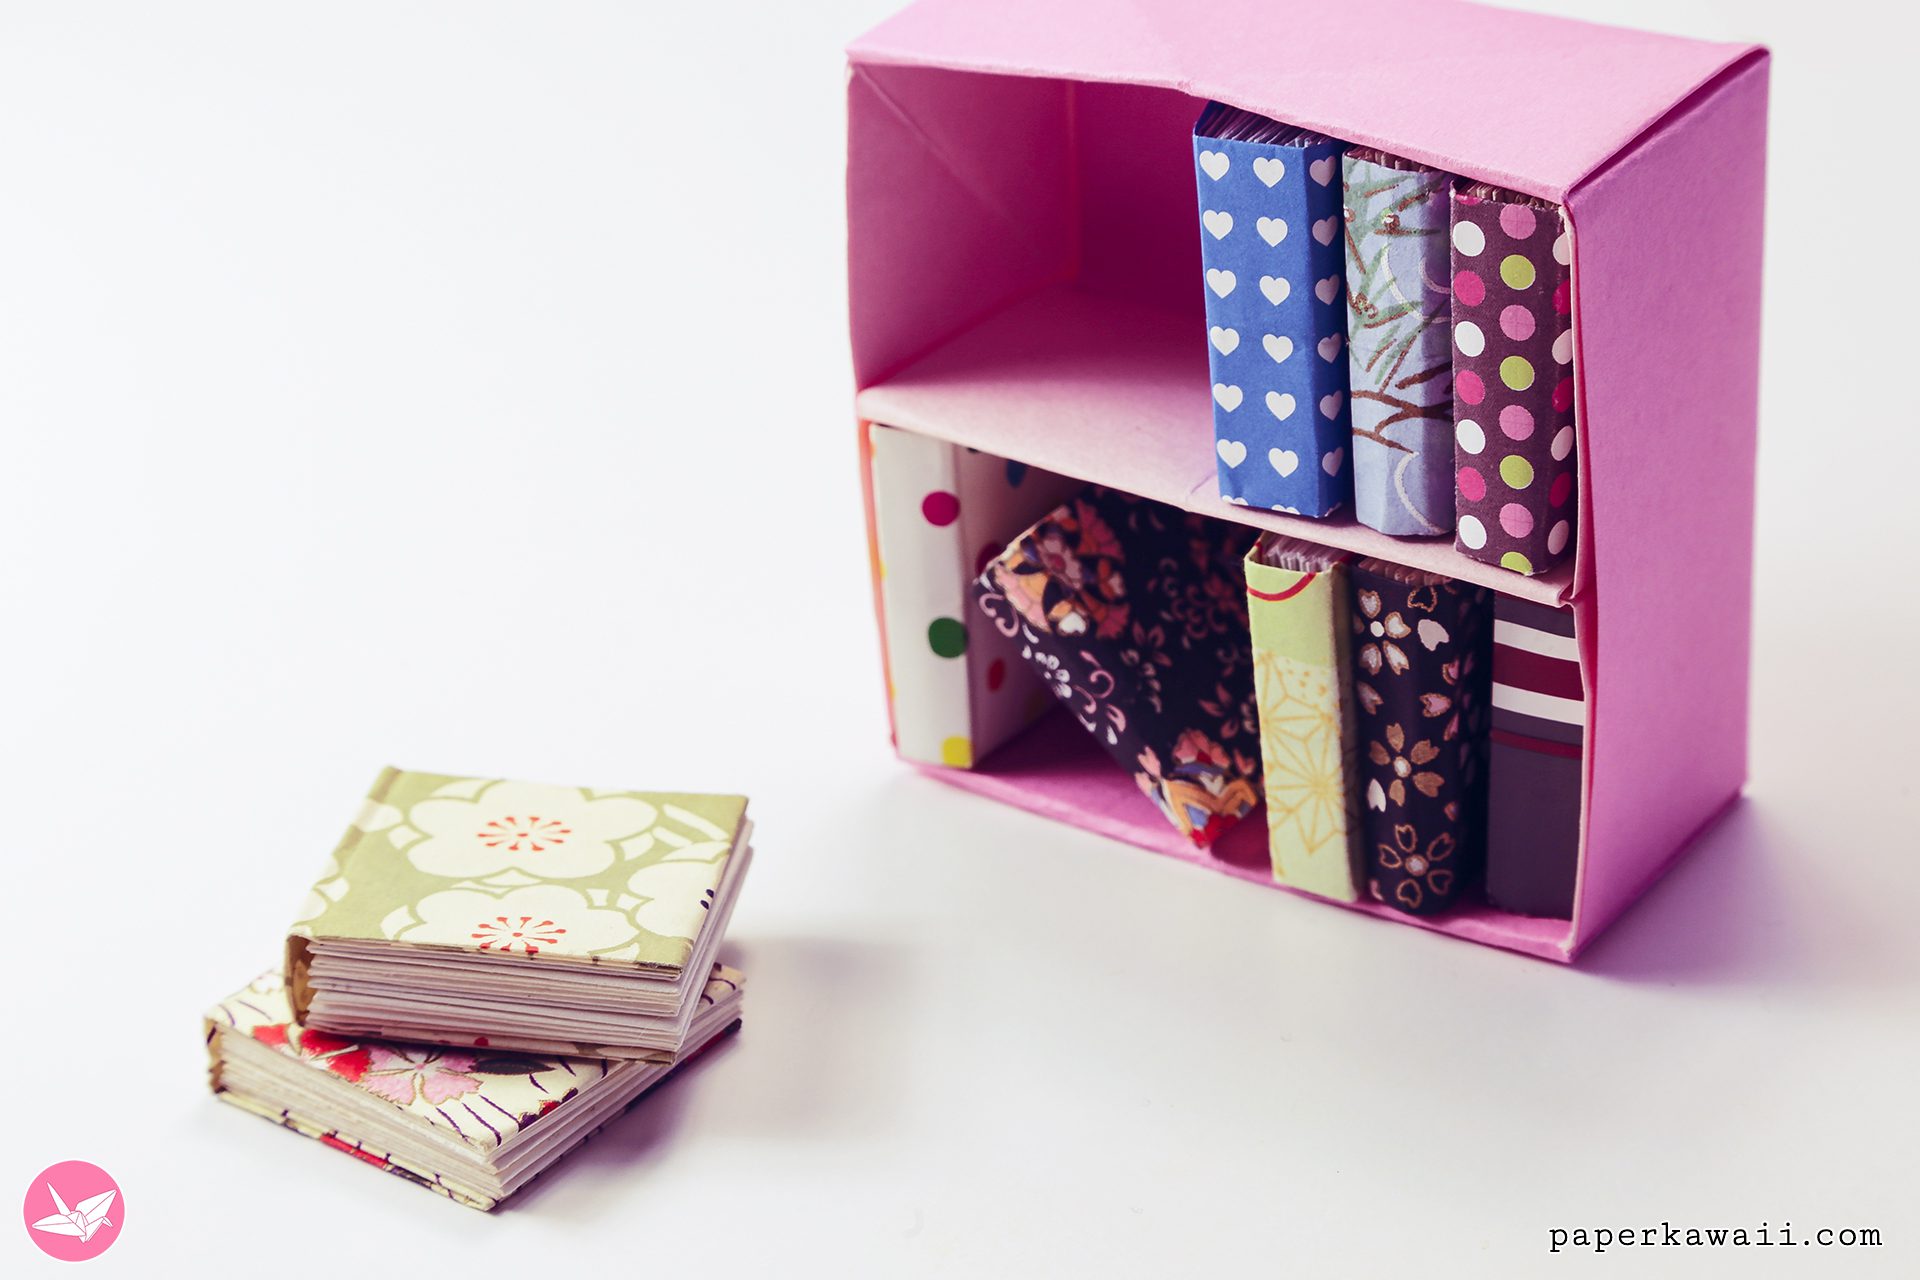
Credit: designoform.com
Adding Finishing Touches
Adding finishing touches gives your origami bookshelf a polished look. These final steps improve both style and function. Small details can make your creation stand out. Focus on decoration and stability for the best results.
Decorative Elements
Choose simple decorations that match your room’s style. Use colored paper or stickers to add flair. Small designs on edges bring life to plain surfaces. Paint or markers can highlight patterns or shapes. Keep decorations light to avoid weakening the paper.
Stabilizing The Bookshelf
Ensure your bookshelf holds books safely. Reinforce weak points with clear tape or glue. Attach small cardboard strips inside corners for extra strength. Avoid heavy materials that can bend the paper. Place the shelf on a flat surface to prevent tipping.
Tips For Display And Use
After you make your origami bookshelf, it is important to think about how to display and use it well. Proper placement helps your bookshelf look great and last longer. Good care keeps it strong and neat. These tips will help you enjoy your origami bookshelf every day.
Best Placement Ideas
Place your origami bookshelf where it gets little direct sunlight. Sun can fade colors and weaken paper. Choose a spot with steady, cool air but not too damp. Avoid areas near heaters or windows that open often.
Use your bookshelf for light items like small books, cards, or decorations. Heavy objects may cause it to lose shape. Keep it on a flat, stable surface. This stops it from tipping over or bending.
Think about viewing angles. Put the bookshelf where you can see it easily. It can be a nice decoration on a desk, shelf, or side table. A visible spot shows off your craft skills.
Maintaining Your Origami Bookshelf
Dust your bookshelf gently with a soft cloth or brush. Avoid wet cleaning which can damage the paper. Keep food and drinks away to prevent stains.
Check your bookshelf often for any weak spots or tears. Fix small problems quickly with glue or tape made for paper. This stops bigger damage later.
Store the bookshelf inside when not using it for a long time. Keep it in a dry, cool place to protect from moisture and heat. Good care keeps your origami bookshelf beautiful for years.
Frequently Asked Questions
What Materials Are Needed For An Origami Bookshelf?
You need sturdy paper or cardstock, a ruler, scissors, and glue. These materials ensure the bookshelf is durable and holds weight well. Optional tools include a bone folder for crisp folds and decorative paper for aesthetic appeal.
How Long Does It Take To Make An Origami Bookshelf?
It typically takes 30 to 60 minutes depending on your skill level. Beginners may take longer, while experienced folders can complete it faster. Patience is key for precise folds and assembling the bookshelf properly.
Can Origami Bookshelves Hold Real Books?
Origami bookshelves made from sturdy materials can hold lightweight books. However, they are best suited for small paperbacks or decorative items. For heavy or large books, consider reinforced designs or traditional shelves.
Is Origami Bookshelf Assembly Difficult For Beginners?
Assembly is straightforward with step-by-step instructions and practice. Beginners should follow each fold carefully and use quality paper for better results. Watching tutorial videos can also enhance understanding and reduce mistakes.
Conclusion
Creating an origami bookshelf is fun and simple to do. Follow each step with care and patience. Use the right paper for the best results. Enjoy folding and see your bookshelf take shape. This project adds a unique touch to your space.
Try making different sizes for variety. Keep practicing to improve your folding skills. Soon, you’ll have a cool, handmade bookshelf to show. Give it a try and enjoy the process. Crafting with paper can be both relaxing and rewarding.
