Are your bookshelf shelves feeling cluttered or messy? Making dividers for your bookshelf can change that fast.
With simple materials and easy steps, you can create neat sections that keep your books and items perfectly organized. Imagine opening your bookshelf and instantly finding what you need without any hassle. In this guide, you’ll discover how to make sturdy, stylish dividers that fit your space and style.
Ready to transform your bookshelf into a tidy, eye-catching display? Let’s get started!
Materials Needed
Before starting your bookshelf divider project, gather all necessary materials. Having the right materials makes the process easier and faster. It also ensures your dividers are strong and look good. Below are the key materials needed for this simple woodworking task.
Wood Types
Choose wood that fits your bookshelf style and budget. Pine is soft, easy to cut, and affordable. Oak is harder, durable, and has a nice grain. Plywood is smooth, flat, and cost-effective. Select wood thickness between 1/2 inch and 3/4 inch. This thickness balances strength and weight well.
Tools Required
Basic tools make the job safe and accurate. A saw, like a handsaw or jigsaw, cuts the wood pieces. Sandpaper smooths rough edges for a clean finish. A measuring tape helps to get exact sizes. A pencil marks cutting lines. Optionally, a drill makes holes for screws or dowels.
Additional Supplies
Glue provides extra hold between wood pieces. Clamps keep parts tight during drying. Screws or nails secure dividers firmly. Wood filler hides any gaps or nail holes. Paint or stain finishes the wood and protects it. Choose supplies that match your wood type for best results.
Choosing The Right Divider Style
Choosing the right divider style helps organize your bookshelf effectively. The style affects how your books and items fit and look. It also impacts the ease of use and flexibility of your shelf. Different styles suit different needs and tastes. Consider what you want to store and how often you change it. Think about the space and your personal style too.
Simple Vertical Dividers
Simple vertical dividers create neat, straight sections. They fit between shelves or stand on the base. These dividers hold books upright and prevent them from falling. They are easy to make with wood or sturdy cardboard. Simple shapes keep your shelf tidy and functional. This style works well for most bookshelves.
Adjustable Dividers
Adjustable dividers let you change sections anytime. They slide or clip into place without tools. This style suits people who add or remove books often. Adjustable dividers come in plastic, wood, or metal. They offer flexibility and save space. Choose adjustable dividers if you want a flexible shelf setup.
Decorative Options
Decorative dividers add style and character to shelves. They come in unique shapes, colors, and patterns. Use them to show personal taste and enhance room decor. Materials include painted wood, metal, or acrylic. Decorative dividers can also support items like plants or photos. Pick decorative options to make your bookshelf eye-catching.
Measuring Your Bookshelf
Measuring your bookshelf correctly is the first step to making perfect dividers. Accurate measurements ensure the dividers fit well and hold your books firmly. Take your time and use a reliable tape measure for best results.
Width And Height Measurements
Start by measuring the width of the shelf from one side to the other. Note the exact number in inches or centimeters. Next, measure the height from the bottom to the top inside the shelf. Record these numbers carefully. These measurements help you cut the dividers to the right size.
Spacing Considerations
Think about the size and number of books you want to store. Leave enough space between dividers for different book widths. Avoid making spaces too tight or too wide. Proper spacing keeps books upright and easy to access. Plan the divider placement before cutting the wood or material.

Credit: www.youtube.com
Cutting The Dividers
Cutting the dividers is a key step in making your bookshelf sturdy and organized. You need to cut the wood pieces to the right size. This ensures the dividers fit perfectly inside the shelf. Accurate cuts also give the bookshelf a neat look.
Use the right tools and techniques to cut safely. Careful cutting prevents mistakes and injuries. Take your time and follow safety rules strictly. This helps you get clean, straight edges on each divider.
Safe Cutting Techniques
Always wear safety goggles to protect your eyes. Use gloves to keep your hands safe from splinters. Keep your workspace clean and free of clutter. Secure the wood firmly before cutting. Avoid wearing loose clothes or jewelry near tools.
Check that your tools are sharp and in good condition. Dull blades can cause slips and rough cuts. Work in a well-lit area to see clearly. Take breaks if you feel tired to stay focused. Follow all safety instructions for the tools you use.
Using A Saw Properly
Choose the right saw for your wood type and thickness. A handsaw works well for small pieces. A circular saw or jigsaw suits larger or thicker wood. Measure twice, then mark the cut line clearly with a pencil.
Hold the saw steady and start cutting slowly. Keep your cutting hand firm but relaxed. Let the saw do the work without forcing it. Follow the marked line carefully to keep cuts straight. After cutting, sand the edges to smooth any rough spots.
Sanding And Finishing
Sanding and finishing are important steps in making dividers for a bookshelf. These steps help the wood feel smooth and look good. Sanding removes rough spots and prepares the surface for painting or staining. Finishing protects the wood from damage and makes it last longer.
Take your time sanding. It makes a big difference in the final look. Finishing adds color and shine, giving your dividers a polished touch.
Sanding Tips
Start sanding with coarse sandpaper to remove big bumps. Use fine sandpaper after to smooth the surface. Always sand along the wood grain. This prevents scratches and keeps the wood looking natural. Clean dust with a cloth before finishing.
Painting And Staining
Choose paint or stain based on the look you want. Paint covers the wood completely and hides grain. Stain brings out the wood’s natural patterns. Apply thin coats and let each dry well. Seal with a clear finish to protect your work.

Credit: www.reddit.com
Installing The Dividers
Installing dividers in your bookshelf helps organize your books and items better. This step needs care to keep the dividers sturdy and aligned. Choose the right method based on your tools and shelf material. Follow simple steps for a neat finish and lasting hold.
Attaching With Nails Or Screws
Use small nails or screws to fix the dividers firmly. Pre-drill holes to avoid splitting the wood. Drive nails or screws slowly to keep the divider straight. This method gives a strong hold for heavy books or items. Check the alignment before fully tightening the screws or nails.
Using Adhesive Options
Apply wood glue or strong adhesive for a clean, nail-free look. Spread glue evenly on the divider edges that touch the shelf. Press the divider firmly and hold it in place for several minutes. Use clamps for better grip while the glue dries. Adhesive works well on smooth surfaces and light loads.
Ensuring Stability
Check the divider for any movement after installation. Add extra support like corner brackets if needed. Make sure the divider stands straight and level. Test by placing books or objects against it gently. Proper stability prevents wobbling and keeps your shelf tidy.
Customizing Your Dividers
Customizing your bookshelf dividers lets you personalize your space. It helps keep your books organized and visually appealing. You can make dividers that match your room style and meet your needs.
Simple changes can make a big difference. From adding colors to labels, customization makes your bookshelf unique. Here are some easy ways to enhance your dividers.
Adding Decorative Elements
Decorative elements make dividers stand out. Paint your dividers with bright or soft colors. Use patterns like stripes or dots for a fun look. You can also stick washi tape or decals on them. These small touches add character without much effort.
Try using different materials like fabric or paper to cover dividers. It gives texture and a cozy feel. Choose colors that match your room’s theme. Keep it simple for a clean look or bold for a statement piece.
Labeling Sections
Labels help find books quickly. Use simple words or numbers to name each section. Write labels on small tags or directly on the divider. Use a clear, easy-to-read font or handwriting.
Try chalkboard paint on the divider for reusable labels. You can change names anytime without hassle. Labeling makes your bookshelf more practical and tidy. It also helps everyone know where to put books back.
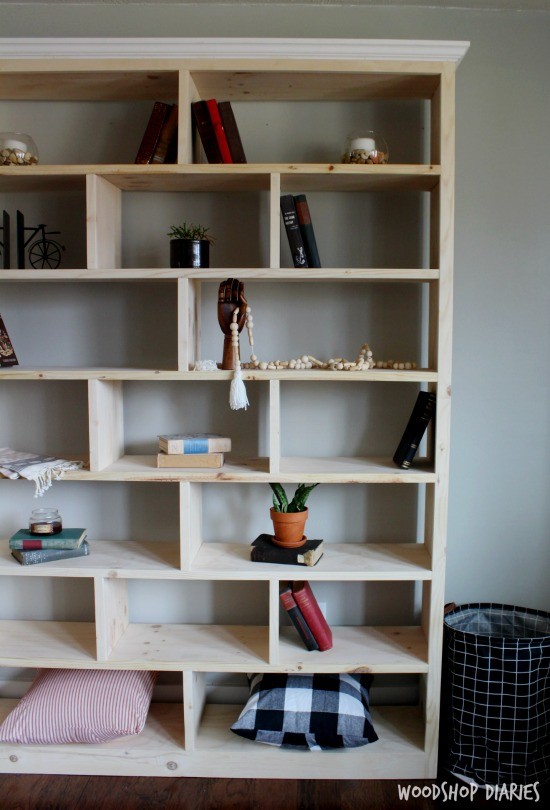
Credit: www.woodshopdiaries.com
Maintenance Tips
Maintaining your bookshelf dividers keeps them looking good and lasting longer. Simple care steps help avoid damage and keep shelves neat. Regular upkeep saves time and money on repairs. Follow these tips to keep your dividers in top shape.
Cleaning
Dust dividers often with a soft cloth. Use a damp cloth for tougher dirt. Avoid harsh chemicals that can damage the material. Dry the dividers well to stop water marks. Clean shelves regularly to prevent dust buildup.
Repairing Damage
Check dividers for cracks or chips often. Small cracks can be fixed with wood glue or filler. Sand rough edges gently to avoid splinters. Replace dividers that are badly damaged. Quick repairs keep your bookshelf safe and tidy.
Frequently Asked Questions
What Materials Are Best For Making Bookshelf Dividers?
Wood, acrylic, and metal are popular materials for bookshelf dividers. Wood offers durability and aesthetic appeal. Acrylic is lightweight and modern-looking. Metal provides strength and a sleek design. Choose materials based on your shelf style and the weight of items you’ll separate.
How Do I Measure Dividers For My Bookshelf?
Measure the height and depth of your bookshelf compartments first. Subtract about a quarter inch for easy fitting. Ensure dividers fit snugly to stay stable. Accurate measurements prevent gaps and provide better book organization.
Can I Make Adjustable Dividers For Different Shelf Sizes?
Yes, adjustable dividers can be made using sliding tracks or removable inserts. This allows customization for various book sizes. Adjustable dividers improve flexibility and maximize storage efficiency. Use materials like wood or plastic for easy modifications.
What Tools Do I Need To Create Bookshelf Dividers?
Basic tools include a saw, measuring tape, pencil, and sandpaper. For precise cuts, a miter saw or jigsaw is helpful. Use clamps to hold pieces while gluing or screwing. These tools ensure clean, safe, and professional results.
Conclusion
Making dividers for your bookshelf can be simple and fun. You only need a few materials and some basic steps. Dividers help keep books neat and easy to find. You can customize them to fit your shelf size and style.
Try different designs to see what works best. This small project makes your space look tidy and organized. Give it a try and enjoy your clutter-free bookshelf!