Imagine having a bookshelf that looks like it’s floating on your wall—sleek, modern, and perfect for showing off your favorite books and decor. You might think building one is tricky or expensive, but it’s actually easier than you expect.
In this guide, you’ll discover simple steps to create your own floating bookshelf that fits your space and style. Ready to transform your room and impress your guests? Let’s get started!

Credit: www.instructables.com
Materials Needed
Gathering the right materials is the first step to build a floating bookshelf. Choosing quality items helps the shelf last longer and hold weight safely.
Here is a clear list of what you need. Each part plays a role in the final shelf’s strength and look.
Wood Selection
Select wood that is strong and smooth. Pine and oak are good choices. Pine is affordable and easy to cut. Oak is harder and lasts longer. Avoid soft or crumbly wood. Check for cracks or knots. These can weaken the shelf.
Tools Required
Use a drill for making holes. A level helps keep the shelf straight. Sandpaper smooths rough edges. A saw cuts the wood to size. A screwdriver secures screws tightly. A tape measure gives exact lengths. These tools ensure your shelf fits and looks good.
Additional Supplies
Buy screws that match your wood thickness. Wall anchors keep the shelf stable on drywall. Wood glue adds extra hold between pieces. Paint or varnish protects and finishes the wood. Choose supplies that fit your style and room decor.
Choosing The Location
Choosing the right location is key for a floating bookshelf. The spot you pick affects how strong the shelf will be and how good it looks. Think about the wall, the space, and where the shelf fits best in the room.
Wall Type Considerations
Not all walls hold weight the same way. Drywall alone may not support heavy books. Stud walls are stronger and hold shelves better. Concrete or brick walls need special anchors. Check your wall type before you start drilling.
Measuring Space
Measure the space carefully. Know the width and height available. Leave some room around the shelf for a neat look. Use a tape measure for exact numbers. Mark the spot lightly with a pencil.
Placement Tips
Place the shelf at eye level for easy reach. Avoid spots near doors or windows to prevent damage. Think about the room’s flow and furniture layout. A well-placed shelf adds style and function to your space.
Preparing The Wood
Preparing the wood is an essential step before building your floating bookshelf. It ensures the wood looks great and lasts long. Proper preparation helps the shelf fit perfectly and hold your books safely. Take your time with these steps to get the best results.
Cutting To Size
Start by measuring the wood carefully. Mark the dimensions clearly on the board. Use a saw to cut the wood to the right size. Keep your cuts straight and clean. This makes the shelf look neat and fit well on the wall.
Sanding And Smoothing
Sand all surfaces to remove rough spots and splinters. Use medium-grit sandpaper first, then fine-grit for a smooth finish. Sand the edges well to avoid sharp corners. Smooth wood feels better and looks more professional.
Staining Or Painting
Choose a stain or paint color that matches your room. Apply evenly with a brush or cloth. Let the wood dry completely between coats. This protects the wood and gives your shelf a nice, clean look.
Installing The Brackets
Installing the brackets is a key step in making a floating bookshelf. This step holds the shelf securely on the wall. Proper bracket installation ensures your shelf stays sturdy and safe for your books.
Finding Studs
Studs are the wooden beams inside your wall. They provide strong support for heavy items. Use a stud finder tool to locate these beams. Move the tool slowly along the wall. Mark the spots where it signals a stud. Brackets should attach to these studs for maximum strength.
Marking Drill Points
Hold the bracket against the wall at the stud marks. Use a pencil to mark the holes on the wall. Make sure the bracket is level before marking. Double-check the positions so the shelf will be straight. Accurate marks help drill holes in the right place.
Securing Brackets
Drill pilot holes at the marked points carefully. Align the bracket with the holes. Use screws to secure the bracket firmly to the wall. Tighten screws but avoid over-tightening to prevent damage. Check the bracket’s stability before placing the shelf.
Mounting The Shelf
Mounting the floating bookshelf is an important step. It makes sure the shelf is safe and looks great on your wall.
Follow these steps carefully to mount your shelf correctly. This will help your books stay secure and your shelf stay level.
Aligning The Shelf
Start by holding the shelf against the wall. Use a level to check if it is straight. Mark the wall where the brackets will go. Make sure the marks match the bracket holes exactly.
Securing The Shelf To Brackets
Place the brackets on the wall using your marks. Drill holes for the screws carefully. Use anchors if the wall is drywall. Tighten the screws to hold the brackets firmly. Slide the shelf onto the brackets slowly.
Checking Stability
Press down gently on the shelf. Watch for any movement or wobbling. If it moves, tighten the screws more. Add extra support if needed. Your shelf should feel strong and steady before placing books on it.

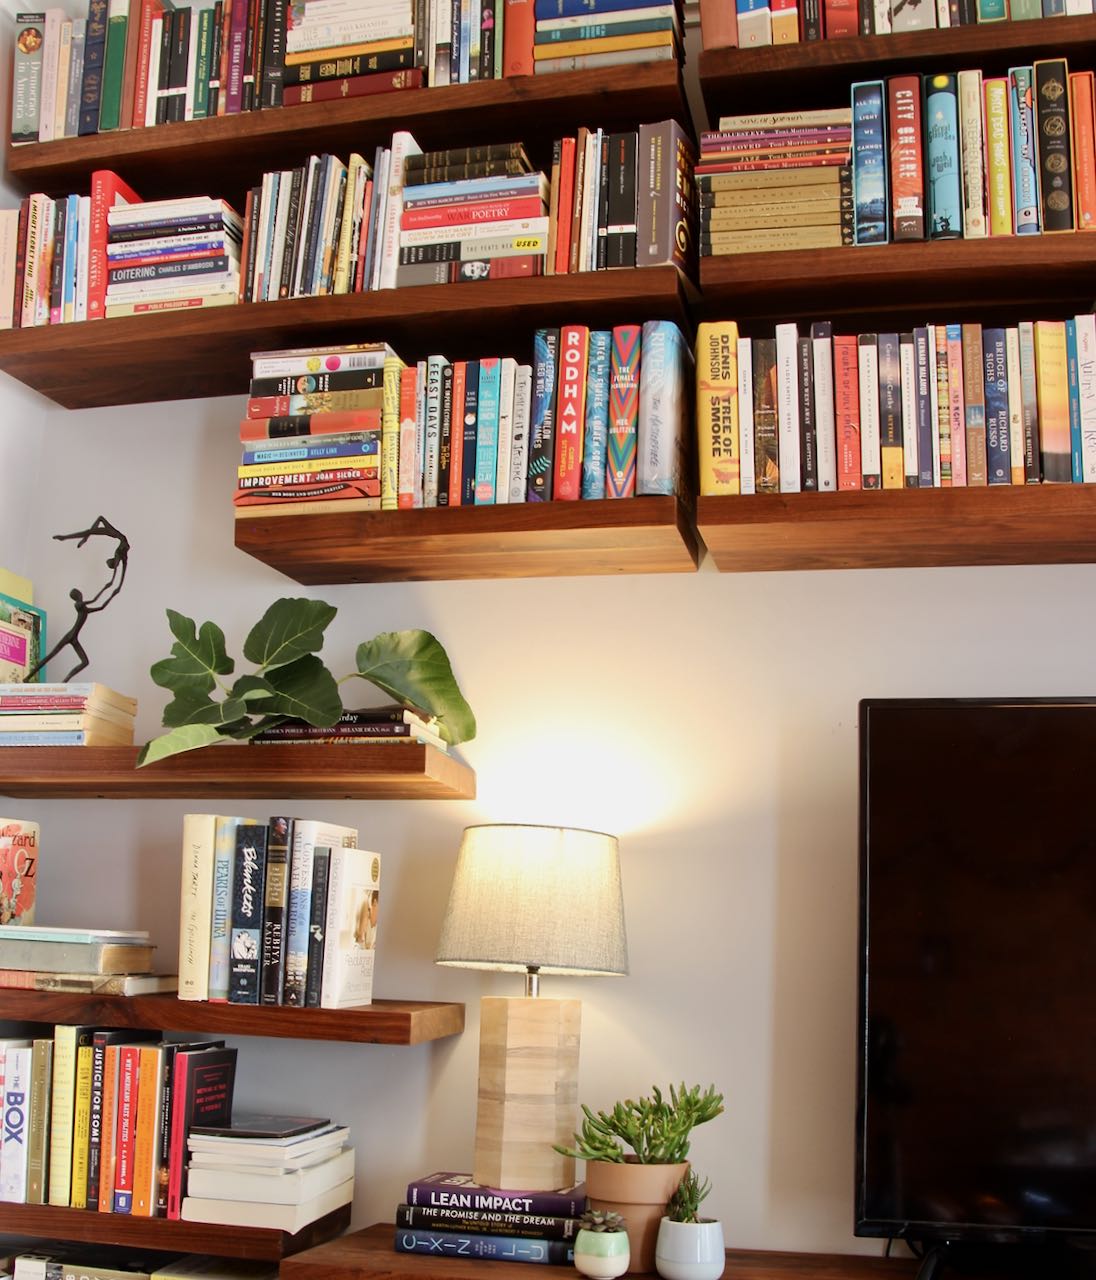
Credit: www.uglyducklinghouse.com
Decorating Your Shelf
Decorating your floating bookshelf makes it more than a place for books. It becomes a part of your room’s style. Careful decoration adds charm and personality.
Use simple ideas to create a neat and attractive look. Balance between books and decorative items is key.
Arranging Books
Place books by size or color for a tidy look. Stack some books horizontally to create variety. Leave some space between books to avoid crowding. Show off favorite book covers by facing them outward.
Adding Decorative Items
Mix small plants, candles, or photo frames with books. Use items that match your room’s style and colors. Avoid too many decorations to keep the shelf clean. Small sculptures or souvenirs add a personal touch.
Maintaining The Shelf
Dust your shelf and items regularly to keep them fresh. Check the shelf’s brackets to ensure they stay strong. Rearrange items every few weeks to keep the look new. Avoid overloading the shelf to prevent damage.
Troubleshooting Tips
Troubles with floating bookshelves can frustrate any DIY enthusiast. Small problems may stop your shelf from working well or looking good. This section helps solve common issues fast and easily. Use these tips to keep your project smooth and your shelf strong.
Fixing Wobbly Shelves
Wobbly shelves often mean loose screws or weak brackets. Tighten all screws using a screwdriver. Check the shelf level with a spirit level. Add extra wall anchors if needed. Use stronger brackets for heavy books. Make sure the shelf fits tightly against the wall. This stops shaking and improves safety.
Dealing With Wall Damage
Drilling holes can cause wall cracks or chips. Use a wall patch kit to fill holes. Sand the patch smooth after drying. Paint over the patch to match the wall color. Choose the right drill bit for your wall type. Avoid hitting wires or pipes behind the wall. This keeps your wall safe and neat.
Extending Shelf Length
Longer shelves hold more books but need more support. Use thicker wood for the shelf board. Add extra brackets spaced evenly along the shelf. Attach brackets into wall studs for strength. Avoid overloading the shelf with heavy items. This keeps the shelf stable and prevents sagging.
Credit: southhousedesigns.com
Frequently Asked Questions
What Materials Do I Need To Make A Floating Bookshelf?
You need wood boards, wall anchors, screws, a drill, a level, and brackets. Choose sturdy wood like pine or oak. Quality materials ensure strong, durable shelves that hold books securely.
How Do I Install A Floating Bookshelf On Drywall?
Locate wall studs using a stud finder. Drill pilot holes and use heavy-duty anchors for extra support. Attach brackets to studs for maximum strength and stability.
Can I Customize The Size Of My Floating Bookshelf?
Yes, you can cut wood to any size. Measure your wall space carefully before cutting. Custom sizes fit your room perfectly and display your books beautifully.
How Much Weight Can A Floating Bookshelf Hold?
Weight capacity depends on wood thickness and bracket strength. Proper installation can support 20-50 pounds per shelf. Always use strong anchors and sturdy materials for safety.
Conclusion
Creating a floating bookshelf is a simple and fun project. It saves space and adds style to any room. You only need basic tools and some patience. Follow the steps carefully to get strong, neat shelves. Enjoy your new bookshelf that looks like it floats on the wall.
It holds your books and shows your creativity. Try making one today and see how it changes your space. A small project with a big impact.