Are you looking for a smart way to save space while adding a unique piece of furniture to your home? Imagine turning your ordinary bookshelf into a fold-out table that opens up when you need it and tucks away neatly when you don’t.
This clever DIY project not only maximizes your room but also gives you a stylish, functional spot for work, meals, or hobbies. You’ll discover simple steps and handy tips to transform your bookshelf into a fold-out table that fits perfectly into your lifestyle.
Ready to create something both practical and eye-catching? Let’s get started!
Choosing The Right Bookshelf
Choosing the right bookshelf is key for a fold out table project. The bookshelf must support the table’s weight and fit your space. It should look good and last long. Picking the right one makes your fold out table safe and useful.
Size And Material Considerations
Pick a bookshelf that fits your room size. It should not be too big or too small. The shelf’s width and height matter for the table size. Solid wood shelves work best for strength. Avoid particle board as it can break easily. Metal or sturdy plywood are good options too. The material affects the table’s look and durability.
Weight Capacity And Stability
The bookshelf must hold the table and items on it. Check how much weight the shelf can carry. Strong shelves have thick boards and solid joints. Look for shelves with a firm base to stop wobbling. Stability keeps the fold out table safe during use. Test the shelf by pressing on it before building.
Gathering Materials And Tools
Before starting your fold out table project, gather all necessary tools and materials. This step saves time and makes the building process smooth. Having everything ready helps avoid interruptions and frustration. Focus on quality tools and materials for better results. Let’s look at the essential tools and materials needed for your fold out table from a bookshelf.
Essential Tools List
- Screwdriver (manual or electric)
- Drill with drill bits
- Measuring tape
- Level
- Hammer
- Wood screws
- Sandpaper or sanding block
- Pencil
- Clamps
- Safety goggles
Materials For The Fold Out Mechanism
- Strong hinges (preferably piano hinges)
- Wood panels for the table surface
- Support brackets or folding brackets
- Wood glue
- Paint or wood finish (optional)
- Small wooden blocks for support
- Bookshelf ready to transform
Planning The Fold Out Table Design
Planning the fold out table design is the first step in turning a bookshelf into a useful table. Good planning saves time and effort during the build. It helps to avoid mistakes and creates a sturdy, functional piece.
Consider the space where the table will be placed. Think about how much room you have and the size of the table you need. Also, decide how the table will fold and unfold. These details affect the design and the materials you choose.
Measuring And Marking
Start by measuring the bookshelf’s height, width, and depth. Note these dimensions carefully. Measure the wall space around the bookshelf. This helps to know how much the table can extend.
Mark the points where the table will attach to the bookshelf. Use a pencil to make light marks. Double-check all measurements before cutting or drilling. Precise marks guide the build and ensure smooth folding.
Selecting The Tabletop Surface
Choose a tabletop surface that matches the bookshelf’s style and strength. Lightweight wood or plywood works well. It should be strong enough to hold books or a laptop.
Consider the finish of the tabletop. A smooth, painted, or varnished surface looks neat and is easy to clean. Avoid heavy or thick materials that make folding difficult.

Credit: www.atthepicketfence.com
Building The Fold Out Mechanism
Building the fold out mechanism is the key part of turning a bookshelf into a table. It allows the tabletop to fold out smoothly and stay stable when used. This section explains how to set up the hinges and support brackets correctly. These parts make sure the table works well and lasts long.
Installing Hinges
Start by choosing strong hinges that can hold the table weight. Position the hinges along the edge of the bookshelf where the table will fold out. Mark the screw holes with a pencil for easy drilling. Use a drill to make pilot holes, preventing wood from splitting. Attach the hinges tightly with screws. Check that the tabletop folds out and folds back easily without wobbling.
Adding Support Brackets
Support brackets keep the table stable when folded out. Pick brackets that fit the size and weight of your fold out table. Attach one side of the bracket to the bookshelf frame. Fix the other side to the underside of the tabletop. Make sure brackets lock in place when the table is open. This stops the table from collapsing during use. Test the table by placing weight on it to confirm strong support.
Attaching The Tabletop
Attaching the tabletop to the bookshelf is the key step in building a fold-out table. This step ensures your table is stable and folds smoothly. A well-attached tabletop gives you a functional and neat workspace. It requires careful measuring and fixing to hold the weight and fold easily.
Securing The Tabletop To The Bookshelf
Start by placing the tabletop on the bookshelf’s edge. Align it so the front edge is even with the shelf’s front. Use a pencil to mark where the hinges will go. Choose strong hinges made for folding furniture. Screw the hinges firmly to the tabletop first. Then attach the other side of the hinges to the bookshelf. Double-check the screws are tight. This prevents the tabletop from wobbling or falling.
Ensuring Smooth Folding Action
Test the folding action by lifting the tabletop up and down. It should move easily without sticking or wobbling. If it feels stiff, check the hinges and screws. Lubricate the hinges with a little oil to help smooth movement. Make sure nothing blocks the tabletop from folding flat against the bookshelf. Adjust the hinges or screws if needed. A smooth fold keeps your space tidy and the table ready to use.
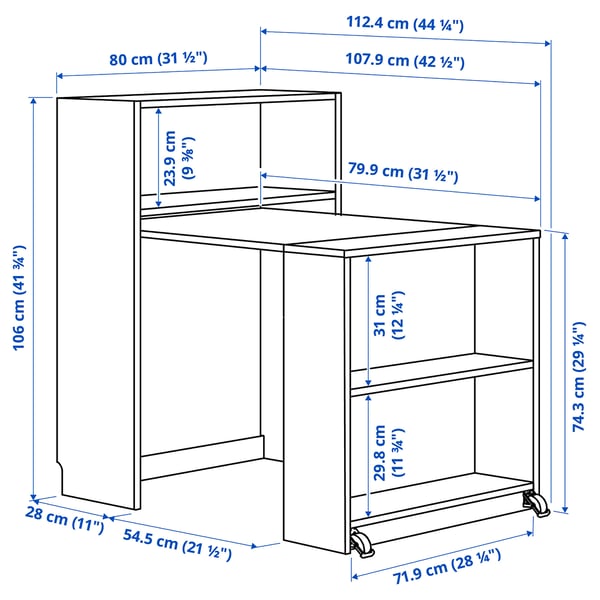
Credit: www.ikea.com
Finishing Touches
Finishing touches make your fold out table look complete and polished. They protect the wood and keep the table safe to use. This step adds charm and durability to your project.
Careful finishing gives your table a smooth feel. It helps the paint or stain stick better. Safety features prevent accidents and make the table user-friendly.
Sanding And Painting
Start by sanding all surfaces with fine-grit sandpaper. This removes rough spots and splinters. Wipe away dust with a clean cloth. Choose paint or stain that suits your room’s style. Apply thin coats for an even finish. Let each coat dry before the next. Painting protects the wood from moisture and wear. It also gives the table a fresh, clean look.
Adding Safety Features
Check all edges and corners for sharp spots. Sand them smooth to avoid injuries. Install rubber bumpers or felt pads under the table. These protect floors and prevent slipping. Use strong hinges and locks to secure the fold-out part. Test the table for stability before use. Safety features help the table last longer and keep users safe.
Tips For Maintenance And Use
Keeping your fold out table from a bookshelf in good shape takes some care. Regular upkeep helps the table stay strong and useful for years. Simple habits make a big difference in its durability and function.
Regular Checks And Repairs
Look over the table often. Check the hinges and screws for tightness. Loose parts can cause wobbling or damage. Tighten screws with a screwdriver as needed. Watch for cracks or splits in the wood. Small cracks can grow if not fixed. Use wood glue to seal cracks quickly. Replace any broken parts to keep the table safe.
Maximizing Space Efficiency
Keep the area around the table clear. This allows you to open and close it smoothly. Store only light items on the shelf above. Heavy items can stress the table structure. Use the table surface wisely. Fold it out only when needed. Fold it back to save space after use. This keeps your room tidy and spacious.

Credit: do-it-cat.com
Frequently Asked Questions
How Do I Start Making A Fold Out Table From A Bookshelf?
Begin by selecting a sturdy bookshelf with enough depth. Measure and plan the table size. Gather materials like hinges, screws, and a support bracket before starting the assembly.
What Tools Are Needed To Build A Fold Out Table?
You’ll need a drill, screwdriver, measuring tape, level, saw, and hinges. These tools help attach the table securely and ensure it folds smoothly.
How To Attach The Fold Out Table To The Bookshelf?
Use strong hinges to connect the table surface to the bookshelf edge. Secure the hinges with screws and add a support bracket underneath for stability.
Can I Customize The Size Of The Fold Out Table?
Yes, customize the table size based on your bookshelf dimensions. Measure carefully to ensure it folds neatly and fits your space perfectly.
Conclusion
Creating a fold-out table from a bookshelf saves space and adds function. This project fits small rooms and busy homes well. You only need basic tools and a bit of time. The steps are clear and easy to follow. You can customize the table size and style as you like.
Try this idea to make your room more useful. It brings simplicity and smart design together. Give it a go and enjoy your new fold-out table!