Are you looking to add a stylish and personal touch to your home? Making a homemade console table might be the perfect project for you.
Imagine having a unique piece that fits your space perfectly and shows off your creativity. In this guide, you’ll discover simple steps to build a beautiful console table with your own hands. Whether you’re a beginner or have some experience, you’ll find easy tips and tricks that make the process enjoyable and rewarding.
Ready to transform your space and impress your guests? Let’s get started!
Choosing The Right Materials
Choosing the right materials is key to making a strong and beautiful console table. The materials affect how the table looks and lasts. Picking good wood and having the right tools makes the building process easier. This section guides you through selecting wood and gathering supplies for your project.
Selecting Wood Types
Choose wood that fits your style and budget. Pine is soft, easy to work with, and affordable. Oak is hard and durable, good for long-lasting furniture. Walnut offers rich color and a smooth finish. Consider wood grain and color to match your room décor. Avoid wood with many knots or cracks. These can weaken the table and spoil the look.
Gathering Tools And Supplies
Get all tools before starting. A saw is needed to cut wood pieces. Sandpaper smooths rough edges for a clean finish. Wood glue and screws hold parts firmly together. A drill helps make holes and secure screws quickly. A measuring tape ensures exact cuts. Paint or stain adds color and protection. Prepare a safe workspace with good lighting.

Credit: farmhouseishblog.com
Designing Your Console Table
Designing your console table is the first step in making a piece that fits your space and style. A well-planned design saves time and materials. It also helps you build a table that looks great and works well.
Focus on clear ideas and simple plans. This way, your project will be easier and more fun to complete.
Deciding On Dimensions
Start by measuring the space where you want your console table. Note the height, width, and depth that fit best. Keep in mind the table should not block walkways or doors. Choose sizes that allow enough room for decorations or storage on top. A common height is about 30 inches. Depth usually ranges from 12 to 18 inches. Width depends on the wall space available.
Sketching A Simple Plan
Draw a basic sketch of your console table on paper. Include the top, legs, and any shelves. Mark the dimensions you decided earlier. Keep the design simple to avoid confusion. Use straight lines and clear labels. This plan guides you during cutting and assembly. It also helps you spot any design problems early.
Preparing The Wood
Preparing the wood is the first step in making a beautiful console table. Good preparation ensures strong joints and a smooth finish. It helps your project look neat and last longer. Follow these simple steps to get the wood ready for assembly.
Measuring And Marking
Measure each piece of wood carefully. Use a tape measure and a pencil for clear marks. Mark all cut lines clearly to avoid mistakes. Double-check measurements before cutting. Accurate marks save time and wood.
Cutting Pieces Accurately
Cut the wood pieces along the marked lines. Use a saw that suits the wood type and size. Take your time to follow the lines closely. Straight cuts make assembly easier and stronger. Keep your hands steady and safe.
Sanding For Smoothness
Sand each wood piece to remove rough edges and splinters. Use medium-grit sandpaper first, then fine-grit for a smooth touch. Smooth wood helps paint or stain stick better. It also feels better to touch and looks nice.
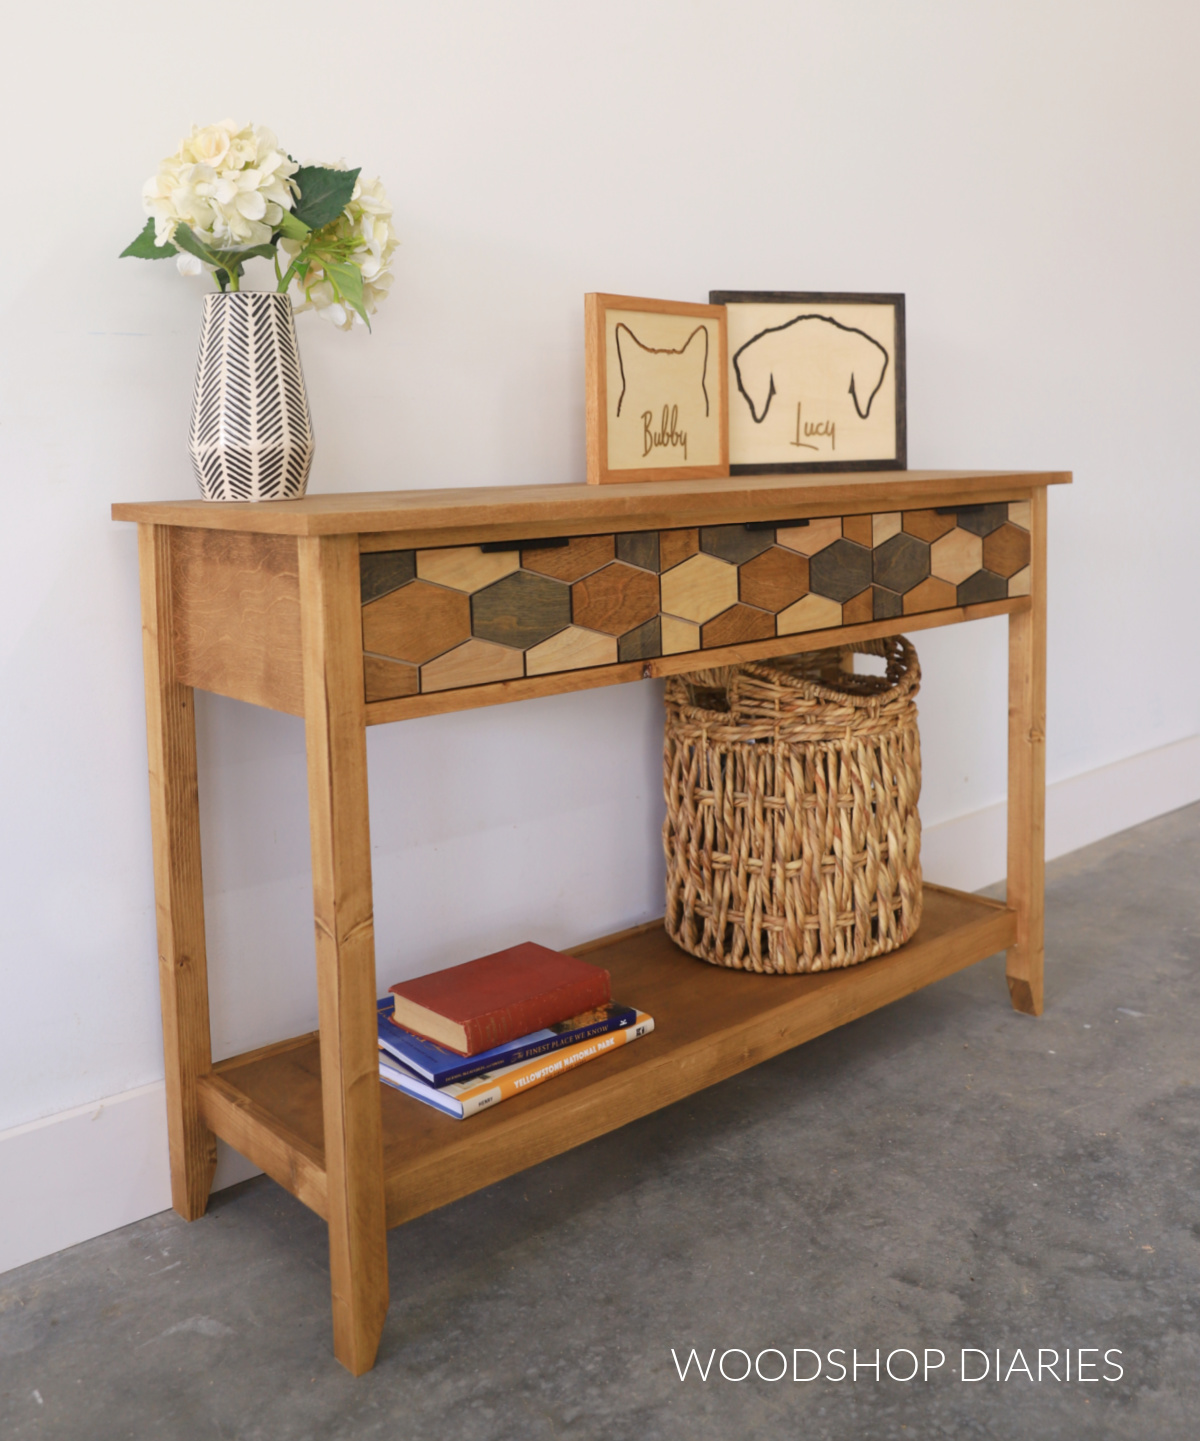
Credit: www.woodshopdiaries.com
Assembling The Table Frame
Assembling the table frame is an important step in making your homemade console table. This part shapes the table’s strength and look. Take your time to follow each step carefully. A solid frame means a durable table that lasts long.
Joining Legs And Supports
Start by attaching the legs to the side supports. Use wood glue and screws for a strong bond. Drill pilot holes before screwing to avoid splitting the wood. Make sure the legs are straight and aligned. Check the height of each leg to keep the table even. Tighten all screws firmly but do not over-tighten.
Ensuring Stability
Add cross supports between the legs for extra strength. These help prevent wobbling and keep the frame steady. Measure and cut the supports to fit snugly. Attach them with screws and glue at the right spots. Test the frame by pressing gently on different parts. Fix any loose joints before moving on.
Attaching The Tabletop
Attaching the tabletop is a key step in building your homemade console table. It gives your table its final shape and strength. You want the tabletop to sit firmly and look even. Taking care here ensures the table lasts long and looks great.
Aligning The Surface
Place the tabletop upside down on a soft surface. This prevents scratches or dents. Position the table base carefully on top. Check that the edges of the tabletop line up with the legs or frame. Use a measuring tape to confirm equal gaps on all sides. Adjust the base until it sits perfectly centered. Tight alignment makes the table stable and neat.
Securing With Screws Or Nails
Choose screws for a stronger hold, or nails for quick fastening. Pre-drill holes to avoid wood splitting. Drill through the base into the tabletop at regular intervals. Use a screwdriver or drill to drive screws in firmly. Countersink screws slightly below the surface for a smooth finish. If using nails, hammer them gently to avoid wood damage. Double-check the tabletop is firmly attached and does not wobble.
Finishing Touches
Finishing touches make your homemade console table look complete and polished. They protect the wood and bring out its beauty. Taking time on these steps improves the table’s durability and style.
Applying Paint Or Stain
Choose paint or stain based on the look you want. Paint offers bright colors and hides wood grain. Stain shows the natural wood texture and adds warmth. Use a brush or cloth for smooth, even coverage. Apply thin coats and let each dry fully before the next. Sand lightly between coats for a clean finish.
Adding Protective Coating
Protective coating guards against scratches and spills. Clear varnish or polyurethane works well for console tables. Apply with a clean brush in long, even strokes. Let the first coat dry, then sand lightly. Add a second coat for better protection. This step keeps your table looking new longer and easier to clean.
Tips For Maintenance
Keeping your homemade console table in great shape takes a little care. Small steps can protect your table’s look and strength over time. Regular upkeep makes your project last longer and stay beautiful.
Cleaning Regularly
Dust your console table often. Use a soft cloth to avoid scratches. Wipe spills quickly to stop stains. Avoid harsh cleaners that can damage the wood. Mild soap and water work well for most surfaces. Dry the table after cleaning to stop water marks.
Handling Minor Repairs
Fix small scratches with a wood touch-up marker. Tighten loose screws or bolts to keep the table steady. Use wood glue to fix small cracks. Sand rough spots gently before applying finish. Repairing early prevents bigger damage later.

Credit: farmhouseishblog.com
Frequently Asked Questions
What Materials Do I Need For A Homemade Console Table?
You need wood planks, screws, sandpaper, wood glue, paint or stain, and tools like a saw and drill. Choose quality wood for durability and a smooth finish.
How Long Does It Take To Build A Console Table?
Building a console table typically takes 4 to 6 hours. This depends on your skill level and drying time for paint or stain.
Can I Customize The Size Of My Console Table?
Yes, you can adjust the dimensions to fit your space. Measure the area carefully before cutting materials for a perfect fit.
What Type Of Wood Is Best For A Console Table?
Hardwoods like oak, maple, or walnut are ideal due to strength and appearance. Softwoods like pine are budget-friendly but less durable.
Conclusion
Making a homemade console table is a fun and rewarding project. It adds style and function to any room. You can choose the size, color, and design you like. Using simple tools and materials saves money. Plus, creating your own furniture gives pride and joy.
Try this project step by step, and enjoy your new console table. It fits your home perfectly and shows your creativity. Start building today and see the difference it makes!