Are you tired of cluttered spaces and looking for a quick way to organize your books and decor? Making a simple bookshelf might be easier than you think.
Imagine having a sturdy, stylish shelf that fits perfectly in your room—built by you, just the way you want it. In this guide, you’ll discover easy steps to create your own bookshelf without needing special skills or expensive tools. Keep reading, and you’ll soon have a practical, beautiful addition to your home that you can be proud of.
Choosing Materials
Choosing the right materials is key to making a simple bookshelf. The materials affect how strong and good-looking your shelf will be. You want materials that are easy to work with and fit your budget. This section covers wood types, tools, and extra supplies.
Types Of Wood
Wood choice shapes your shelf’s look and strength. Pine is soft and easy to cut. It suits beginners and costs less. Oak is harder and lasts longer. It looks great but costs more. Plywood is made of wood layers glued together. It is stable and good for shelves. MDF is smooth and cheap but not very strong. Pick wood based on your skill and budget.
Required Tools
Tools help you cut and join wood parts. A saw cuts wood to size. A drill makes holes for screws. Screwdrivers tighten screws. A measuring tape keeps your cuts accurate. Sandpaper smooths rough edges. Clamps hold pieces while you work. These tools make building easier and safer.
Additional Supplies
Screws and nails hold the shelf together. Wood glue strengthens joints. Paint or stain changes the shelf color. Brushes or rollers apply paint evenly. Wood filler fills holes or cracks. Safety gear like gloves and glasses protects you. These supplies finish your project nicely.
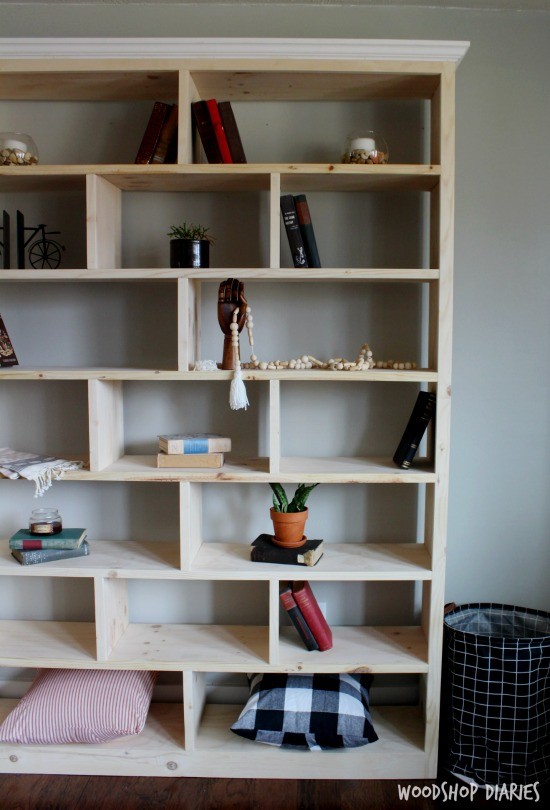
Credit: www.woodshopdiaries.com
Planning Your Bookshelf
Planning your bookshelf is the first step to a successful project. Careful planning saves time and avoids mistakes. It helps you build a shelf that fits your space and needs perfectly.
Think about what you want and where the shelf will go. This way, you can choose the right size, design, and materials. Planning makes the building process smoother and more fun.
Determining Size
Start by deciding the size of your bookshelf. Measure the wall space where the shelf will stand. Consider the height, width, and depth carefully.
Think about the items you want to store. Books, decor, or both? This affects the shelf height and depth. Make sure the shelf fits well without crowding the room.
Design Ideas
Choose a style that matches your room. Simple designs work well for beginners. Straight lines and open shelves are easy to build.
Think about adding features like adjustable shelves or a small cabinet. Sketch your ideas on paper. This helps visualize the final look and plan materials.
Measuring And Marking
Use a tape measure for accuracy. Mark your measurements on wood with a pencil. Double-check all marks before cutting.
Clear, precise marks make cutting easier. Label each part to avoid confusion. This step keeps your project organized and error-free.
Cutting The Wood
Cutting the wood is a key step in building a simple bookshelf. This process shapes the boards to the right size. Precise cuts help the pieces fit well. It makes the assembly easier and the shelf strong. Proper cutting also saves material and reduces waste. Let’s explore how to cut wood safely and correctly.
Safety Tips
Always wear safety goggles to protect your eyes. Use ear protection to guard against loud saw noises. Keep your fingers away from the blade at all times. Make sure the wood is stable before cutting. Work in a clean, well-lit area. Double-check the saw’s settings before starting. Stop immediately if the saw feels stuck.
Cutting Techniques
Mark the wood clearly with a pencil and ruler. Follow the lines slowly for a straight cut. Use a saw with a sharp blade for cleaner edges. For long cuts, support the wood on both ends. Use clamps to hold the wood steady if needed. Cut small sections one at a time. Smooth rough edges with sandpaper after cutting.
Preparing Pieces
After cutting, check each piece for the right size. Sand the surfaces to remove splinters and rough spots. Arrange the pieces in order before assembling. Label each piece to avoid confusion later. Clean the wood dust from all parts. Store the pieces flat to prevent warping. Double-check measurements before moving on.
Assembling The Frame
Assembling the frame is the key step in building a simple bookshelf. It shapes the whole structure and holds the shelves together. You need to join the wood pieces carefully to make a strong frame. A good frame keeps the bookshelf stable and neat.
Use the right tools and techniques to connect the parts firmly. Take your time to measure and line up the pieces. A well-assembled frame makes the rest of the work easier and faster.
Joining Techniques
Wood pieces can be joined in many ways. The most common method is using butt joints, where edges meet at right angles. You can also use dado joints for extra strength. These slots hold the shelves better inside the frame.
Choose a technique that fits your tools and skill level. Simple joints work well for beginners and keep the process quick. Make sure the joints fit tightly without gaps.
Using Screws And Nails
Screws and nails are easy to use for joining frame parts. Screws hold pieces firmly and can be tightened if needed. Nails are faster but less strong than screws. Use wood screws with a drill for best results.
Pre-drill holes before screwing to avoid splitting the wood. Drive nails straight to keep the wood intact. Use clamps to hold pieces steady while fastening.
Ensuring Stability
Stability is essential for a safe bookshelf. Check that all joints are tight and flush. Use corner braces or metal brackets for extra support if needed. Make sure the frame is square by measuring diagonals.
Place the frame on a flat surface to test balance. Fix any wobbles before adding shelves. A stable frame prevents the bookshelf from tipping or leaning.
Adding Shelves
Adding shelves to your simple bookshelf is an important step. Shelves hold your books and items. You want them strong and well-placed. This section explains how to space, secure, and adjust shelves. Follow these tips for a sturdy and useful bookshelf.
Spacing Considerations
Think about the height of your books and items. Leave enough space for tall books and small objects. Measure the tallest item you want on each shelf. Keep space between shelves about 10 to 12 inches. This fits most books and decorations. Avoid making shelves too close or too far apart.
Securing Shelves
Use strong brackets or shelf pins to hold shelves. Attach brackets firmly to the side panels. Use screws that fit the wood thickness. Check that shelves sit level and steady. Tighten screws if shelves wobble. Secure shelves well to prevent accidents and damage.
Adjustable Options
Make shelves adjustable for more flexibility. Use shelf pins and holes on the side panels. Place pins at different heights to change shelf levels. This helps store books of various sizes. Adjustable shelves give your bookshelf more use over time.
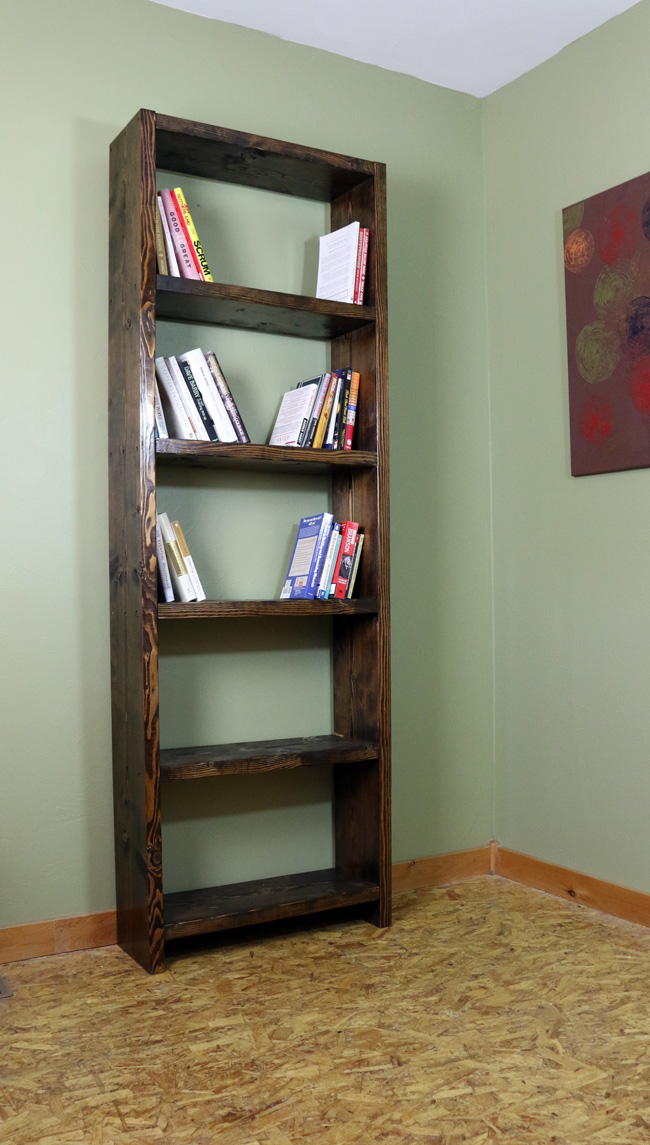
Credit: www.diypete.com
Finishing Touches
Finishing touches give your bookshelf a clean and polished look. These steps protect the wood and improve its appearance. Taking time here ensures your project lasts longer and looks great.
Sanding And Smoothing
Start by sanding all surfaces with medium-grit sandpaper. This removes rough spots and splinters. Follow with fine-grit sandpaper to create a smooth finish. Always sand in the direction of the wood grain. Wipe away dust with a damp cloth before moving on.
Painting And Staining
Choose paint or stain based on your style. Paint adds color and covers imperfections. Stain enhances natural wood patterns and gives a warm tone. Apply thin, even coats using a brush or cloth. Let each coat dry completely before adding another.
Protective Coatings
Apply a clear protective coating to shield the wood from damage. Options include polyurethane, varnish, or wax. Use a clean brush for smooth coverage. This layer guards against scratches and moisture. Allow full drying time for best results.
Maintaining Your Bookshelf
Maintaining your bookshelf keeps it looking good and lasting longer. Simple care helps avoid damage and keeps shelves sturdy. Regular upkeep saves time and cost on big repairs later.
Cleaning Tips
Dust your bookshelf often to stop dirt build-up. Use a soft cloth or duster to clean all surfaces. Avoid using wet cloths on wooden shelves to prevent warping. Clean spills immediately to avoid stains. For glass parts, use a glass cleaner and soft cloth.
Repairing Damage
Fix small scratches with wood filler or wax sticks. Tighten loose screws or nails to keep shelves stable. Replace broken boards or brackets quickly to avoid accidents. Sand rough edges to prevent splinters. Use wood glue for cracks or splits in the wood.
Upgrading Features
Add shelf liners to protect surfaces and make cleaning easier. Install hooks on sides for extra storage options. Paint or stain the bookshelf to refresh its look. Attach LED strip lights for better visibility. Upgrade brackets to stronger ones if you add heavier items.

Credit: www.simplyeasydiy.com
Frequently Asked Questions
How Do I Start Building A Simple Bookshelf?
Begin by choosing the right wood and gathering essential tools. Measure your space carefully. Cut the wood to size, sand edges, and assemble using screws or nails. Finish with paint or varnish for durability and appearance.
What Tools Are Needed To Make A Bookshelf?
You will need a saw, drill, screwdriver, measuring tape, level, clamps, and sandpaper. These tools help you cut, assemble, and finish the bookshelf accurately and safely.
How Long Does It Take To Build A Simple Bookshelf?
Building a simple bookshelf usually takes 2 to 4 hours. Time depends on your skill level, tools, and design complexity. Preparation and drying time for finishes may add extra hours.
What Type Of Wood Is Best For Bookshelves?
Pine, plywood, and MDF are popular for bookshelves. Pine is affordable and easy to work with. Plywood offers strength and smooth surfaces. Choose wood based on budget, weight capacity, and style preference.
Conclusion
Building a simple bookshelf can be a fun and useful project. It needs just a few materials and some basic steps. You can create a sturdy shelf for your books or decorations. Taking your time and following instructions helps you get good results.
This project also gives a sense of pride and accomplishment. Try different sizes or designs to match your space. Enjoy your new bookshelf and the work you put into it. Simple, practical, and rewarding.