Are you looking to give your wood console table a fresh, new look without spending a fortune? Painting it yourself is easier than you might think, and the results can transform your space instantly.
Whether your table has scratches, looks outdated, or just needs a splash of color, this guide will walk you through every step. By the end, you’ll have the confidence and know-how to turn your plain wood console into a stunning centerpiece.
Ready to get started? Let’s dive in!
Choosing The Right Paint
Choosing the right paint is the first step in transforming your wood console table. The paint affects how your table looks and how long it lasts. Picking the right type, color, and finish will give your table a fresh, beautiful look.
Types Of Paints For Wood
Latex paint is water-based and easy to clean. It dries fast and is good for indoor furniture. Oil-based paint lasts longer and is tougher. It gives a smooth finish but takes more time to dry. Chalk paint is popular for a vintage look. It sticks well without much sanding. Consider the paint type based on your table’s use and style.
Selecting Colors
Choose colors that match your room’s style. Light colors like white or cream brighten small spaces. Dark colors add drama and hide stains better. Neutral shades fit most decors and are safe choices. Bold colors make a statement and show personality. Test a small area before painting the whole table.
Finishes And Sheens
Matte finish hides imperfections and looks soft. Satin finish has a slight shine and cleans easily. Semi-gloss is shiny and durable, great for busy surfaces. Glossy finish reflects light and shows every detail. Pick a finish based on how you use the table and the look you want.

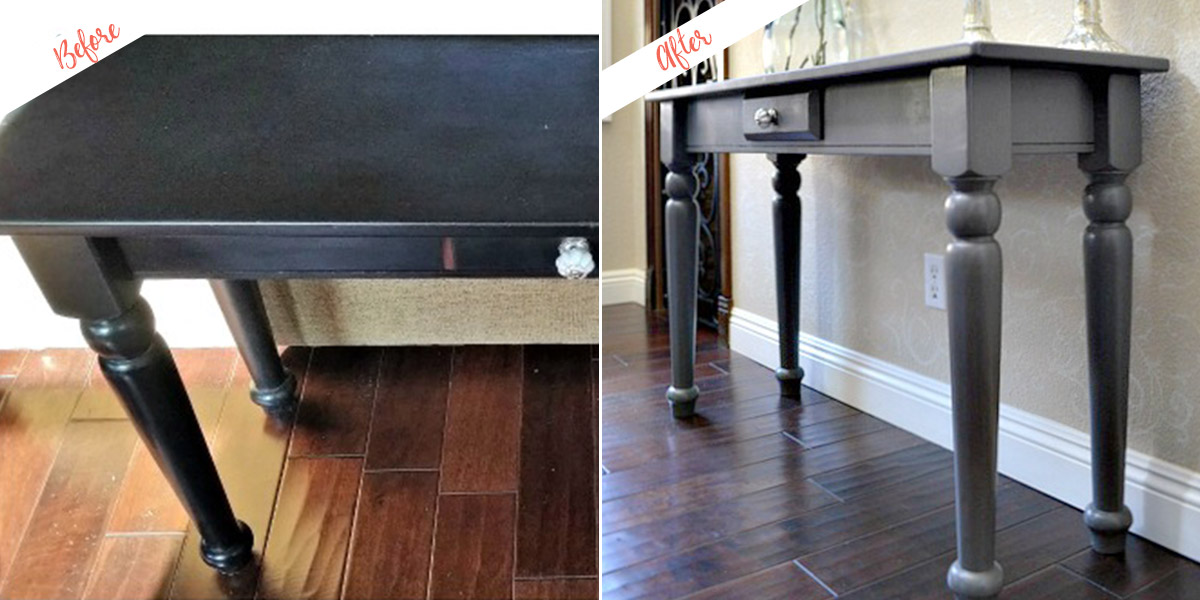
Credit: loveandspecs.com
Preparing The Table
Preparing the table is the first step to a smooth painting process. A well-prepared surface helps the paint stick better and last longer. Skipping this step can cause peeling and uneven color. Take your time to make the wood ready.
Cleaning The Surface
Start by removing dust and dirt from the table. Use a soft cloth or sponge with warm soapy water. Wipe the entire surface gently. Rinse with clean water and let it dry completely. Clean surfaces allow paint to stick well.
Sanding Techniques
Use fine-grit sandpaper to smooth the wood. Sand in the direction of the wood grain. Avoid pressing too hard to prevent scratches. Sanding removes the old finish and creates a rough surface. This roughness helps paint to hold better.
Repairing Imperfections
Check for cracks, holes, or dents on the table. Fill small holes and cracks with wood filler. Let the filler dry according to the instructions. Sand the filled areas gently to blend with the surface. Fixing imperfections creates a smooth base for painting.
Priming The Wood
Priming the wood is an important step before painting your console table. It helps the paint stick better and last longer. Primer also protects the wood from moisture and stains. Skipping this step can cause the paint to peel or chip easily.
Importance Of Primer
Primer creates a smooth base for your paint. It seals the wood surface and covers any imperfections. This helps the paint look even and true to color. Primer also prevents knots and tannins in the wood from bleeding through the paint. It improves the durability of your paint job.
Applying Primer Correctly
Start by sanding the table lightly to remove rough spots. Use a clean brush or roller to apply the primer. Spread it evenly in thin layers. Avoid thick coats that drip or bubble. Cover all surfaces, including edges and corners. Let each coat dry before applying another if needed.
Drying Times
Drying time varies by primer type and room conditions. Most primers dry within 1 to 2 hours. Wait at least 24 hours before painting over primer for best results. Ensure the surface feels dry and smooth. Proper drying prevents paint from peeling or cracking later.
Credit: www.behr.com
Painting Process
The painting process is the most important step in transforming your wood console table. It requires patience and careful attention. A well-painted table looks fresh and lasts longer. Follow simple steps to get a smooth, even finish.
Choosing Brushes And Tools
Select brushes with soft, synthetic bristles. They work best with most paints and give smooth strokes. Use a small angled brush for corners and detailed areas. A foam roller helps cover large flat surfaces quickly. Keep a clean cloth handy for wiping dust or drips.
Applying The First Coat
Start with a thin, even layer of paint. Dip your brush lightly and remove excess paint. Brush in the direction of the wood grain for a natural look. Avoid heavy layers to prevent drips and uneven texture. Let the first coat dry completely before moving on.
Adding Additional Coats
Apply two or three more coats for full coverage. Each layer should be thin and smooth. Lightly sand the table with fine-grit sandpaper between coats. This removes bumps and helps paint stick better. Wipe off dust before adding the next coat. Patience here gives the best results.
Finishing Touches
Finishing touches bring your painted wood console table to life. They create a smooth, lasting finish and add style. Small steps here make a big difference. Pay close attention to each step for the best results.
Sanding Between Coats
Sanding between paint coats removes bumps and dust. Use fine-grit sandpaper, about 220 grit. Sand lightly to avoid scraping off paint. Wipe dust with a clean, dry cloth. This step helps paint layers stick well.
Sealing And Protecting
Sealing protects your table from scratches and water. Choose a clear polyurethane or varnish for wood. Apply thin, even coats with a brush. Let each coat dry fully before adding another. This keeps your table safe and shiny.
Decorative Accents
Decorative accents make your table unique. Add new knobs, stencils, or decals for character. Use painter’s tape for clean lines. Small details highlight your style and brighten the room. Keep accents simple for a balanced look.
Credit: www.confessionsofaserialdiyer.com
Maintenance Tips
Maintaining your painted wood console table keeps it looking fresh and new. Simple care routines can extend its life and beauty. Small efforts prevent damage and wear. Follow these easy tips to protect your painted furniture.
Cleaning Painted Furniture
Use a soft cloth or sponge for cleaning. Avoid harsh chemicals that can damage the paint. Mild soap mixed with water works well. Wipe gently to remove dust and dirt. Dry the surface with a clean cloth to avoid water spots.
Handling Wear And Tear
Protect your table from scratches by using coasters and mats. Avoid placing hot or wet items directly on the surface. Regularly check edges and corners for chips or peeling paint. Address small damages early to stop them from getting worse.
Touch-up Techniques
Keep leftover paint for future touch-ups. Lightly sand damaged areas before repainting. Apply a thin coat of paint with a small brush. Allow it to dry completely. Repeat if needed to blend with the original finish.
Frequently Asked Questions
How Do I Prepare A Wood Console Table For Painting?
Start by cleaning the surface with mild soap and water. Sand the table to remove old finish and smooth imperfections. Wipe off dust with a tack cloth before applying primer. Proper preparation ensures better paint adhesion and a smooth finish.
What Type Of Paint Is Best For Wood Console Tables?
Use acrylic latex paint for durability and easy cleanup. Chalk paint is also popular for a matte, vintage look. Choose paint designed for wood furniture to ensure good coverage and long-lasting results.
How Many Coats Of Paint Should I Apply?
Typically, two to three thin coats provide the best coverage. Allow each coat to dry fully before applying the next. Multiple thin layers prevent drips and give a professional finish.
Should I Use A Primer Before Painting Wood Furniture?
Yes, primer improves paint adhesion and blocks stains or tannins. It creates a smooth base for even color application. Using primer extends the life of your paint job.
Conclusion
Painting a wood console table can refresh any room easily. Start with cleaning and sanding for a smooth base. Choose paint that fits your style and space. Take your time applying thin coats for best results. Let each layer dry fully before the next step.
Small details, like handles, can change the look a lot. Enjoy the process and watch your table transform beautifully. This simple project adds charm without much effort. Try it yourself and see how fun and rewarding it can be. Your space will thank you for the fresh, new look.