Are you ready to give your outdoor wood furniture a fresh, vibrant look? Before you grab that paintbrush, there’s one crucial step you can’t skip: proper preparation.
Getting your furniture ready for painting not only helps the paint stick better but also ensures your work lasts through sun, rain, and everything in between. In this guide, you’ll discover simple, effective ways to prepare your wood furniture so your new paint job looks flawless and stands the test of time.
Keep reading—your beautiful, refreshed outdoor space is just a few steps away!

Credit: www.ikea.com
Choosing The Right Wood
Choosing the right wood is important for outdoor furniture painting. Wood must handle weather and stay strong. Some woods last longer and need less care. Picking the right type helps paint stick better. It also keeps your furniture looking good for years.
Check the wood’s condition before painting. Old or damaged wood may not hold paint well. Preparing wood well makes painting easier and the finish smoother.
Types Of Wood Suitable For Outdoor Use
Teak is popular for outdoor furniture. It resists water and insects naturally. Cedar is light and smells nice. It also fights rot and bugs. Redwood has good strength and looks beautiful. Pine is cheaper but needs more protection. Choose wood that fits your budget and climate.
Assessing Wood Condition
Look for cracks, holes, or soft spots. These signs mean wood is weak or damaged. Sand rough areas to smooth the surface. Remove old paint or finish before starting. Clean dirt and dust off the wood. Dry wood paints better than wet or damp wood.
Gathering Essential Tools
Preparing outdoor wood furniture for painting starts with gathering the right tools. Proper tools make the job easier and help achieve a smooth finish. Without these essentials, painting can become messy and frustrating. Collect everything before you begin.
Sanding Equipment
Sanding removes old paint and smooths the wood surface. Use sandpaper with medium and fine grits. A sanding block helps keep pressure even. For bigger pieces, an electric sander saves time and effort. Always wear a mask to avoid breathing dust.
Cleaning Supplies
Clean furniture before painting to remove dirt and grease. Use a bucket, sponge, and mild detergent. Rinse with clean water and let it dry completely. A stiff brush helps remove stubborn dirt. Clean surfaces allow paint to stick better.
Painting Materials
Choose paint made for outdoor wood to resist weather damage. Get brushes or rollers suitable for your paint type. Use painter’s tape to protect areas you don’t want to paint. Have a drop cloth or newspaper to catch drips. Stir paint well before use for even color.
Cleaning The Furniture
Cleaning outdoor wood furniture is the first step before painting. Dirt, dust, and stains can stop paint from sticking well. Proper cleaning helps paint last longer and look better. It also prevents damage under the paint.
Removing Dirt And Debris
Start by brushing off loose dirt and leaves. Use a soft brush or cloth to avoid scratching the wood. Next, wash the furniture with warm water and mild soap. Use a sponge or soft brush to scrub gently. Rinse the furniture thoroughly to remove soap. Let the wood dry completely before moving to the next step.
Dealing With Mold And Mildew
Mold and mildew appear as dark or white spots on wood. These can cause paint to peel or bubble. Mix one part bleach with three parts water in a spray bottle. Spray the affected areas and let it sit for 10 minutes. Scrub the spots with a soft brush to remove mold. Rinse well with clean water and allow the furniture to dry fully. This cleaning stops mold from growing under new paint.
Sanding Techniques
Sanding is a key step before painting outdoor wood furniture. It helps the paint stick better and creates a smooth finish. Using the right sanding methods saves time and effort. It removes old paint, dirt, and rough spots. Proper sanding also prevents peeling and cracking after painting. Follow simple steps for best results.
Choosing The Right Grit
Start with coarse grit sandpaper like 80 or 100. It removes old paint and rough wood quickly. After that, switch to medium grit, around 150. This smooths out scratches from the coarse paper. Finish with fine grit sandpaper, about 220 grit. It creates a smooth surface ready for paint. Avoid using grit too coarse or too fine only. The right sequence protects the wood and improves paint adhesion.
Sanding Tips For Smooth Surfaces
Always sand in the direction of the wood grain. This avoids scratches and rough patches. Use a sanding block or electric sander for even pressure. Check the surface often to avoid over-sanding. Clean dust with a brush or cloth between sanding steps. Keep your sanding motion steady and gentle. Take breaks to prevent uneven spots. Smooth surfaces help paint look clean and last longer.
Repairing Damages
Repairing damages is a key step before painting outdoor wood furniture. Fixing cracks, holes, and broken parts ensures a smooth finish. It also helps the paint last longer and protects the wood from weather damage.
Filling Cracks And Holes
Start by cleaning the damaged areas. Remove dirt and loose wood pieces with a brush or cloth. Use wood filler to fill cracks and holes. Press the filler firmly into the gaps.
Let the filler dry completely. Sand it smooth to match the furniture surface. This step creates a flat, even base for painting. Avoid skipping this part to prevent paint from peeling.
Replacing Broken Parts
Check for parts that are broken beyond repair. Replace these parts with new wood pieces. Cut the replacement parts to fit the original size and shape.
Attach the new pieces securely using wood glue or screws. Make sure the joins are tight and stable. Sand the joints to blend with the rest of the furniture.
Strong repairs keep your furniture sturdy and ready for painting. This prevents future damage and improves the overall look.
Priming The Wood
Priming wood is a crucial step before painting outdoor furniture. It protects the wood from moisture and helps paint stick better. Skipping primer can cause paint to peel or fade quickly. Proper priming ensures a smooth and long-lasting finish.
Selecting The Right Primer
Choose a primer made for outdoor wood. Oil-based primers work well for hardwood and rough surfaces. Latex primers dry faster and clean up easily with water. Look for primers that block stains and resist mold. Check product labels for outdoor use and weather protection.
Applying Primer Effectively
Start with clean, dry wood. Remove dust and old paint flakes. Use a brush or roller to spread primer evenly. Apply a thin, smooth coat without drips. Let the primer dry fully before painting. Sand lightly between coats if needed for a smooth surface.
Painting Tips
Painting outdoor wood furniture requires care and attention. The right techniques help protect your furniture and improve its look. Follow these painting tips to get the best results and make your furniture last longer.
Choosing Outdoor Paint
Select paint made for outdoor use. It resists weather, moisture, and sunlight. Acrylic latex paint works well on wood. It dries fast and is easy to clean. Avoid indoor paints. They do not protect well from outdoor conditions.
Applying Multiple Coats
Apply thin, even coats for a smooth finish. One thick coat can drip and peel later. Let each coat dry fully before adding the next. Two to three coats usually give the best coverage and protection. Lightly sand between coats for better adhesion.
Drying And Curing Time
Allow enough time for paint to dry before use. Drying means the surface feels dry to touch. Curing means paint has fully hardened inside. Curing takes longer and is important for durability. Avoid heavy use until the paint cures completely.
Sealing And Protection
Sealing and protection are key steps after painting outdoor wood furniture. These steps keep the paint fresh and stop damage from sun, rain, and dirt. Proper sealing helps your furniture last longer and look great through all seasons.
Without a good seal, paint can peel or fade quickly. Moisture can also enter the wood, causing it to swell or crack. Protecting your painted furniture means less work and more enjoyment.
Using Sealants For Longevity
Choose a sealant made for outdoor wood. Clear sealants keep the paint color bright. They stop water from soaking into the wood. Brush or spray the sealant evenly over the surface. Let it dry fully before using the furniture.
Apply two coats for best protection. Each coat adds a strong layer against weather damage. Sealants also block harmful UV rays that fade paint. Regular sealing keeps furniture looking new for years.
Maintenance After Painting
Clean painted furniture often with a soft cloth and mild soap. Dirt and dust can wear down the sealant. Check for cracks or chips in the paint regularly. Touch up any damaged areas to prevent wood exposure.
Reapply sealant every 1-2 years, depending on use and weather. This simple care keeps the wood safe and the paint fresh. Proper maintenance saves money by avoiding costly repairs or replacements.
Common Mistakes To Avoid
Preparing outdoor wood furniture for painting requires care and attention. Avoiding common mistakes can save time and effort. These errors can ruin your work or shorten the paint’s life. Focus on the right steps and materials for the best results.
Skipping Preparation Steps
Do not skip cleaning the furniture before painting. Dirt and dust stop paint from sticking well. Sand the wood to remove old paint and rough spots. Without sanding, paint peels quickly. Fill cracks and holes with wood filler. Skip these steps, and the finish looks uneven and fades fast.
Using Inappropriate Paint Types
Choose paint made for outdoor wood furniture. Indoor paint cannot handle weather changes. Use water-resistant or exterior-grade paint. It protects wood from rain and sun damage. Avoid cheap paints that wear off fast. Proper paint keeps furniture looking fresh for years.

Credit: furniturewerks.com
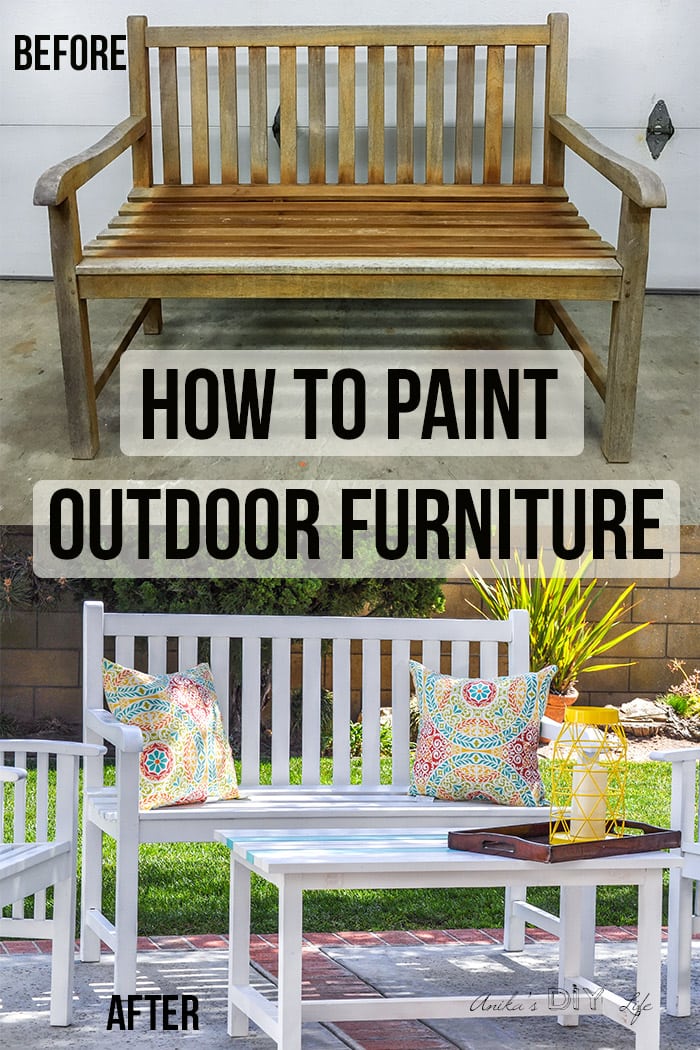
Credit: www.anikasdiylife.com
Frequently Asked Questions
How Do I Clean Wood Furniture Before Painting?
Clean wood furniture with mild soap and water. Remove dirt, grease, and mildew thoroughly. Let it dry completely before painting.
Should I Sand Outdoor Wood Furniture Before Painting?
Yes, sanding smooths the surface and removes old finishes. Use medium-grit sandpaper for best results. Always sand evenly to ensure paint adhesion.
What Primer Is Best For Outdoor Wood Furniture?
Use a high-quality, exterior wood primer. It seals the wood and improves paint durability. Choose one compatible with your paint type.
How Long Should Primer Dry Before Painting?
Primer typically dries in 1 to 4 hours. Follow manufacturer instructions for optimal results. Ensure it’s completely dry to avoid peeling.
Conclusion
Preparing outdoor wood furniture for painting takes time and care. Clean the surface well to remove dirt and old paint. Sand the wood until smooth to help paint stick. Use a primer to protect the wood and improve paint coverage.
Allow each layer to dry completely before the next step. Taking these steps makes your furniture last longer and look great. Enjoy a fresh, beautiful finish that stands up to weather. Simple preparation leads to strong, lasting results. Ready to paint with confidence!