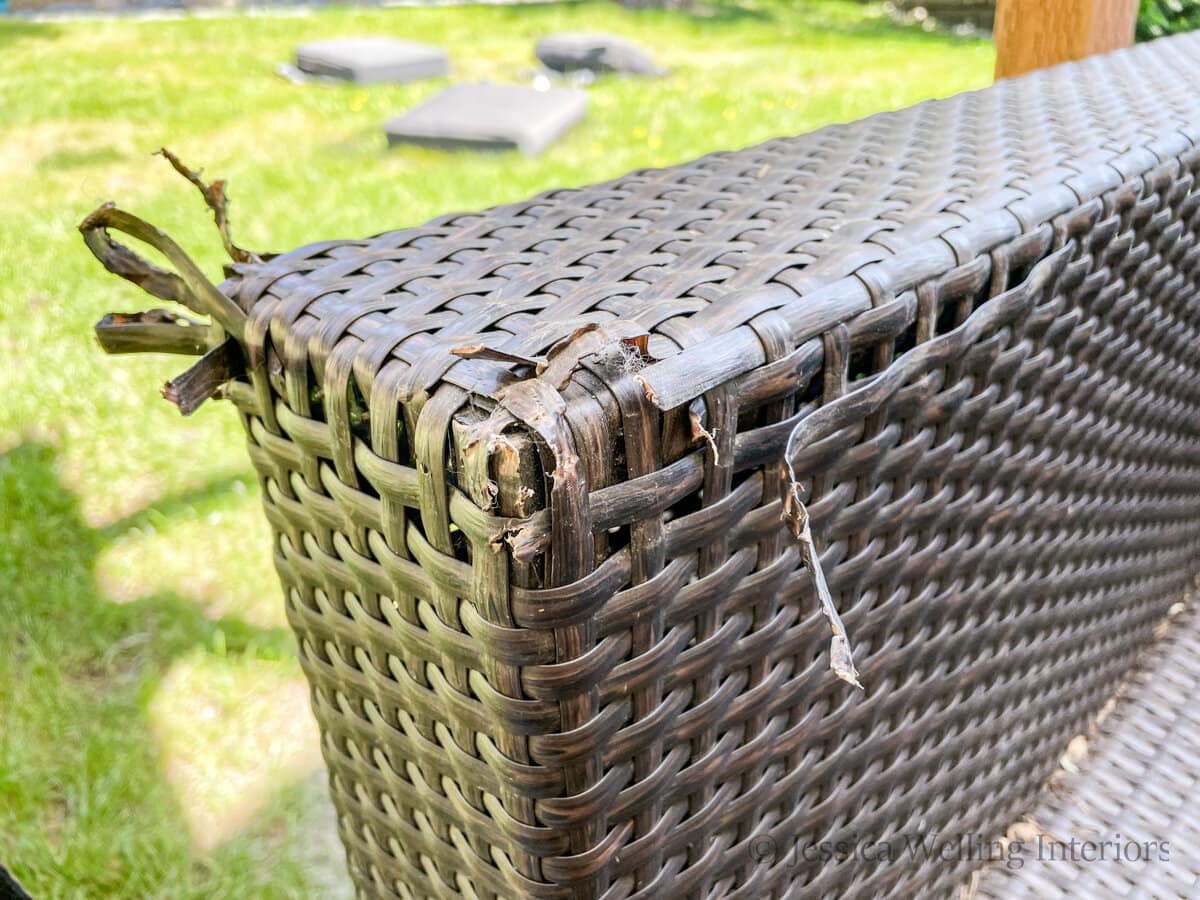
Is your outdoor furniture looking worn out because of damaged wicker? You don’t have to toss it away or spend a fortune buying new pieces.
Replacing the wicker on your outdoor furniture is easier than you think—and it can bring your favorite chairs and sofas back to life. Imagine relaxing on furniture that looks fresh and feels sturdy again, all because you took a simple step to fix it yourself.
Keep reading, and you’ll discover clear, step-by-step tips to replace your wicker quickly and confidently. Your outdoor space deserves that fresh, inviting look, and you’re just a few easy moves away from making it happen.
Credit: jessicawellinginteriors.com
Tools And Materials Needed
Replacing wicker on outdoor furniture needs the right tools and materials. Using proper supplies makes the job easier and neat. Gather all items before starting the repair. This helps keep the work smooth and saves time.
Essential Tools
- Flathead screwdriver to remove old wicker strands
- Scissors for cutting new wicker strips
- Pliers to pull tight the new wicker
- Measuring tape for accurate length
- Staple gun or hammer and small nails to secure wicker
Choosing Replacement Wicker
Select wicker that matches your furniture’s style and color. Synthetic wicker works well outdoors due to weather resistance. Natural wicker looks great but may not last as long outside. Measure the width and length needed before buying. Buy extra to cover mistakes or future repairs.
Additional Supplies
- Outdoor wood glue for extra hold
- Sandpaper to smooth rough edges
- Protective gloves to avoid splinters
- Plastic clips or clamps to hold wicker while drying
- Cleaning brush to remove dirt before repair

Credit: www.youtube.com
Preparing The Furniture
Preparing the furniture is the first step to replace wicker on outdoor furniture. A clean, smooth frame makes the job easier and helps the new wicker last longer. Take your time with this stage to get the best results.
Cleaning The Frame
Start by wiping the frame with a damp cloth. Remove dust and dirt from every corner. Use mild soap and water for stubborn grime. Avoid harsh chemicals that can damage the frame. Let the frame dry completely before moving on.
Removing Old Wicker
Carefully cut away the old wicker using scissors or a utility knife. Pull out any loose strands by hand. Remove all staples or nails holding the wicker in place. Take your time to avoid damaging the frame. A clean frame is ready for the new wicker.
Measuring And Cutting Wicker
Measuring and cutting wicker is a key step in replacing outdoor furniture. Getting the size right makes the new wicker fit well and look neat. Take your time and be precise for the best results.
Taking Accurate Measurements
Start by measuring the area where the wicker will go. Use a tape measure and note the width and length carefully. Measure twice to avoid mistakes. Check the depth if the wicker wraps around a frame. Write down all numbers clearly. Small errors can cause big fitting problems later.
Cutting Tips
Choose sharp scissors or a utility knife for cutting wicker. Cut slowly and follow the measurement marks exactly. Keep the wicker flat on a sturdy surface to avoid bends. Trim a little less than needed first. You can always cut more, but you cannot add back material. Smooth out any rough edges with sandpaper if needed.
Attaching New Wicker
Attaching new wicker to outdoor furniture requires patience and care. This step shapes the look and durability of your piece. Proper technique keeps the wicker tight and secure. The process involves weaving the strands and fixing the ends firmly. Follow these simple methods to achieve a neat finish.
Weaving Techniques
Start by threading the wicker through the frame holes. Pull each strand tight but avoid snapping it. Use an over-under pattern to create a strong weave. Keep the spacing even for a clean look. Work slowly to prevent tangling or uneven tension. Check your progress often to maintain alignment. This method ensures your wicker will hold up outdoors.
Securing The Ends
Trim excess wicker close to the frame. Tuck the ends under nearby strands to hide them. Use small nails or staples for extra hold if needed. Press the ends firmly to avoid loosening over time. Seal the tips with glue for added protection. Properly secured ends prevent unraveling and extend furniture life. Take your time to finish this step well.
Finishing Touches
After weaving new wicker onto your outdoor furniture, the final steps make it look neat and last longer. These finishing touches help protect your work from weather and daily use. Take time to trim and seal the wicker carefully. A clean finish means your furniture looks fresh and holds up well.
Trimming Excess Material
Cut off extra wicker strands close to the frame. Use sharp scissors or a craft knife for clean cuts. Avoid pulling or tugging the material. Trim slowly to prevent damage to the weave. Neat edges stop fraying and give a tidy look.
Sealing And Protecting
Apply a clear outdoor sealant to the wicker. Use a brush to cover all surfaces evenly. Sealants guard against sun, rain, and dirt. Let the sealant dry fully before using the furniture. This step keeps the wicker strong and bright for many seasons.

Credit: rattanyard.com
Maintenance Tips
Maintaining wicker on outdoor furniture keeps it looking fresh and extends its life. Proper care stops damage and reduces the need for replacement. Follow simple steps to keep your wicker strong and beautiful.
Cleaning Wicker Furniture
Dust and dirt can build up on wicker quickly. Use a soft brush or vacuum with a brush attachment to remove loose dirt. Wipe the wicker gently with a cloth dipped in warm soapy water. Avoid soaking the material. Rinse with a clean damp cloth to remove soap. Let the furniture dry completely in the shade to prevent fading.
Preventing Damage
Keep wicker furniture out of direct sunlight for long periods. Sun can cause the wicker to dry and crack. Cover furniture during rain or store it indoors in bad weather. Avoid placing heavy items on wicker seats to prevent sagging. Check for loose strands and fix them early to stop further damage.
Frequently Asked Questions
How Do I Remove Old Wicker From Outdoor Furniture?
Start by cutting loose wicker strands with scissors. Use pliers to pull off remaining fibers gently. Clean the frame thoroughly before reweaving new wicker or applying replacements.
What Materials Work Best For Replacing Outdoor Wicker?
Synthetic resin wicker is ideal for outdoor use. It resists weather, UV rays, and moisture. Natural wicker is less durable outdoors and requires frequent maintenance.
Can I Replace Wicker Myself Or Hire A Professional?
DIY replacement is possible with patience and basic tools. However, complex patterns may need professional weaving skills. Consider your comfort level before starting the project.
How Long Does Replacing Wicker On Outdoor Furniture Take?
Simple wicker replacement can take a few hours. More intricate designs may require a full day or multiple sessions. Time depends on furniture size and skill level.
Conclusion
Replacing wicker on outdoor furniture is a simple task anyone can do. Choose the right materials and tools before you start. Take your time to weave carefully and neatly. This will make your furniture look fresh and last longer. Regular care will keep it strong and beautiful.
Enjoy your renewed outdoor space with comfort and style. Small efforts make a big difference in home projects. Try this project to refresh your furniture today.