Are you ready to give your outdoor furniture a fresh, smooth finish? Choosing the right sandpaper can make all the difference in how your furniture looks and lasts.
But with so many options out there, it’s easy to feel overwhelmed. Don’t worry—this guide will help you pick the perfect sandpaper for your project. By the end, you’ll know exactly what to use to bring out the best in your outdoor pieces.
Keep reading to make your furniture shine like new!
Choosing The Right Grit
Choosing the right sandpaper grit is key to preparing outdoor furniture. The grit number tells how rough or smooth the sandpaper is. Lower numbers mean rougher grit, good for heavy work. Higher numbers are finer and better for smooth finishes. Using the correct grit helps protect the wood and gives a better look.
Coarse Grit For Heavy Stripping
Coarse grit sandpaper has a rough texture. It is best for removing old paint or varnish. Use grit numbers between 40 and 60. This grit strips away thick layers quickly. It also smooths out deep scratches or rough spots. Be careful not to sand too hard to avoid damaging the wood.
Medium Grit For Smoothing Surfaces
Medium grit sandpaper is good for evening out the surface. Grit numbers range from 80 to 120. This grit removes small bumps and scratches left by coarse grit. It prepares the wood for a fine finish. Sand gently and evenly to get a smooth base for painting or staining.
Fine Grit For Final Touches
Fine grit sandpaper has a smooth texture. Use grit numbers between 150 and 220. This grit creates a polished surface on the wood. It helps paint and stain stick better. Light sanding with fine grit also removes dust and small imperfections. Finish with this grit for the best outdoor furniture look.
Types Of Sandpaper Materials
Choosing the right sandpaper material is key for outdoor furniture projects. Each type works differently on wood and other surfaces. Knowing the material helps you get smooth, lasting results. This guide explains popular sandpaper materials for outdoor use.
Aluminum Oxide Benefits
Aluminum oxide is tough and lasts long. It works well on wood and metal. This sandpaper cuts smoothly without clogging. It handles rough sanding and fine finishing tasks. Good for repeated use on outdoor furniture.
Garnet For Wood Finishing
Garnet sandpaper is softer and great for wood. It creates a smooth surface without scratches. It wears down evenly, avoiding deep cuts. Ideal for final sanding before painting or staining wood.
Silicon Carbide For Durability
Silicon carbide is very sharp and tough. It suits sanding hard materials like plastic and metal. It works well on wet or dry surfaces. Perfect for outdoor furniture exposed to weather. Helps achieve a clean, even finish quickly.
Preparing Different Wood Types
Preparing outdoor furniture for sanding requires understanding the wood type. Different woods need different sanding techniques. This helps protect the wood and ensures a smooth finish. Proper sanding also makes painting or staining easier.
Softwoods Vs Hardwoods
Softwoods like pine or cedar are easier to sand. Use medium grit sandpaper, around 80 to 120 grit. This removes rough spots without damaging the wood. Hardwoods like oak or teak need finer sandpaper. Use 120 to 150 grit to avoid scratches. Sand gently to keep the wood’s natural look.
Dealing With Painted Surfaces
Old paint must be removed before refinishing. Start with coarse sandpaper, about 60 to 80 grit. This strips thick paint layers quickly. After that, use finer sandpaper, 120 grit, to smooth the surface. Always wear a mask to avoid inhaling paint dust.
Sanding Weathered Wood
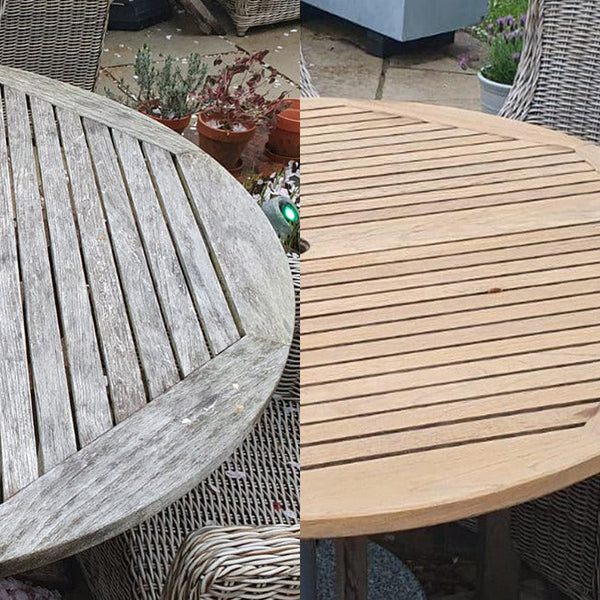
Weathered wood often feels rough and uneven. Begin with 80 grit sandpaper to remove dirt and splinters. Follow with 120 or 150 grit to smooth the surface. Sand along the grain to prevent scratches. This prepares the wood for sealing or painting.

Credit: www.luxushomeandgarden.com
Sanding Techniques For Outdoor Furniture
Sanding outdoor furniture helps prepare the surface for painting or staining. It removes old finishes, smooths rough spots, and opens wood pores to absorb new coatings well. Proper sanding techniques protect the wood and improve the final look.
Different methods work for various furniture shapes and materials. Using the right technique saves time and effort. It also prevents damage to your outdoor pieces.
Hand Sanding Tips
Hand sanding works best for small or curved areas. Wrap sandpaper around a sanding block for even pressure. Use fine-grit sandpaper, like 120 to 180 grit, for a smooth finish. Sand in the wood grain direction to avoid scratches. Change sandpaper often to keep it effective.
Using Power Sanders Safely
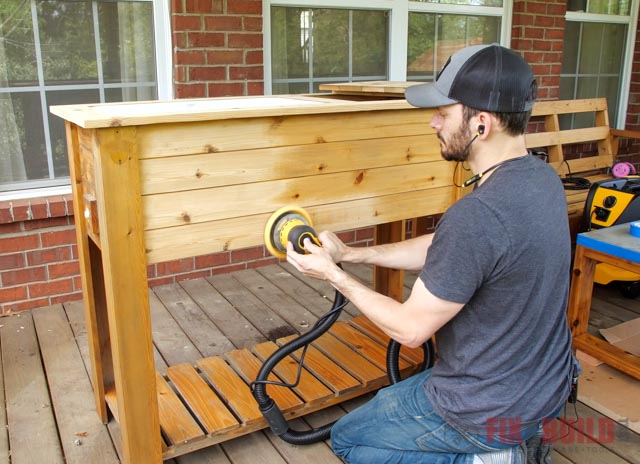
Power sanders speed up the sanding process on flat surfaces. Choose a random orbital sander for less risk of gouging the wood. Always wear safety goggles and a dust mask. Keep the sander moving to avoid creating deep marks. Check progress frequently to prevent over-sanding.
Maintaining Even Pressure
Apply steady, light pressure while sanding. Pressing too hard can damage the wood surface. Let the sandpaper do the work. Keep your hand steady and move in smooth strokes. Even pressure helps achieve a consistent finish.
Protecting Furniture After Sanding
Sanding outdoor furniture smooths rough spots and removes old finishes. Protecting the wood after sanding keeps it looking good longer. It stops water damage and prevents dirt from settling in. Taking the right steps after sanding helps your furniture last through all seasons.
Cleaning Dust And Debris
After sanding, clean the surface well. Use a soft brush or cloth to remove dust. Dust left on wood blocks sealants from sticking. Wipe the furniture with a damp cloth. Let it dry completely before applying any finish.
Applying Sealants And Stains
Choose a sealant made for outdoor use. It protects wood from moisture and sun damage. Stains add color and extra protection. Use a brush or cloth to apply evenly. Follow the grain of the wood for best results. Allow the sealant or stain to dry fully. Apply a second coat for stronger protection if needed.
Regular Maintenance Tips
Check your furniture often for signs of wear. Clean it regularly to remove dirt and grime. Reapply sealant or stain every year or two. Cover furniture during rain or snow. Store pieces indoors in harsh weather. Small care steps help keep your outdoor furniture looking fresh.
Credit: www.luxushomeandgarden.com
Credit: fixthisbuildthat.com
Frequently Asked Questions
What Grit Sandpaper Is Best For Outdoor Furniture?
For outdoor furniture, start with 80-120 grit sandpaper to remove old finish. Finish with 180-220 grit for smoothness. This range balances effective stripping and a smooth surface for repainting or sealing.
Can I Use Waterproof Sandpaper Outdoors?
Yes, waterproof sandpaper (wet/dry sandpaper) works well outdoors. It resists clogging and allows sanding with water, reducing dust. This helps achieve a smoother finish on outdoor wood and metal furniture.
How Often Should I Sand Outdoor Furniture?
Sand outdoor furniture every 1-2 years or before refinishing. Regular sanding removes dirt, old paint, and rough spots. This maintains the furniture’s appearance and extends its lifespan.
Is Coarse Or Fine Sandpaper Better For Outdoor Wood?
Start with coarse sandpaper (80-120 grit) to remove damaged layers. Then use fine grit (180-220) to smooth the wood. Coarse sandpaper strips, while fine sandpaper prepares for finishing.
Conclusion
Choosing the right sandpaper helps protect outdoor furniture well. Start with coarse grit to remove old paint or rough spots. Then, use finer grit to smooth the surface gently. This process makes painting or staining easier and longer-lasting. Taking time to sand properly saves effort later.
Keep your furniture looking fresh and strong season after season. Sandpaper choice matters for good results and lasting beauty. Simple steps lead to great outdoor furniture care.