Have an old ladder lying around and wondering what to do with it? What if you could turn it into a unique, stylish bookshelf that adds character to your space?
You’re about to discover a simple, creative way to give new life to that ladder. This project is perfect if you want to save money, add a personal touch to your home, and impress your friends with your DIY skills.
Keep reading, and you’ll learn exactly how to transform your old ladder into a beautiful bookshelf step by step. Your perfect storage solution is closer than you think!

Credit: dandelionexpress.wordpress.com
Choosing The Right Ladder
Choosing the right ladder is the first step to make a sturdy bookshelf. The ladder will become the frame and shelves, so it must be strong and in good shape. Not all ladders work well for this project. Pick one that fits your space and style.
Think about the material and height. These will affect the final look and how much storage you get.
Types Of Ladders To Use
Wooden ladders are the best choice for bookshelves. They offer a natural, warm look. You can paint or stain them to match your room.
Metal ladders give an industrial feel. They are strong but may need extra shelves or boards to hold books safely.
Step ladders and extension ladders both work. Step ladders are shorter and easier to move. Extension ladders are taller but bulkier.
Inspecting Ladder Condition
Check for cracks, loose joints, or broken rungs. These can make the shelf unsafe.
Look for signs of rot or rust. Old ladders may need cleaning or sanding.
Test the ladder’s stability by standing it upright. It should not wobble or shake.
Fix minor damage before starting. Replace parts that are too weak to hold weight.
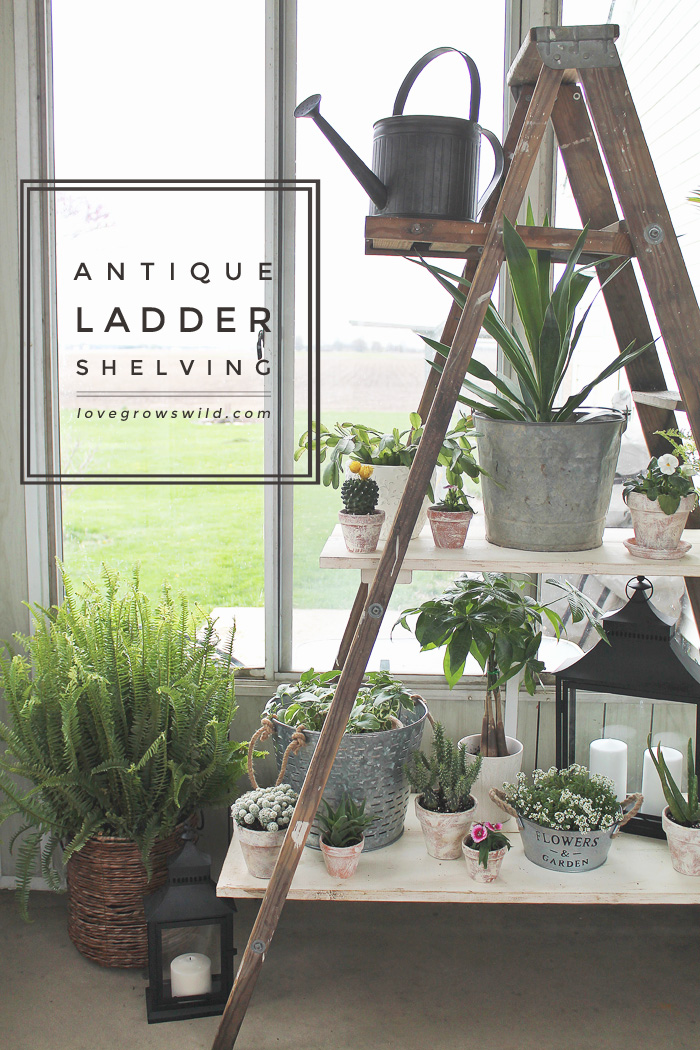
Credit: lovegrowswild.com
Gathering Materials And Tools
Before starting your bookshelf project, gather all materials and tools. This step saves time and keeps the work smooth. Prepare a workspace with good lighting and enough room. Organize everything nearby for easy access during the project.
Essential Tools Checklist
- Electric drill with drill bits
- Screwdriver (manual or electric)
- Measuring tape
- Level tool
- Sandpaper or electric sander
- Paintbrush or roller (for finishing)
- Clamps (to hold pieces steady)
- Safety goggles
- Dust mask
Additional Supplies Needed
- Old wooden ladder
- Wood screws
- Wood glue
- Wood filler (for holes and cracks)
- Primer and paint or wood stain
- Sandpaper (various grits)
- Protective finish (clear varnish or sealant)
Preparing The Ladder
Preparing the ladder is the first step in turning it into a stylish bookshelf. This step ensures the ladder is safe, clean, and ready for use. Taking time to prepare the ladder well makes the entire project easier and the final product strong.
Cleaning And Sanding
Start by cleaning the ladder thoroughly. Use a damp cloth to remove dust and dirt. For sticky spots, a mild soap works well. Let the ladder dry completely before moving on.
Next, sand the ladder’s surface. Use medium-grit sandpaper to smooth rough areas. Sanding removes old paint and splinters. It also helps the new finish stick better. Wipe off dust with a dry cloth after sanding.
Removing Unwanted Parts
Check the ladder for any parts you don’t need. Remove broken steps or loose nails carefully. Take off hardware like hooks or brackets that won’t fit the bookshelf design. Use the right tools to avoid damage. Clean the ladder again after this step to clear any debris.
Designing Your Bookshelf
Designing your bookshelf is the first step to turn an old ladder into a useful piece. This stage helps you see the final look and how it will fit your space. Good design makes the project easier and the shelf stronger.
Think about how many shelves you want and how tall they should be. These choices affect how much stuff you can store and how the ladder looks on your wall or floor.
Planning Shelf Placement
Look at the ladder and decide where the shelves should go. Choose spots that balance the ladder’s shape and size. Space the shelves evenly or place them where you want to store bigger items.
Keep in mind the ladder’s rungs. They can be shelf supports or need removal. Plan shelves that fit between or on top of these rungs for stability.
Measuring And Marking
Use a tape measure to find the exact spots for shelves. Measure twice to avoid mistakes. Mark these points clearly with a pencil or masking tape.
Check the ladder’s width and depth. These measurements help you cut shelves that fit well. Mark edges and corners to guide your cuts and attachments later.
Installing Shelves
Installing shelves on an old ladder turns it into a useful bookshelf. This step makes the ladder stable and ready to hold your books and decor. Choosing the right materials and attaching them well are key. The shelves must fit well and support weight safely.
Choosing Shelf Materials
Pick wood that is strong and light. Pine and plywood work well. Avoid heavy wood that can make the ladder unstable. Measure the space between ladder steps. Cut shelves to fit this space exactly. Smooth the edges to avoid splinters. Paint or stain the shelves to match the ladder or your room decor.
Attaching Shelves Securely
Use screws or brackets to hold shelves firmly. Pre-drill holes in the shelves and ladder to prevent wood from splitting. Check that shelves are level before tightening screws. Place brackets under shelves for extra support. Make sure each shelf is stable and will not wobble. Test by pressing down lightly on each shelf.
Finishing Touches
Finishing touches bring your ladder bookshelf to life. They protect the wood and add style. These final steps make your project look complete and polished. Choose options that suit your room and taste. Small details can make a big difference.
Painting And Staining Options
Painting or staining changes the ladder’s look. Paint offers bright colors or soft pastels. It covers old marks and gives a fresh feel. Staining shows the wood’s natural grain and texture. Choose a stain that matches other furniture. Use a brush or cloth for smooth application. Let each coat dry fully before adding another. Clear sealant protects paint or stain from wear. This step keeps your shelf looking new longer.
Adding Decorative Elements
Decorative elements add charm and personality. Use washi tape or stencils for patterns. Attach small hooks to hang items like keys or plants. Add baskets on shelves to hold small objects. Try fairy lights for a warm, cozy glow. Attach small signs or labels for a rustic touch. These details make your bookshelf unique and inviting.
Safety Tips
Safety is the top priority when turning an old ladder into a bookshelf. This project involves tools, heights, and heavy items. Careful steps help prevent accidents and damage. Follow these safety tips to build a strong and safe bookshelf.
Ensuring Stability
Check the ladder for cracks or weak spots. Fix or replace any damaged parts before starting. Place the ladder on a flat, stable surface to avoid tipping. Use screws and brackets to secure shelves firmly to the ladder. Tighten all connections to keep the structure steady. Test the ladder by gently shaking it before adding books.
Proper Weight Distribution
Place heavier books on the lower shelves to keep the center of gravity low. Spread books evenly across each shelf to avoid overloading one side. Avoid stacking too many heavy items on a single shelf. Balance decorations and books to prevent leaning. Regularly check the shelf for signs of stress or bending.
Maintenance And Care
Maintaining and caring for your bookshelf made from an old ladder keeps it looking good. It also extends its life. Simple steps help protect the wood and finish. A clean, sturdy shelf holds your books safely.
Cleaning Advice
Dust the shelf regularly with a soft cloth. Avoid wet cloths that can damage the wood. Use a dry or slightly damp cloth for sticky spots. Do not use harsh chemicals or abrasive cleaners. These can ruin the paint or wood finish.
For deeper cleaning, mix mild soap with water. Wipe gently and dry immediately. Keep the shelf away from direct water contact. This prevents warping or rotting of the wood.
Preventing Wear And Tear
Place the bookshelf in a dry area. Avoid spots with high humidity or direct sunlight. Use felt pads under heavy items to stop scratches. Check screws and joints often to keep them tight.
Do not overload the shelves with heavy books. Spread weight evenly to avoid bending. Touch up scratches with matching paint or wood stain. This keeps the shelf looking fresh and strong.
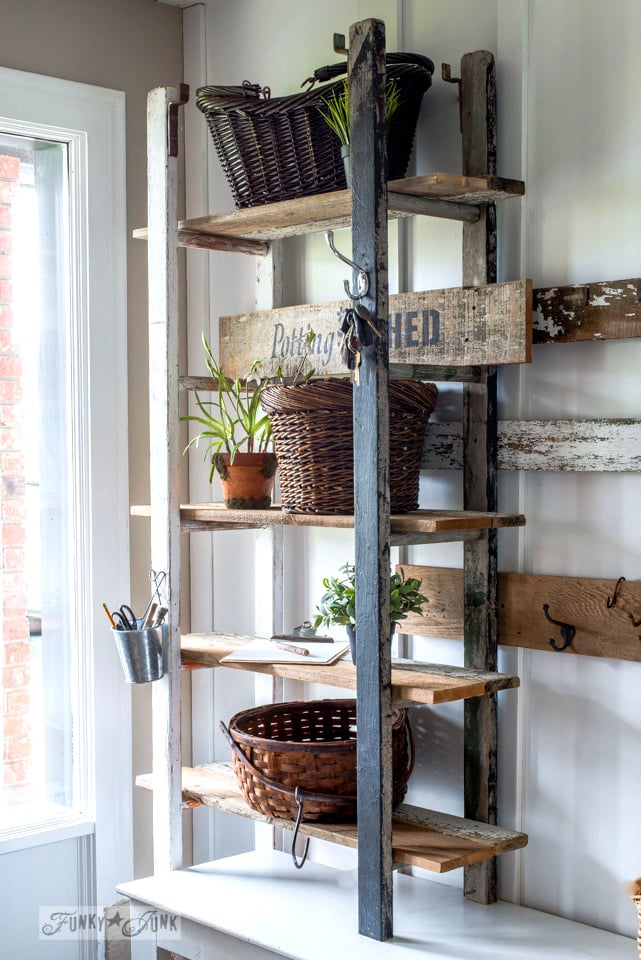
Credit: www.funkyjunkinteriors.net
Frequently Asked Questions
How Do You Prepare An Old Ladder For A Bookshelf?
Clean the ladder thoroughly and sand rough spots. Remove any loose paint or rust. This ensures a smooth surface for painting or sealing.
What Tools Are Needed To Convert A Ladder Into A Bookshelf?
You will need sandpaper, paint or sealant, screws, a drill, brackets, and wooden planks for shelves. These tools help secure and finish the bookshelf.
How Can I Make The Bookshelf Sturdy And Safe?
Use strong brackets to support shelves. Secure the ladder to the wall with anchors. This prevents wobbling and ensures safety.
Can I Customize The Bookshelf Size Using Different Ladders?
Yes, ladder size determines shelf height and width. Choose a ladder that fits your space and book collection needs.
Conclusion
Creating a bookshelf from an old ladder is simple and fun. It saves money and gives new life to old items. You can customize it to fit your space and style. This project adds charm and storage to any room.
Try it yourself and enjoy the process. A unique bookshelf like this brings character and usefulness together. Start with what you have and build something special today.