
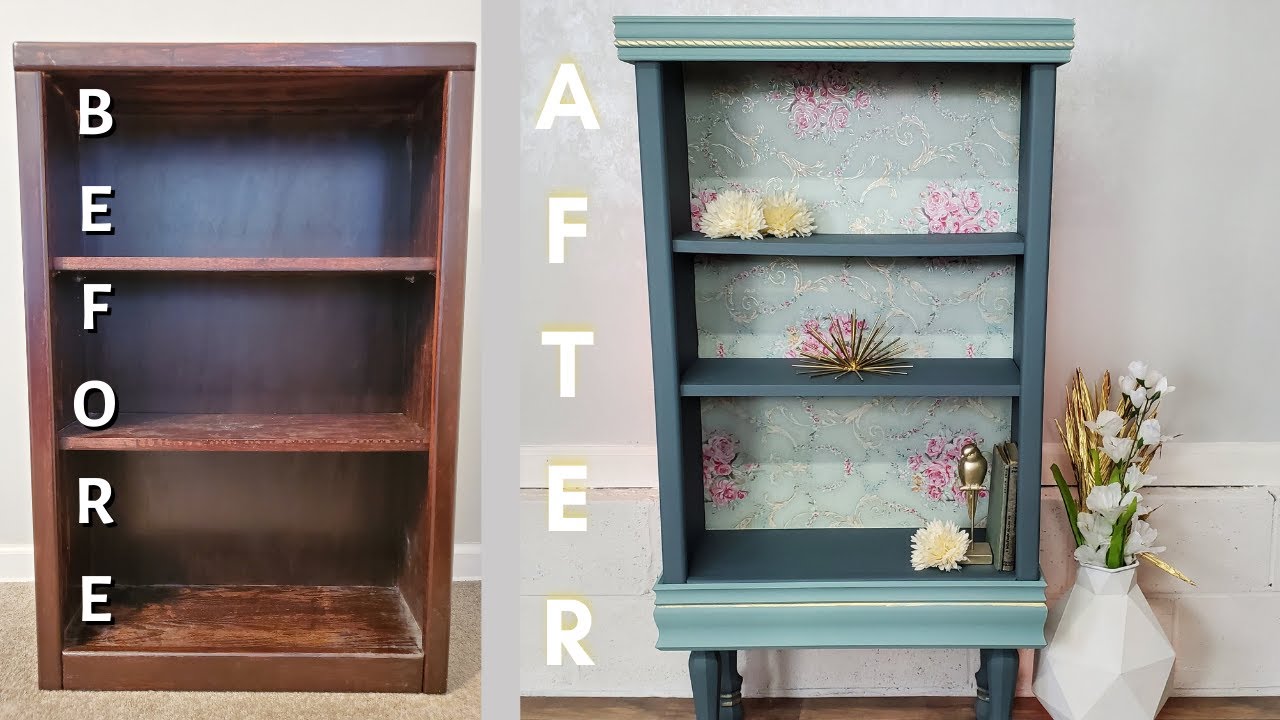
Are you tired of looking at your old, dull bookshelf? Imagine giving it a fresh, vibrant new look without spending a fortune.
Repainting your bookshelf is easier than you think, and it can completely transform your space. In this guide, you’ll discover simple steps to make your bookshelf look brand new. Whether you want a sleek modern finish or a cozy vintage feel, you’ll learn how to do it right.
Keep reading, and you’ll soon have a beautiful bookshelf that stands out and reflects your style perfectly.
Choose The Right Paint
Choosing the right paint is key to a great bookshelf makeover. The paint you select affects durability, appearance, and the shelf’s overall feel. Picking the best type and finish helps your bookshelf look fresh and last longer.
Consider the room where the bookshelf will stand. The paint needs to handle wear and tear but also match your decor. Think about the color and how it will blend with other furniture.
Types Of Paint For Bookshelves
Latex paint is a popular choice. It cleans easily and dries fast. It works well on wood and MDF shelves.
Oil-based paint gives a smooth, hard finish. It lasts longer but takes more time to dry. It may have a strong smell.
Chalk paint offers a matte, vintage look. It requires less prep work and can be sealed for protection.
Finish Options
Glossy finishes reflect light and show details well. They resist stains and are easy to clean.
Satin finishes have a soft shine. They hide imperfections better than gloss.
Matte finishes provide a flat look. They work well for a subtle, modern style but can be harder to clean.
Color Selection Tips
Light colors make small rooms feel bigger. They brighten up dark corners.
Dark colors add depth and drama. They create a strong focal point.
Neutral colors blend with most decor. They offer a timeless, classic look.
Test paint samples on the shelf first. See how the color changes in different light.
Prepare The Bookshelf
Preparing the bookshelf is the first step to a smooth repaint job. A well-prepared surface helps the paint stick better and last longer. It also makes your finished bookshelf look neat and fresh.
Remove Items And Hardware
Start by taking everything off the bookshelf. Remove books, decorations, and any loose items. Next, unscrew or pull off hardware like knobs or handles. This makes painting easier and prevents damage to these parts.
Clean And Sand The Surface
Wipe the bookshelf with a damp cloth to remove dust and dirt. Use a gentle cleaner if needed. After cleaning, sand the surface with fine-grit sandpaper. Sanding smooths rough spots and helps the paint stick better. Wipe off the sanding dust with a clean cloth.
Fix Imperfections
Look for cracks, holes, or dents on the wood. Fill these with wood filler or putty. Let it dry completely. Sand the filled areas smooth so they blend with the rest of the surface. This step creates a flawless base for painting.
Set Up Your Workspace
Setting up your workspace is the first step to repainting your bookshelf. A good setup helps you work cleanly and safely. It also keeps your paint job neat and smooth. Prepare your area well before starting to paint.
Clear enough space to move around easily. Make sure the room has good light and fresh air. This will help you see details and avoid strong paint fumes.
Protect Surrounding Areas
Cover floors and nearby furniture with plastic sheets or old newspapers. This stops paint drops from ruining your space. Tape edges of walls or baseboards to keep paint inside the bookshelf area. Use painter’s tape for clean, sharp lines. Protection saves time on cleanup later.
Gather Tools And Materials
Collect all tools before starting. You will need sandpaper, primer, paint, brushes, and a small roller. Have a clean cloth to wipe dust from the shelf. Use a paint tray to hold your paint. Keep everything close to avoid interruptions. Being ready speeds up your painting process.
Credit: www.youtube.com
Apply Primer
Applying primer is a key step in repainting your bookshelf. It creates a smooth base for paint to stick well. Primer also helps cover old colors and stains. This step protects the wood and keeps paint from peeling. Taking time to apply primer ensures a long-lasting finish.
Why Primer Matters
Primer improves paint adhesion on the bookshelf surface. It blocks stains and wood tannins from bleeding through paint. Primer helps paint cover better with fewer coats. It seals porous surfaces, preventing paint from soaking in unevenly. This leads to a smoother and more even look.
Tips For Even Application
Use a clean brush or roller for primer. Apply thin, even coats to avoid drips. Work in long, smooth strokes along the wood grain. Avoid overloading the brush with primer. Sand lightly between coats if needed for a smooth finish.
Drying Time
Let the primer dry fully before painting. Drying time depends on the primer type and room temperature. Usually, it takes 1 to 4 hours to dry. Check the label for exact drying instructions. Rushing this step may cause paint to peel later.
Paint The Bookshelf
Painting the bookshelf is a fun part of the project. It gives the furniture a fresh, new look. The right paint and method make a big difference. You want smooth, even color without mess or streaks. Patience and care help you get the best results. Below are key tips on painting techniques and handling the paint.
Brush Vs. Spray Techniques
Brush painting is simple and cheap. It works well for small or detailed areas. You can control the paint easily with a brush. Spraying covers large areas faster. It gives a smooth, even finish without brush marks. Sprayers need more prep work to avoid mess. Choose the method that fits your space and skills.
Layering And Drying Between Coats
Apply paint in thin layers. Thick coats can drip and take longer to dry. Let each layer dry completely before the next coat. Drying times vary by paint type and room temperature. Multiple thin coats give a stronger, better-looking finish. Patience here saves you time and work later.
Avoiding Drips And Streaks
Keep your brush or sprayer loaded just right. Too much paint causes drips and runs. Use smooth, even strokes for brushing. For spraying, hold the nozzle steady and move at a steady speed. Check the surface often to catch drips early. Fix small drips by gently smoothing them out before drying.
Add Finishing Touches
After painting your bookshelf, the final steps make a big difference. These small actions help protect your work and give your shelf a fresh, complete look. Take your time with these finishing touches for the best results.
Seal The Paint
Sealing the paint protects the surface from chips and scratches. Use a clear, water-based sealer for a smooth finish. Apply thin, even coats with a brush or spray. Let each coat dry fully before adding the next. This step keeps your paint looking fresh for a long time.
Reattach Hardware
Put back any knobs, handles, or brackets you removed. Check if the screws fit tightly without damage. Clean the hardware before reattaching to keep it shiny. Tighten all screws firmly but avoid over-tightening. Proper hardware helps your bookshelf look neat and sturdy.
Decorate Your Refreshed Bookshelf
Arrange your books and decorations in a balanced way. Use different sizes and colors to create interest. Add plants or small art pieces for a lively touch. Keep some space free to avoid clutter. A well-decorated shelf highlights your repainting work beautifully.
Common Mistakes To Avoid
Repainting a bookshelf can refresh any room. It looks simple but many make mistakes. Avoiding these errors saves time and effort. The right steps create a smooth and lasting finish. Below are common mistakes to watch out for.
Skipping Surface Preparation
Clean the bookshelf before painting. Dirt and dust stop paint from sticking well. Sand rough areas to smooth the wood. Skipping this step causes peeling paint later.
Using The Wrong Paint
Choose paint made for wood furniture. Wall paint may not hold up well. Use a durable, easy-to-clean paint. The wrong paint can chip or fade fast.
Applying Thick Paint Layers
Apply thin, even coats of paint. Thick layers drip and take longer to dry. Multiple thin coats give a better look and last longer.
Not Letting Paint Dry Properly
Wait for each coat to dry fully. Rushing causes smudges and uneven surfaces. Follow the paint label’s drying time instructions carefully.
Ignoring Ventilation
Paint in a well-ventilated space. Fumes can be harmful and slow drying. Open windows or use fans to improve airflow.

Credit: raggedy-bits.com

Credit: loveyourabode.com
Frequently Asked Questions
How Do I Prepare A Bookshelf For Repainting?
Start by removing all items and dust from the bookshelf. Sand the surface to smooth rough areas. Wipe with a damp cloth to remove dust. Apply primer for better paint adhesion and durability.
What Type Of Paint Works Best For Bookshelves?
Use water-based acrylic or latex paint for bookshelves. These paints dry quickly and resist chipping. Choose a semi-gloss or satin finish for easy cleaning and a polished look.
How Many Coats Of Paint Should I Apply?
Apply two to three thin coats of paint. Allow each coat to dry completely before applying the next. Multiple coats ensure an even, durable, and vibrant finish.
Can I Repaint A Bookshelf Without Sanding?
Sanding is recommended but not always necessary. Use a deglosser to remove shine on glossy surfaces. Proper surface prep improves paint adhesion and prevents peeling.
Conclusion
Repainting a bookshelf can refresh any room quickly and affordably. Start by cleaning and sanding the surface well. Choose paint that fits your style and shelf material. Take your time with each coat for the best finish. Let the paint dry fully before adding books or decor.
Small steps make a big difference in the final look. Enjoy your newly painted bookshelf as it brightens your space. Simple projects like this bring a sense of pride and change. Give your old shelf a fresh, new life today.