Are you looking for a unique way to organize your coats and add charm to your space? Building a piano coat rack might be the perfect project for you.
Imagine transforming an old piano part into a stylish, functional piece that impresses guests and keeps your entryway neat. In this guide, you’ll discover simple steps to create your own piano coat rack—even if you’re not a woodworking expert. Ready to turn something ordinary into a conversation starter?
Keep reading, and let’s get started!
Choosing Materials
Start by picking sturdy wood for the piano coat rack. Choose hooks that can hold heavy coats easily. Make sure all materials fit well together.
Selecting The Right Wood
Choose wood that is strong and easy to work with. Pine and oak are popular choices. Pine is soft and affordable. Oak is harder and lasts longer. Pick wood with a smooth surface to avoid splinters. Check for cracks or knots that can weaken the rack.
Picking Hardware And Hooks
Select hooks that fit the style of your rack. Metal hooks are durable and hold heavy coats well. Brass hooks add a classic touch. Make sure screws and nails match the hooks in color and size. Use wall anchors for extra support if hanging heavy items.
Gathering Tools
Prepare all tools before starting your project. A saw will cut the wood to size. Sandpaper smooths rough edges. A drill makes holes for screws and hooks. Have a screwdriver, measuring tape, and pencil ready. Safety gear like goggles and gloves protects you.

Credit: www.anikasdiylife.com
Designing Your Coat Rack
Designing your piano coat rack is an important step before building. It helps you create a piece that fits your space and style. Careful design makes sure the rack is useful and looks great. This section guides you through key design steps for your project.
Measuring And Planning
Start by measuring the wall space where the rack will hang. Note the width, height, and depth available. Think about how many coats or items you want to hold. Plan enough space between hooks for easy access. Write down all measurements to avoid mistakes later.
Incorporating Piano Elements
Use parts of an old piano for unique details. Piano keys can become hooks or decorative strips. Wood from the piano’s frame adds charm and strength. Keep the piano look by using black and white colors. These touches make your coat rack special and eye-catching.
Sketching The Layout
Draw your coat rack design on paper or digitally. Include exact measurements and placement of hooks. Show where piano parts will fit into the design. This sketch guides your building process and helps avoid errors. Keep the design simple for easier construction.
Preparing The Wood
Preparing the wood is the first key step to build your piano coat rack. The wood must be ready to hold hooks and support weight. Proper preparation makes your rack strong and looks great. It includes cutting, sanding, and finishing the wood. Each step improves the wood’s quality and durability.
Cutting To Size
Start by measuring the wood carefully. Cut the pieces to the exact size needed for your rack. Use a saw that suits your skill level and tools. Smooth, straight cuts help the rack fit together well. Always wear safety gear during cutting to protect yourself.
Sanding And Smoothing
After cutting, sand the wood to remove rough edges. Use medium-grit sandpaper first, then fine-grit for a smooth finish. Sand along the wood grain to avoid scratches. This step prevents splinters and helps the finish stick better. Check all surfaces and corners for smoothness.
Applying Finish Or Paint
Choose a finish or paint that suits your style and wood type. Apply a thin coat evenly with a brush or cloth. Let it dry completely before adding more layers. Finishing protects the wood from moisture and wear. It also gives your coat rack a polished, attractive look.
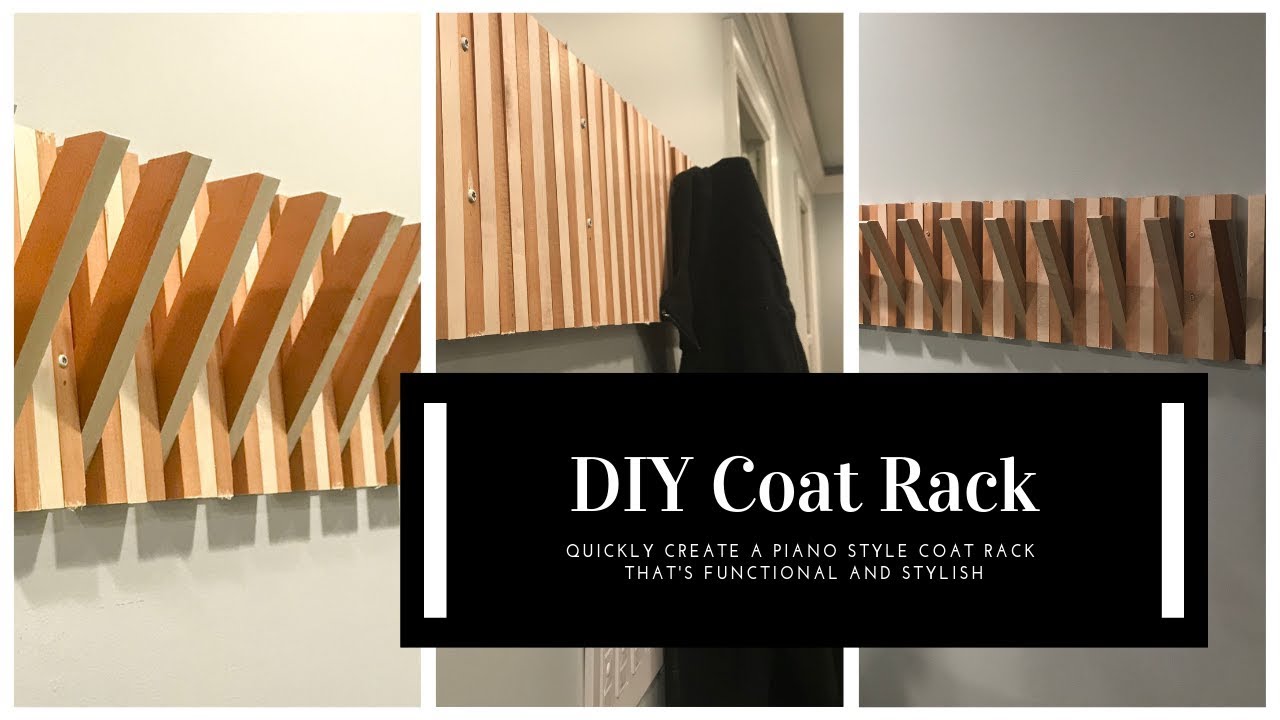
Credit: www.youtube.com
Assembling The Rack
Assembling the piano coat rack is a key step to finish your project. This part brings all the pieces together to create a sturdy and attractive rack. Follow each step carefully to ensure your coat rack stands strong and looks great.
Attaching Hooks
Start by placing the hooks evenly along the wooden board. Mark their positions with a pencil. Use screws and a screwdriver to fix each hook firmly. Make sure the hooks are straight and secure. Test by gently pulling on each hook to check stability.
Securing Components
Join the main parts of the rack using wood glue and screws. Apply glue to the edges before fitting pieces together. Tighten screws to hold everything in place. Check corners and joints for tightness. Wipe off any extra glue before it dries.
Adding Decorative Details
Use paint or stain to add color and protect the wood. Choose a finish that matches your room style. Add small accents like stencils or decals if desired. Let the rack dry completely before using it. This step improves both look and durability.
Mounting And Placement
Mounting and placement are key steps in building your piano coat rack. The right location keeps it both useful and safe. Secure mounting prevents damage to walls and rack. Follow clear steps to find the best spot and fix the rack firmly.
Choosing Wall Location
Pick a wall that is easy to reach. Avoid places near doors that open wide. Make sure the wall is free of obstacles. Check that the rack won’t block walkways or furniture. A spot near the entrance is usually best. The wall should be flat and clean.
Installing Support
Use a stud finder to locate wall studs. Studs offer strong support for your rack. Mark the spots where you will drill holes. Use screws and anchors made for your wall type. Drill pilot holes first to avoid cracking. Screw the rack tightly into the studs for stability.
Testing Stability
After installation, gently pull on the rack. Check for any wobbling or movement. Hang a few coats to test its strength. If it feels loose, tighten the screws. Make sure the rack holds weight without shifting. A stable rack lasts longer and stays safe.

Credit: www.reddit.com
Maintenance Tips
Maintaining your piano coat rack keeps it looking great and working well. Simple care steps protect the wood and finish. A little effort can extend its life for many years.
Cleaning And Care
Dust the coat rack regularly with a soft cloth. Avoid using water or harsh cleaners. A dry or slightly damp cloth works best. Wipe spills immediately to prevent stains. Keep the rack away from direct sunlight and heat sources. This prevents fading and cracking.
Touching Up Finish
Small scratches can be fixed with a wood touch-up marker. Match the color to your rack’s finish. Lightly rub the marker over the scratch and blend it with a soft cloth. For worn areas, apply a thin layer of furniture polish. Let it dry and buff gently to restore shine.
Ensuring Longevity
Check screws and hooks regularly to keep them tight. Replace any damaged parts to avoid accidents. Avoid hanging very heavy items on the rack. Use felt pads under the rack’s base to protect floors. Proper maintenance ensures your piano coat rack stays sturdy and beautiful for years.
Frequently Asked Questions
What Materials Are Needed To Build A Piano Coat Rack?
You need wood panels, screws, hooks, wood glue, and paint or stain. Select sturdy wood like pine or oak for durability. Use quality screws and hooks to support heavy coats. Prepare basic woodworking tools such as a drill, saw, and screwdriver for assembly.
How Long Does It Take To Build A Piano Coat Rack?
Building a piano coat rack typically takes 3 to 5 hours. This includes measuring, cutting, assembling, and finishing. Time may vary based on your woodworking skill level. Planning and preparation can speed up the process significantly.
Can I Customize The Design Of My Piano Coat Rack?
Yes, you can customize size, color, and hook placement. Add shelves or decorative elements to match your home decor. Use different stains or paint for a unique look. Customization makes the coat rack both functional and visually appealing.
How Do I Mount The Piano Coat Rack Securely?
Mount the rack on wall studs for strong support. Use a level to ensure it is straight. Secure with heavy-duty screws and anchors if studs are not available. Proper mounting prevents accidents and increases the rack’s weight capacity.
Conclusion
Building a piano coat rack adds charm and function to any room. The steps are simple and clear to follow. You can choose wood and hooks that fit your style. This project saves money and gives a personal touch to your space.
Enjoy hanging coats neatly and impressing guests with your handiwork. Try it today and see how easy it feels to create something useful and beautiful.
