Looking for a smart way to save space and add extra storage to your room? Building bunk bed storage stairs is the perfect solution.
Not only do these stairs make climbing safer and easier, but they also give you handy drawers or shelves right where you need them. Imagine having a clutter-free room with everything neatly tucked away. In this guide, you’ll discover simple steps and tips to create your own sturdy, stylish storage stairs that fit your space and needs.
Ready to transform your bunk bed into a clever storage powerhouse? Let’s get started!
Planning Your Storage Stairs
Planning your storage stairs is the first step to a successful bunk bed project. Careful planning helps create safe, functional, and space-saving stairs. Thoughtful preparation saves time and money during building. Focus on key aspects like size, materials, and design. Each part affects comfort and usefulness.
Measuring Space And Dimensions
Start by measuring the space near the bunk bed. Measure the height from floor to top bunk. Note the width available for the stairs. Check floor space for the stair base. Write down all measurements clearly. Double-check numbers before moving forward. Accurate measurements ensure the stairs fit perfectly.
Choosing Materials
Select strong and durable materials for safety. Wood is a popular choice for its strength and look. Use hardwood like oak or maple for long-lasting stairs. Choose screws and nails that hold firmly. Sandpaper smooths rough edges to avoid splinters. Consider paint or stain for a clean finish.
Designing Stair Layout
Plan the stair shape and storage options. Decide if stairs will have drawers or open shelves. Choose a comfortable step height, usually 7 to 8 inches. Make steps wide enough for safe climbing. Think about handrails or side guards. Sketch the layout on paper for clear guidance.
Gathering Tools And Supplies
Gathering the right tools and supplies is the first step in building bunk bed storage stairs. Having everything ready helps the project go smoothly. It saves time and prevents frustration during the build. This section covers the must-have tools, the best hardware choices, and how to prepare your materials. Follow these tips to start your project with confidence.
Essential Tools List
Start with basic hand tools like a hammer and tape measure. A power drill makes screwing faster and easier. Use a saw to cut wood pieces accurately. Sandpaper or an electric sander smooths rough edges. A square tool helps keep corners straight. Clamps hold pieces in place while you work. Safety gear like goggles and gloves protect you during the build.
Selecting Hardware
Choose strong screws designed for wood. These hold the stairs securely. Use metal brackets for extra support on joints. Drawer slides work well for storage compartments. Pick hardware that matches the size of your wood pieces. Avoid cheap hardware that can break or bend. Reliable hardware ensures the stairs stay safe for years.
Preparing Materials
Buy wood that is sturdy and free from cracks. Pine or plywood are good options. Cut all pieces to the correct size before assembly. Label each piece to keep track of parts. Sand the wood to remove splinters. Apply a finish or paint to protect the wood. Proper preparation makes the build easier and neater.
Cutting And Preparing Wood
Cutting and preparing wood is a crucial step in building bunk bed storage stairs. This process ensures each piece fits perfectly and supports weight safely. Accurate cutting and smooth finishes help create strong, durable stairs. Take time to prepare wood carefully for the best results.
Marking Measurements
Start by measuring each stair part precisely. Use a tape measure and pencil to mark the wood. Double-check all marks before cutting. Clear, straight lines guide your cuts and prevent mistakes. Mark every piece separately for better organization.
Safe Cutting Techniques
Use a saw suitable for your wood type. Keep your hands away from the blade at all times. Cut slowly and steadily, following your marks closely. Wear safety goggles and gloves to protect yourself. Secure the wood firmly on a stable surface before cutting.
Sanding And Finishing
After cutting, sand all edges and surfaces smoothly. Use medium to fine sandpaper for a clean finish. Sanding removes splinters and rough spots that can cause injury. Finish with a wood sealant or paint to protect the wood. Let each layer dry completely before adding another.
Assembling The Stair Frame
Assembling the stair frame is the first big step in building bunk bed storage stairs. This part creates the basic shape and strength of your stairs. A strong frame supports the steps and the weight of anyone climbing. Taking time to build it right ensures safety and durability. Follow clear steps to make the process easy and smooth.
Building Side Panels
Start by cutting two side panels from strong wood. These panels hold the steps and give the stairs their shape. Measure carefully to match the height of your bunk bed. Cut out spaces where the steps will fit. Sand the edges to avoid splinters. Use screws to join the panels with corner braces for extra strength.
Attaching Steps
Cut the steps to fit between the side panels. Each step should be wide enough for safe footing. Attach steps using wood screws from the outside of the side panels. Check that each step sits level before tightening the screws. Space the steps evenly to allow easy climbing. Reinforce the steps with small blocks under each one if needed.
Ensuring Stability
Check the whole frame for any wobble or movement. Add extra braces along the back or bottom if the frame feels loose. Use a level to confirm the stairs stand straight. Tighten all screws and bolts securely. Test the stairs by pressing down on each step. A stable frame keeps the stairs safe for daily use.
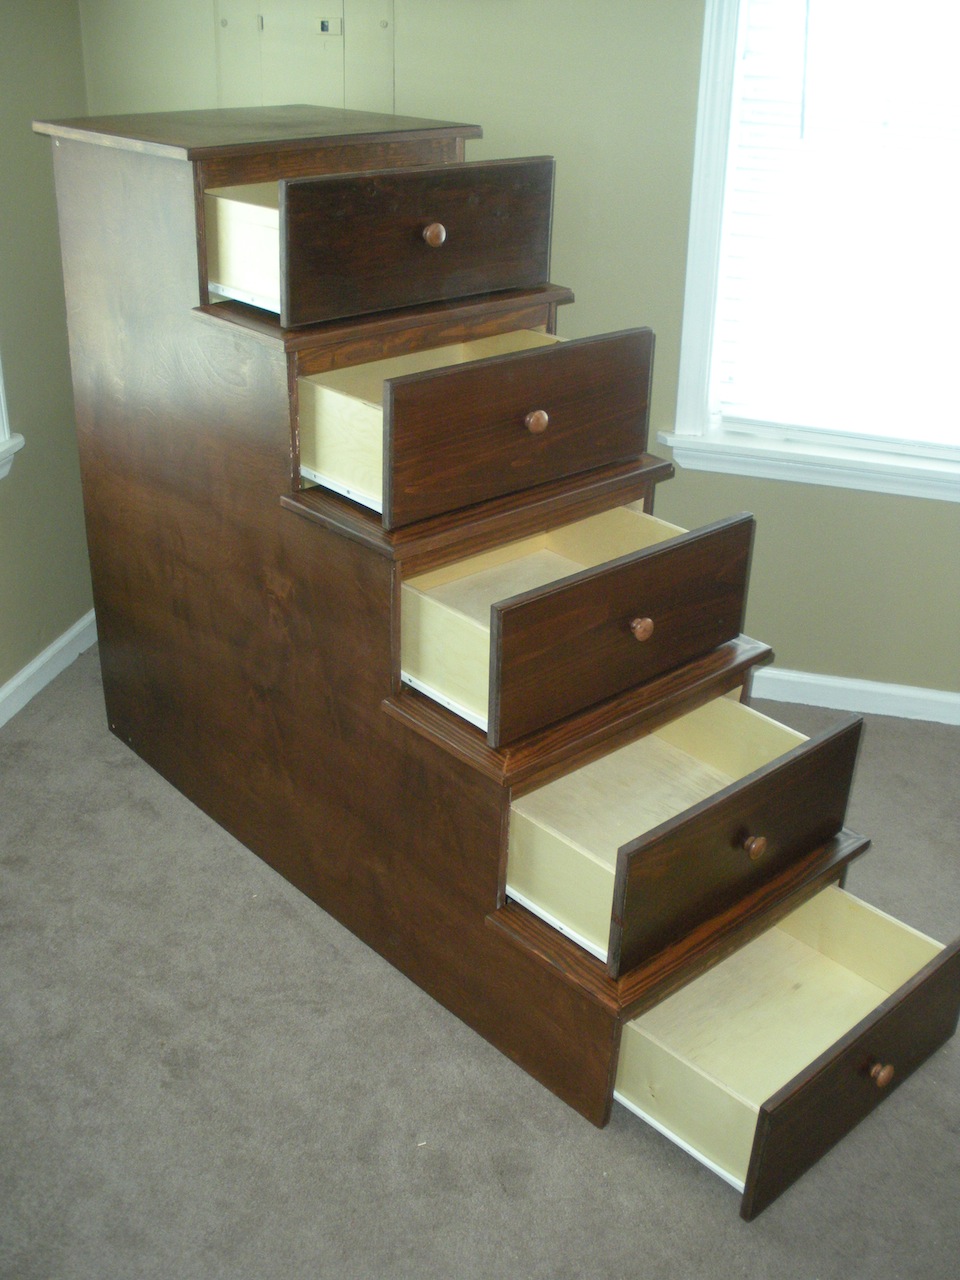
Creating Storage Compartments
Creating storage compartments in bunk bed stairs is a smart way to save space. It helps keep the room neat and organized. Storage compartments can be drawers or shelves built into each step. This makes the stairs both safe and useful. Follow clear steps to design and install these compartments.
Designing Drawers And Shelves
Start by measuring the space inside each stair. Decide if you want drawers or open shelves. Drawers are great for hiding clutter. Shelves work well for books or toys. Plan the size of each compartment carefully. Make sure they fit the stair frame and do not block the step surface.
Installing Drawer Slides
Use drawer slides for smooth opening and closing. Choose slides that fit your drawer size. Attach the slides to the inside of the stair frame. Then fix the matching part on the drawer sides. Check the movement to ensure the drawer slides easily without sticking.
Adding Handles And Pulls
Select handles or pulls that are easy to grip. They should be safe and simple for kids to use. Attach them to the front of each drawer. Place handles centered or near the top edge. Secure them with screws to avoid loosening over time.

Credit: www.ana-white.com
Finishing Touches
Finishing touches bring your bunk bed storage stairs to life. They protect the wood and add style. Safety and decoration make the stairs both useful and nice to see. The final steps create a polished, complete look.
Painting And Staining Options
Choose paint or stain that matches the room’s colors. Paint covers the wood fully and offers many color choices. Stain shows the wood grain and gives a natural look. Use non-toxic, child-safe finishes for safety. Apply at least two coats for durability. Let each coat dry well before adding another.
Safety Features
Add anti-slip strips or pads on each step for safety. Round the edges of stairs to avoid sharp corners. Secure handrails firmly to help with balance. Check that all screws and nails are flush with the surface. Test the stairs for stability before use. Safety makes the stairs comfortable and worry-free.
Decorative Elements
Add fun knobs or handles on storage drawers for easy use. Use stencils or decals to create patterns on stairs. Place small baskets or boxes inside storage for neatness. Choose simple decorations that children will like. Keep decorations low to avoid clutter. These small touches make the stairs unique and inviting.
Installing The Storage Stairs
Installing the storage stairs is a key step in building your bunk bed storage solution. This process makes sure the stairs fit well and stay safe to use. Proper installation helps keep the stairs stable and the bed secure. Follow each step carefully to avoid common mistakes. Let’s start with positioning the stairs next to the bunk bed.
Positioning Next To Bunk Bed
Place the storage stairs right beside the bunk bed frame. Align the stairs so the bottom step sits flat on the floor. Check that the top step meets the edge of the bed platform. Make sure the stairs do not block any drawers or storage compartments. This position allows easy climbing and access to the bed.
Securing To Bed Frame
Use strong screws or brackets to attach the stairs to the bed frame. Drill pilot holes in the frame and stairs to prevent wood splitting. Tighten all screws firmly to avoid wobbling. Double-check that the stairs do not shift when pushed. Securing the stairs keeps them stable and safe for daily use.
Testing For Safety
Test the stairs by applying pressure on each step. Stand on the stairs and shift your weight side to side. Listen for creaks or movement that could show weakness. Adjust or tighten connections as needed. Safety testing ensures the stairs hold weight without risk of falling.

Credit: www.veterinavitkovice.cz
Maintenance And Tips
Proper care keeps your bunk bed storage stairs safe and lasting longer. Small habits protect your stairs from damage and wear. Follow these tips to maintain your stairs well.
Regular Inspections
Check your stairs often for loose screws or cracks. Tighten any loose parts right away. Look under steps and inside drawers for damage. Early fixes stop bigger problems later. Make inspections part of your routine.
Cleaning Advice
Use a soft cloth or duster to clean stairs weekly. Avoid harsh chemicals that can harm the wood or paint. Wipe spills immediately to prevent stains. Keep drawers clean and dust-free inside. Clean stairs keep the area fresh and safe.
Space Optimization Tips
Use storage drawers for toys, clothes, or books. Label each drawer to find items easily. Avoid overloading drawers to prevent damage. Keep the top of stairs clear for safe climbing. Organize often to keep clutter away.
Credit: thewoodwhisperer.com
Frequently Asked Questions
How Do I Start Building Bunk Bed Storage Stairs?
Begin by measuring your bunk bed’s height and available space. Plan stair dimensions and storage compartments. Gather materials like wood, screws, and tools. Sketch a detailed design to ensure safety and functionality before cutting and assembling the pieces.
What Materials Are Best For Bunk Bed Storage Stairs?
Use sturdy hardwood or plywood for durability and safety. Choose non-toxic paint or finish for a child-friendly environment. Ensure screws and brackets are strong enough to support weight. Quality materials increase longevity and enhance the stairs’ appearance.
How Can I Make Bunk Bed Stairs Safe For Kids?
Install handrails and ensure steps are wide and deep. Use non-slip treads on each step. Secure the stairs firmly to the bunk bed frame. Regularly check for loose parts and smooth any sharp edges to prevent injuries.
How Much Space Do Bunk Bed Storage Stairs Require?
Typically, stairs need about 24 to 30 inches in width and depth. Storage compartments vary but should fit within the stair dimensions without overcrowding. Measure your room carefully to ensure the stairs fit comfortably beside the bunk bed.
Conclusion
Building bunk bed storage stairs can save space and keep rooms tidy. Follow clear steps to create sturdy, useful stairs with storage. Use quality materials for safety and long-lasting use. Take your time measuring and assembling each part carefully. Enjoy the extra storage and easy access to the top bunk.
A simple project that adds both function and style to any bedroom. Give it a try, and see how much space you gain. Small changes can make a big difference in your home.