Looking to add a touch of warmth and style to your space? Building a simple wood bookshelf might be just what you need.
Imagine having a sturdy, beautiful shelf that holds your favorite books, displays your treasures, and fits perfectly in your room—all made by your own hands. You don’t need to be a woodworking expert or spend a fortune. This guide will show you easy steps to create a bookshelf that looks great and lasts long.
Ready to turn basic wood into something special? Let’s get started!
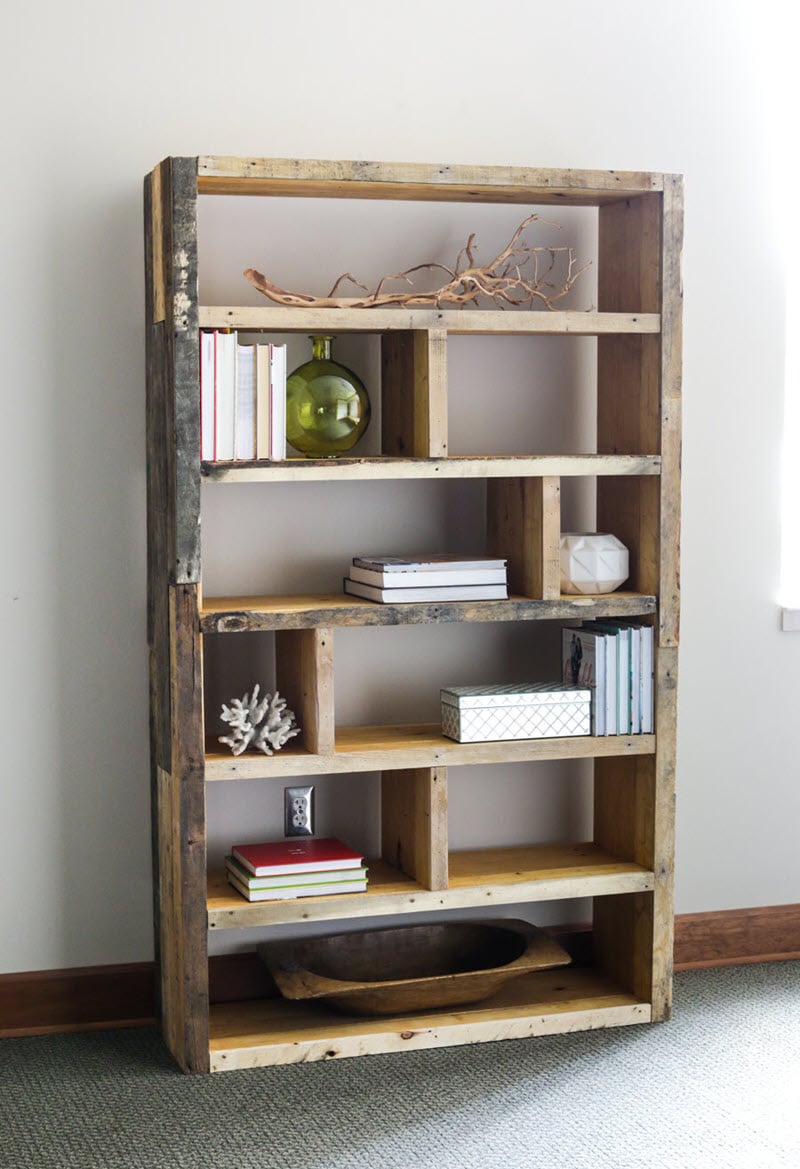
Credit: jenwoodhouse.com
Materials And Tools
Building a simple wood bookshelf starts with gathering the right materials and tools. Choosing good wood and having the proper tools makes the project easier and more enjoyable. Safety gear is also key to protect yourself during the work. This section explains what you need before you begin.
Wood Selection
Pick wood that is strong and easy to work with. Pine is a popular choice for beginners. It is soft, affordable, and widely available. Oak and maple are harder woods and last longer. Choose boards that are straight and free of knots. This helps the bookshelf look smooth and sturdy.
Essential Tools
You need a few basic tools to build the bookshelf. A saw cuts the wood to size. A drill makes holes for screws. Screwdrivers help fasten the pieces together. Sandpaper smooths rough edges. A tape measure and pencil are useful for marking cuts. These simple tools will help you build the shelf with ease.
Safety Gear
Wear safety glasses to protect your eyes from dust and wood chips. Use gloves to avoid splinters. A dust mask keeps you from breathing sawdust. Work in a well-ventilated area. Safety gear keeps you safe and comfortable during the project.
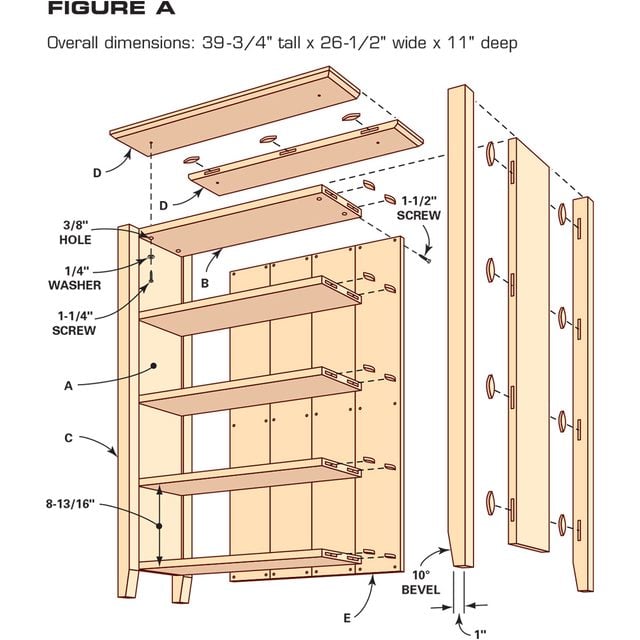
Credit: www.familyhandyman.com
Design And Measurements
Design and measurements are the first steps in building a simple wood bookshelf. Planning carefully saves time and materials. It helps to avoid mistakes during cutting and assembly. A good design makes the bookshelf sturdy and useful.
Choosing The Size
Decide how tall and wide the bookshelf should be. Think about the space where it will stand. Measure the height, width, and depth. Keep in mind the size of books or items to store. Choose a size that fits well and holds enough items.
Sketching The Plan
Draw a simple sketch of your bookshelf on paper. Show the front, side, and top views. Mark where the shelves will go. Label the parts with their measurements. This sketch helps to visualize the project clearly.
Marking The Wood
Transfer the measurements from your sketch to the wood pieces. Use a pencil and ruler for accuracy. Mark lines for cutting carefully. Double-check all marks before cutting. Clear marks make the cutting process easier and more precise.
Cutting The Wood
Cutting the wood is the first step to shape your bookshelf parts. Precise cuts make assembly easier and the final shelf stronger. Take your time and focus on accuracy. Proper cutting saves wood and effort later on.
Measuring Twice, Cutting Once
Always measure your wood pieces carefully. Use a tape measure and mark the cut lines clearly. Double-check each measurement before cutting. This habit prevents mistakes and wasted wood. Remember, it is easier to fix measuring than cutting errors.
Using A Saw Safely
Choose the right saw for your wood type and thickness. Hold the saw firmly and keep your fingers away from the blade. Cut slowly along the marked line. Use safety goggles to protect your eyes. Safety first keeps your project smooth and injury-free.
Sanding The Edges
After cutting, sand the edges to remove splinters and rough spots. Use medium-grit sandpaper to smooth the surface. This step improves the look and feel of your bookshelf. Sanding helps paint or finish stick better too.
Assembling The Frame
Assembling the frame is a key step in building your simple wood bookshelf. This step gives your bookshelf its shape and strength. Follow the instructions carefully to join each part firmly. A strong frame means your bookshelf will last long and hold many books.
Take your time to line up each piece correctly. Accuracy here helps avoid problems later. Use the right tools and materials for the best results.
Joining The Sides And Shelves
Start by placing the side panels upright. Position the shelves between the sides at the marks you made earlier. Ensure the shelves are level and fit snugly. Use clamps to hold them in place if needed. This keeps everything steady during assembly.
Using Screws And Nails
Choose screws for a strong hold and nails for quick fixing. Drill pilot holes before driving screws to prevent wood splitting. Drive nails carefully to avoid bending them. Use a hammer or screwdriver with steady pressure. Secure each joint tightly but avoid over-tightening.
Checking For Stability
Once assembled, check the frame for wobbling or gaps. Press gently on different parts of the frame. Make sure the shelves do not move or sag. Tighten any loose screws or nails. A stable frame ensures your bookshelf is safe and durable.
Finishing Touches
Finishing touches give your wood bookshelf a polished look. They protect the wood and improve its appearance. Taking time on these steps makes your project last longer. Small details make a big difference in quality and feel.
Filling Gaps And Holes
Start by checking for any gaps or holes in the wood. Use wood filler to fill these spaces. Apply it with a putty knife, pressing it firmly inside. Let the filler dry fully before sanding it smooth. This step ensures a clean surface for painting or staining.
Applying Paint Or Stain
Choose paint or stain based on your desired look. Paint offers bright colors and a solid finish. Stain shows the wood grain and adds warmth. Apply evenly with a brush or cloth. Work in thin coats to avoid drips and runs. Allow each coat to dry before adding another.
Adding Protective Coating
Seal your bookshelf with a clear protective coating. Use polyurethane, varnish, or lacquer for durability. This layer guards against scratches and moisture. Apply with a clean brush in thin layers. Let each coat dry and sand lightly for smoothness. This step keeps your shelf looking new for years.
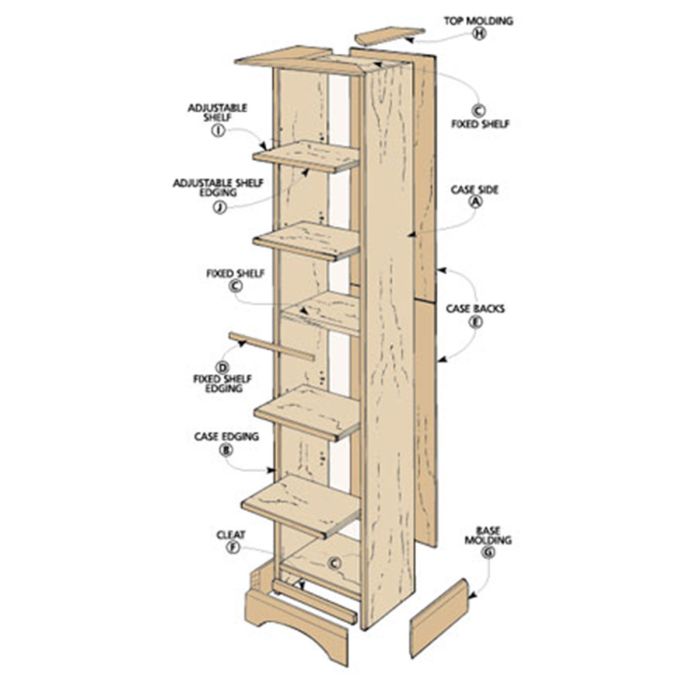
Credit: www.woodpeck.com
Placing And Organizing
Placing and organizing your new wood bookshelf is key to its function and look. A good spot enhances room space and keeps books safe. Thoughtful arrangement makes your collection easy to find and nice to see.
Positioning The Bookshelf
Choose a flat, stable surface for your bookshelf. Avoid spots near heating vents or direct sunlight. This protects wood and books from damage. Leave some space around for cleaning and air flow. Pick a place that fits your room size and style.
Securing To The Wall
Secure the bookshelf to the wall for safety. Use brackets or wall straps to prevent tipping. Find wall studs with a stud finder for strong support. Attach hardware tightly, so the shelf stays firm. This step is important in homes with kids or pets.
Arranging Books And Decor
Sort books by size, color, or topic for easy access. Place heavier books on lower shelves for balance. Mix in decor items like plants or photos to add charm. Leave some empty space to avoid clutter. Change the setup over time to keep it fresh.
Frequently Asked Questions
What Materials Do I Need To Build A Simple Wood Bookshelf?
You need wood boards, screws, wood glue, sandpaper, paint or stain, and basic tools like a saw and drill. Choosing quality wood ensures durability and a smooth finish for your bookshelf.
How Long Does It Take To Build A Basic Bookshelf?
Building a simple bookshelf typically takes 2 to 4 hours. Time depends on your skill level, tools, and drying time for paint or stain. Planning and preparation can help speed up the process.
What Tools Are Essential For Building A Wooden Bookshelf?
Essential tools include a saw, drill, screwdriver, measuring tape, level, and clamps. These tools help you cut, assemble, and secure the bookshelf accurately and safely.
Can I Customize The Size Of My Wood Bookshelf?
Yes, you can customize the bookshelf size to fit your space. Adjust the height, width, and depth measurements before cutting the wood for a perfect fit.
Conclusion
Building a simple wood bookshelf is a fun and useful project. You can create a sturdy shelf with basic tools and materials. Step-by-step, you saw, sand, and assemble the pieces. The result fits your space and style perfectly. This project helps you save money and learn woodworking skills.
Enjoy your new bookshelf filled with books or decorations. Try building one for your home today. It feels great to make something with your own hands.