Are you ready to add a magical touch to your room while organizing your books? Building a castle bookshelf is a fun and creative way to showcase your favorite reads and impress your guests.
Imagine a bookshelf that looks like a towering castle, making your space unique and full of charm. In this guide, you’ll discover simple steps to create your own castle bookshelf, even if you don’t have much experience with woodworking. By the end, you’ll have a stunning piece that not only holds your books but also sparks your imagination every time you see it.
Let’s get started and bring a bit of fairy-tale magic into your home!
Materials And Tools
Building a castle bookshelf starts with gathering the right materials and tools. This step ensures your project is smooth and enjoyable. Having everything ready saves time and avoids frustration. Let’s explore what you need for a sturdy and beautiful bookshelf.
Choosing The Right Wood
Select wood that is strong and easy to work with. Pine and plywood are popular choices. Pine is affordable and has a nice grain. Plywood offers stability and comes in large sheets. Avoid soft woods that may dent easily. Measure your space to decide how much wood to buy. Think about the shelf’s color and texture too.
Essential Tools Checklist
Gather basic tools before starting. A saw helps cut wood to size. A drill makes holes for screws. Sandpaper smooths rough edges. Screwdrivers fasten pieces together. A tape measure ensures precise cuts. Clamps hold wood steady while working. Safety gear like goggles and gloves protect your eyes and hands.
Optional Decorative Items
Decorations add charm to your castle bookshelf. Paint or wood stain changes the color. Brushes or rollers help apply finishes evenly. Small knobs or handles can mimic castle details. Use stencils to paint bricks or windows. LED strip lights create a magical glow. Choose items that match your room’s style.

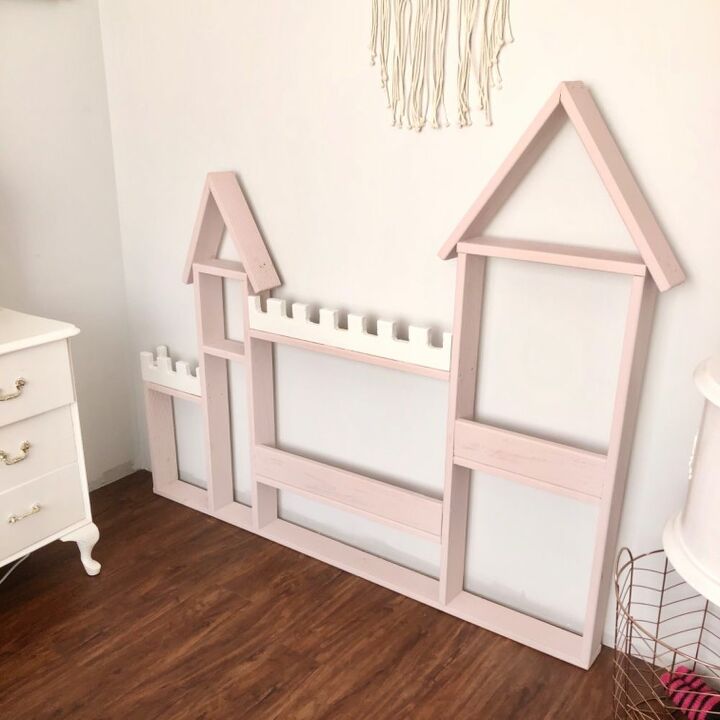
Credit: www.reddit.com
Design And Planning
Design and planning are the first steps to build a castle bookshelf. A clear plan saves time and avoids mistakes. It helps you visualize the final product and gather the right materials. Careful design makes the building process smooth and enjoyable.
Sketching Your Castle Bookshelf
Start by drawing a simple sketch of your castle bookshelf. Focus on the main shape and features. Include towers, battlements, and shelves. Use a pencil so you can change details easily. This sketch guides your work and shows how the bookshelf will look.
Measuring And Marking
Measure the space where the bookshelf will go. Write down the height, width, and depth. Use a ruler or tape measure for accuracy. Mark these measurements on your sketch. Accurate measurements help avoid fitting problems later.
Creating A Cut List
Make a list of all wood pieces needed. Include lengths, widths, and thicknesses. Organize the list by parts like shelves, walls, and towers. A cut list helps you buy the right amount of wood. It also speeds up cutting and assembling.
Cutting And Shaping Wood
Cutting and shaping wood are key steps in building a castle bookshelf. These tasks give the wood its form and style. Careful work ensures the pieces fit well and look great.
Start by preparing your tools and wood. Measure twice. Cut once. Precision matters.
Safe Cutting Techniques
Always wear safety goggles and gloves. Keep your workspace clean and clear. Use a sharp saw for smooth cuts. Hold the wood firmly to avoid slips. Cut slowly and steadily. Follow the marked lines carefully. Never rush. Check the blade condition before starting. Use clamps to hold small pieces in place.
Shaping Castle Features
Shape the wood to mimic castle towers and walls. Use a jigsaw for curves and angles. Sand edges to soften sharp corners. Carve small details with a chisel. Create battlements by cutting rectangular notches. Work slowly to keep shapes accurate. Test fit each piece as you go. This step adds charm to your bookshelf.
Sanding For Smoothness
Sand all surfaces to remove splinters and rough spots. Start with coarse sandpaper, then use finer grades. Sand edges and corners carefully. Wipe off dust with a dry cloth. Smooth wood feels good and looks neat. Proper sanding helps paint or stain stick better. Take your time for the best finish.
Assembly Process
The assembly process of your castle bookshelf is simple and fun. It lets you build a strong and beautiful piece for your room. Follow each step carefully to make sure your bookshelf looks great and lasts long.
Joining The Pieces
Start by sorting all the wooden parts. Match each piece to the plan you have. Use wood glue on the edges for a tight fit. Then, connect the pieces with screws or nails. Make sure corners are square and edges align well. Tight joints make the bookshelf stable and neat.
Adding Shelves
Next, place the shelves inside the frame. Measure the distance between shelves evenly. Attach shelf supports or brackets to hold them up. Slide the shelves onto the supports gently. Check each shelf for levelness with a small tool. Proper shelf placement gives a clean and balanced look.
Securing Stability
After adding shelves, check the overall stability. Use corner braces or extra screws on weak spots. Make sure the bookshelf does not wobble or lean. Place it against a wall for extra safety. You can also add a wall anchor to prevent tipping. A stable bookshelf keeps your books safe and organized.
Painting And Finishing
Painting and finishing your castle bookshelf gives it a beautiful, polished look. This step protects the wood and makes the design stand out. Taking time to do it right ensures your bookshelf lasts for years. Follow these simple steps to paint and finish like a pro.
Priming The Wood
Start by applying a wood primer. Primer helps the paint stick better and lasts longer. Use a brush or roller to cover all surfaces evenly. Let the primer dry completely before painting. Sand lightly if the surface feels rough. This creates a smooth base for your paint.
Choosing Paint Colors
Select colors that match your room and style. Soft tones create a calm look, while bright colors add fun. Use acrylic or latex paint for easy cleaning and durability. Paint thin layers to avoid drips and streaks. Allow each coat to dry before adding the next one.
Adding Decorative Details
Use small brushes to paint windows, doors, or bricks on the castle. Add shadows or highlights for depth. Consider using stencils for neat shapes. Finish with a clear sealant to protect your artwork. This step gives your bookshelf a unique, charming look.
Credit: www.hometalk.com
Safety Tips
Building a castle bookshelf is fun and rewarding. Safety must come first during the project. Taking simple safety steps helps avoid accidents and injuries. This section shares key safety tips for a smooth build.
Protective Gear
Wear safety goggles to protect your eyes from dust and wood chips. Use gloves to keep your hands safe from splinters. A dust mask helps you breathe clean air while sanding or cutting wood. Wear ear protection if using loud power tools. Dress in close-fitting clothes to avoid getting caught in tools.
Tool Handling Tips
Check tools before use to make sure they work properly. Hold tools firmly and use both hands when needed. Keep fingers away from blades and moving parts. Unplug power tools when changing bits or blades. Use the right tool for each job to avoid damage or injury. Store tools safely when not in use.
Workspace Safety
Keep your workspace clean and free of clutter. Make sure the floor is dry and clear to avoid slips. Work in a well-lit area to see clearly. Keep a first-aid kit nearby for emergencies. Avoid distractions and stay focused on your work. Always have a fire extinguisher close by, just in case.
Customization Ideas
Customization makes your castle bookshelf truly unique. It lets you change the look and function to fit your needs. Small changes can make a big difference. Here are some ideas to inspire you.
Adding Lighting
Lighting can highlight your castle bookshelf beautifully. Use LED strips along the edges for a soft glow. Small spotlights can focus on special items. Battery-powered lights are easy to install and move. Lighting adds warmth and draws attention to details.
Incorporating Storage Bins
Storage bins keep things tidy and organized. Choose bins that fit inside the shelves perfectly. Clear bins help you see what is inside quickly. Use fabric bins for a softer, cozy look. Bins hide clutter and make cleaning faster.
Personalizing With Accessories
Add accessories that show your style. Small castle figurines or themed bookends work well. Use colorful baskets or decorative boxes for extra flair. Picture frames or small plants bring life to the shelves. Personal touches make the bookshelf feel special and inviting.

Credit: www.youtube.com
Frequently Asked Questions
What Materials Are Needed To Make A Castle Bookshelf?
You need plywood, wood glue, screws, sandpaper, paint, and brushes. Measuring tape and saw are also essential. These materials help create a sturdy, attractive castle bookshelf.
How Long Does It Take To Build A Castle Bookshelf?
Building a castle bookshelf typically takes 6 to 10 hours. Time depends on your skill level and tools available. Planning and patience ensure a quality finished product.
Can Beginners Build A Castle Bookshelf Easily?
Yes, beginners can build it with clear instructions and basic tools. Start with simple cuts and follow step-by-step guides. Practice improves skills for more complex projects.
How Do I Ensure The Castle Bookshelf Is Stable?
Use strong wood, secure joints with screws and glue, and check for level surfaces. Reinforce corners and allow glue to dry fully. Stability prevents accidents and prolongs bookshelf life.
Conclusion
Building a castle bookshelf can be a fun and rewarding project. It adds charm and style to any room. You only need basic tools and some patience. Each step is simple to follow and helps you create something unique. Enjoy the process and watch your bookshelf take shape.
Soon, you will have a beautiful place for your books and treasures. Give it a try and bring a little castle magic into your home.