Do you want to create a cozy and fun space for your dolls? Making a doll bunk bed is easier than you think, and it’s a great way to add a personal touch to your doll collection.
Imagine your dolls tucked in, one on top and one below, just like a real bunk bed! In this guide, you’ll discover simple steps to build your own doll bunk bed using materials you probably already have at home. Keep reading, and soon you’ll have a charming little bed that your dolls will love—and you’ll feel proud knowing you made it yourself.
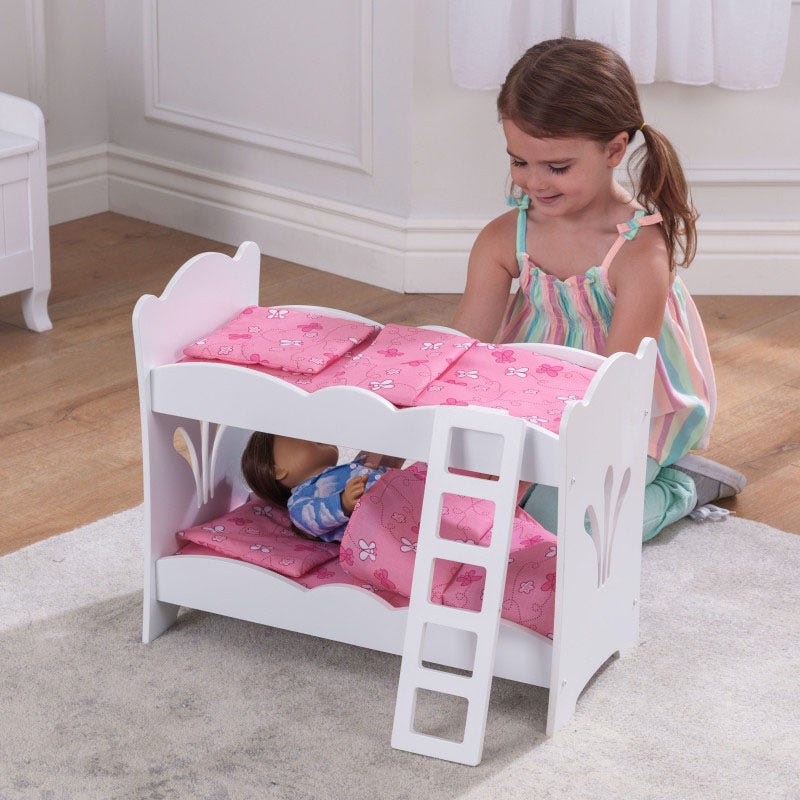
Credit: www.kidkraft.com
Materials Needed
Making a doll bunk bed requires some basic materials. These materials help create a strong and safe bed for dolls. Choosing the right wood, tools, and supplies makes the project easier and better. Below are the details of what you need to start.
Wood Types And Sizes
Choose softwood like pine for easy cutting and sanding. Use 1×2 inch wood strips for the frame. Thin plywood sheets work well for the bed base. Make sure the wood is smooth and free of splinters. The wood pieces should be about 12 inches long for each bed side.
Tools Required
A small handsaw or jigsaw cuts the wood pieces. Use a hammer or screwdriver for assembly. Sandpaper smooths rough edges. A measuring tape helps keep pieces the right size. A pencil marks cutting lines on the wood. Clamps hold pieces steady during gluing or nailing.
Additional Supplies
Wood glue strengthens joints and keeps the bed sturdy. Small nails or screws secure the parts together. Paint or wood stain adds color and protects the wood. Use a paintbrush for applying finishes. Felt pads on the bottom prevent scratches on surfaces. Small cushions or fabric make the bed cozy for dolls.
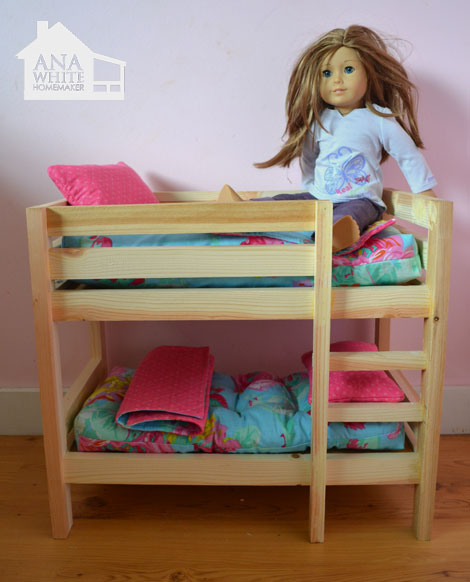
Credit: www.ana-white.com
Preparing The Wood
Preparing the wood is the first step in making a doll bunk bed. It sets the base for a strong and safe bed. Good preparation makes the building process smooth and the final product durable. Take your time with this stage to get the best results.
Measuring And Marking
Start by measuring the wood pieces carefully. Use a ruler or tape measure to get exact lengths. Mark the wood with a pencil where you will cut. Double-check your marks to avoid mistakes. Clear and precise marks help you cut wood in the right size.
Cutting The Pieces
Cut along the pencil lines using a saw. Use a handsaw or a jigsaw for straight cuts. Cut slowly and steadily for clean edges. Wear safety glasses to protect your eyes. Keep the wood steady to avoid slips and uneven cuts.
Sanding The Edges
Sand all cut edges to make them smooth. Use sandpaper or a sanding block for this. Smooth edges prevent splinters and make the bed safe for dolls. Sand in one direction and check for rough spots. Take your time to get a nice finish.
Building The Frame
Building the frame is the first big step in making a doll bunk bed. It forms the main structure and holds everything together. You need to work carefully to make sure the frame is strong and safe for the dolls.
Use smooth wood pieces and measure them well. Cut each piece to the right size before you start assembling. A good frame makes the whole bed look nice and last longer.
Assembling The Bed Base
Start by joining the four pieces that make the base. These pieces create the bottom rectangle of the bed. Use wood glue and small nails to hold them tight. Check that all corners are square before the glue dries.
Make sure the base is flat and even. This part supports the mattress and keeps it steady. A solid base stops the bed from wobbling or tipping over.
Creating The Support Slats
Next, cut thin wooden slats to fit inside the bed base. These slats hold the mattress up. Space them evenly to give good support. Attach the slats with screws or nails to the base frame.
The slats add strength and stop the mattress from sagging. Choose wood that is strong but not too thick. This keeps the bed light and easy to move.
Constructing The Side Rails
Side rails keep the dolls safe while they sleep. Cut two long and two short pieces for the sides. Attach them to the bed base using screws or wood glue.
Make sure the rails stand straight and strong. Sand the edges smooth to avoid splinters. The rails also give the bunk bed its classic look.
Adding The Ladder
Adding a ladder to your doll bunk bed makes it fun and realistic. It lets your dolls climb up and down safely. A good ladder fits well with the bed frame. It should be strong but light. You can build a simple ladder with just a few materials. The process includes designing the steps and attaching the ladder to the frame. Each step must be even and sturdy for the dolls to stand on.
Designing The Ladder Steps
Start by measuring the height of the bunk bed. Divide this height into equal parts for each step. Use thin wooden sticks or craft sticks for the steps. Cut the sticks to the same length. Make sure each step is wide enough for your dolls’ feet. Sand the edges smooth to avoid splinters. Space the steps evenly on two longer side pieces. Glue or nail the steps in place carefully. Let the glue dry completely before moving on.
Attaching The Ladder To Frame
Place the ladder next to the bunk bed where it looks best. Use small screws or strong glue to fix the ladder to the bed frame. Check that the ladder is steady and does not wobble. If needed, add extra support pieces. Attach the ladder at the top and bottom for safety. Test the ladder by placing a doll on the steps. Adjust if the ladder feels loose or unstable. A secure ladder keeps your doll play safe and fun.
Finishing Touches
Finishing touches bring your doll bunk bed to life. They make it look complete and ready for play. Small details add charm and personality. These final steps also protect the wood and keep the bed safe.
Painting Or Staining
Choose bright or soft colors for painting. Use non-toxic paint to keep it safe. Staining shows the wood’s natural beauty. Apply thin, even coats for best results. Let each coat dry fully before the next. Sand lightly between coats for smoothness.
Adding Mattresses And Bedding
Cut foam or cotton to fit each bunk. Cover mattresses with colorful fabric for comfort. Use tiny pillows and blankets to match. Sewing simple bedding is easy and fun. Soft bedding makes the doll bed cozy and inviting.
Safety Checks
Check for sharp edges or splinters. Sand any rough spots until smooth. Ensure all parts are tightly attached. Avoid small parts that dolls or children could swallow. Test the bed for stability before play. Safety makes the doll bed enjoyable and worry-free.

Credit: www.youtube.com
Tips For Customization
Making a doll bunk bed is fun, but customization makes it special. Small changes can create a unique piece. This section shares tips to personalize your doll bunk bed. These ideas help you add style and function. You can make the bed look just how you want. Explore simple ways to customize your project.
Personalizing Colors And Patterns
Choose colors that match your doll’s room or your favorite shades. Use paint or colorful paper to decorate the bed frame. Patterns like stripes, polka dots, or flowers add charm. Try mixing two or three colors for a fresh look. Make sure to use safe, non-toxic paints.
Adding Storage Options
Storage keeps doll accessories tidy and easy to find. Attach small baskets or boxes under the bottom bunk. Use hooks on the sides for hanging tiny bags or clothes. Add shelves near the bed for dolls’ books or toys. Storage helps keep the play area neat and organized.
Using Decorative Accessories
Accessories bring personality to the doll bunk bed. Add tiny pillows and blankets for comfort. Use small fairy lights to make it cozy and bright. Stickers or decals give extra decoration without mess. These details make the bed inviting and fun for dolls.
Frequently Asked Questions
How Do You Start Making A Doll Bunk Bed?
Begin by gathering materials like wood, screws, and paint. Measure your doll size, then cut wood pieces accordingly. Assemble the frame carefully, ensuring stability before adding ladders or railings. Sand edges smooth and finish with paint or varnish for a polished look.
What Tools Are Needed To Build A Doll Bunk Bed?
You’ll need a saw, drill, screwdriver, measuring tape, and sandpaper. Optional tools include clamps and a paintbrush. These help in cutting, assembling, smoothing, and finishing the doll bunk bed efficiently and safely.
How Long Does It Take To Make A Doll Bunk Bed?
Typically, it takes 2 to 4 hours, depending on complexity and skill level. Simple designs require less time, while detailed beds with paint or decorations need more. Planning and preparation speed up the process significantly.
Can I Customize The Doll Bunk Bed Design?
Yes, customization is easy with different paint colors, patterns, and accessories. You can add pillows, bedding, or themed decorations. Adjust the size to fit various dolls or create unique features like storage drawers.
Conclusion
Making a doll bunk bed is a fun and simple project. You only need basic materials and tools. Follow the steps carefully to build a sturdy bed. This craft can improve creativity and patience. Kids will enjoy playing with their handmade furniture.
Try different colors or decorations to make it unique. Small efforts bring great satisfaction. Start your project today and watch your doll’s room transform. Crafting brings joy, one step at a time.