Are you looking for a fun and creative way to organize your child’s playroom? Building a baby doll bunk bed might be the perfect project for you.
Imagine giving your child’s favorite dolls a cozy, stylish place to rest—while saving space and adding charm to the room. In this guide, you’ll discover simple steps and handy tips to create a sturdy, beautiful bunk bed that both you and your child will love.
Ready to turn a few pieces of wood into a special doll bed? Let’s get started!

Credit: www.bybrittanygoldwyn.com
Materials Needed
Gathering the right materials is the first step to build a sturdy baby doll bunk bed. Choosing quality items ensures the bed is safe and lasts long. Below are the key materials needed for this project.
Wood Types And Sizes
Use solid wood like pine or poplar for durability. Select smooth boards to avoid splinters. For the frame, 1×4 or 1×6 inch boards work well. Cut the wood into pieces based on your design plan. Sand edges for a clean finish.
Tools Required
A saw is needed to cut wood precisely. Use a drill to make holes for screws. Screwdrivers help fasten the parts together. Sandpaper smooths rough edges. A measuring tape ensures accurate cuts and fits.
Safety Gear
Wear safety glasses to protect your eyes from dust and debris. Use gloves to guard your hands from splinters. A dust mask keeps you safe from inhaling sawdust. Work in a well-ventilated space for better air quality.
Preparing The Wood
Preparing the wood is the first step to building a sturdy baby doll bunk bed. Proper preparation makes the building process smoother. It helps ensure safety and durability. Taking time to prepare wood carefully gives a better finish. This section covers measuring, cutting, and sanding.
Measuring And Marking
Measure each piece of wood carefully. Use a ruler or tape measure for accuracy. Mark the cut lines with a pencil. Double-check all measurements before cutting. Clear and precise markings guide your cutting. This step prevents mistakes and wasted wood.
Cutting Techniques
Use a saw suitable for wood cutting. A handsaw or jigsaw works well for small pieces. Cut along the marked lines slowly and steadily. Keep your hands away from the blade. Cutting straight edges helps the parts fit perfectly. Take breaks if needed to stay focused.
Sanding Edges
Sand all cut edges to remove splinters. Use fine-grit sandpaper for a smooth finish. Sand in the direction of the wood grain. Smooth edges make the bunk bed safe for children. Check all pieces and sand any rough spots. Clean dust off before assembly.
Assembling The Frame
Assembling the frame is the first step in building a sturdy baby doll bunk bed. This part gives the bed its shape and strength. Work carefully to ensure each piece fits well. A strong frame keeps the bed safe and stable for playtime.
Building The Bed Base
Start by laying out the wooden boards for the base. These boards hold the mattress in place. Attach the slats evenly to create a flat surface. Use screws to keep the slats from moving. Check that the base is square and strong before moving on.
Attaching Side Rails
Next, fix the side rails to the bed base. Side rails keep the doll from falling off. Align the rails with the edges of the base. Screw them in tightly to avoid wobbling. Make sure both rails are the same height and straight.
Securing The Legs
Finally, attach the legs to the frame. Legs lift the bed off the ground. Place each leg at the corner of the base. Use strong screws to secure the legs firmly. Test the bed by gently pressing down to check stability.
Creating The Bunk Structure
Creating the bunk structure is the key step in building a baby doll bunk bed. The structure must be strong and safe. Each part should fit well to keep the beds steady. Follow clear steps to stack and secure the beds, add support beams, and install safety rails. This ensures the bunk bed is both fun and safe for play.
Focus on solid connections and proper balance. Use simple tools and materials to make the process easy and quick. Let’s break down each part for a perfect build.
Stacking And Securing Beds
Place the two beds one on top of the other carefully. Check that the bottom bed is stable on the floor. Align the top bed so it sits evenly above the bottom bed. Use screws or strong glue to join the beds together. Secure the corners tightly to avoid any wobbling. Tight connections keep the beds from moving during play.
Adding Support Beams
Add horizontal support beams between the beds for extra strength. Use wooden strips or small boards that fit the width of the beds. Attach these beams firmly under the top bed frame. This helps spread weight evenly and stops the beds from bending. Make sure beams are flush and fixed well with screws or nails.
Installing Safety Rails
Safety rails protect dolls from falling off the top bunk. Cut wooden slats to fit along the sides of the upper bed. Fix the rails securely to the bed frame using screws. Leave enough space so dolls can easily get in and out. Check rails are strong and do not move when pressed. Safety rails add peace of mind during playtime.
Finishing Touches
Finishing touches turn your baby doll bunk bed from simple to special. These final steps add charm and comfort. They make the bed ready for playtime and display. Focus on painting, bedding, and personal details to complete your project.
Painting And Decorating
Choose safe, non-toxic paint for your doll bunk bed. Bright colors or soft pastels work well. Use small brushes for neat edges. Let the paint dry completely before adding more layers. Stickers or stencils create fun patterns. Avoid heavy decorations that can fall off.
Adding Mattresses And Bedding
Cut small foam pieces for mattresses. Cover them with soft fabric or felt. Sew or glue the fabric edges to keep them neat. Use tiny pillows and blankets to match your doll’s size. Choose washable materials for easy cleaning. This makes the bed cozy and inviting.
Personalizing The Bunk Bed
Add name tags or small signs to the bed. Use markers or print labels with your doll’s name. Attach miniature toys or accessories on the sides. Small curtains or fairy lights add extra charm. Personal touches make the bed unique and fun to use.
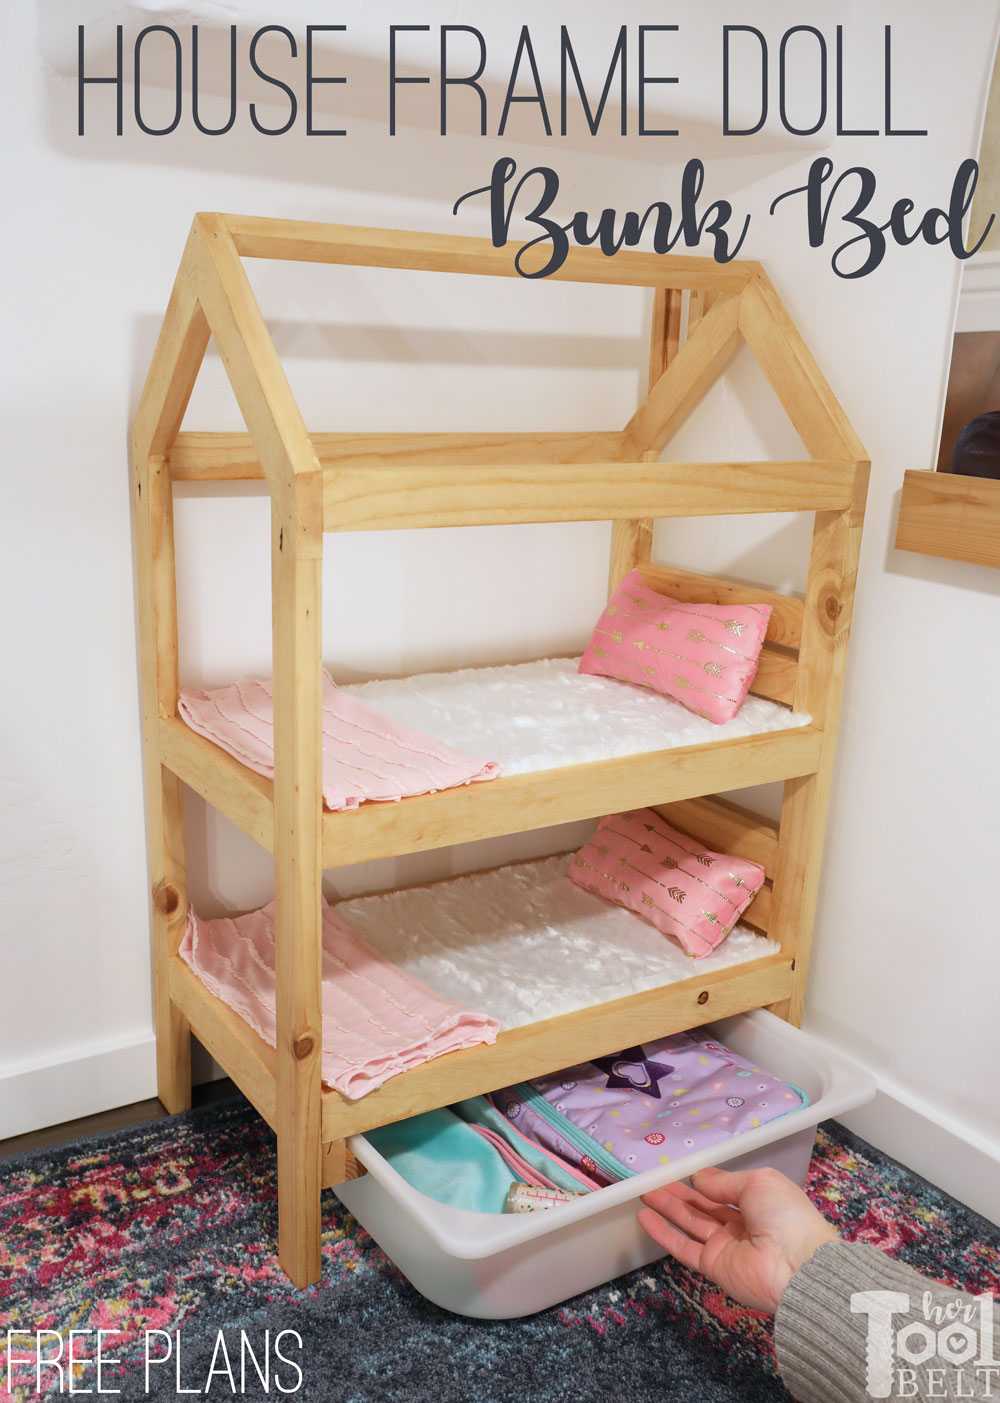
Credit: www.hertoolbelt.com
Safety Tips
Safety is the top priority when building a baby doll bunk bed. Taking the right steps keeps children and their toys safe. Careful attention to details helps avoid accidents and injuries.
Ensuring Stability
Make sure the bunk bed stands firm and does not wobble. Use strong wood and tight screws for support. Test the bed by gently shaking it. If it moves, tighten all connections again.
Place the bed on a flat surface. Avoid putting it on slippery or uneven floors. A stable base prevents tipping and falling.
Avoiding Sharp Edges
Sand all edges and corners smooth. Sharp edges can hurt small hands and fingers. Use fine sandpaper to remove splinters and rough spots.
Check for any nails or screws sticking out. Cover or file down any metal parts that could scratch. Smooth surfaces make playtime safer and more fun.
Supervision During Use
Always watch children when they play with the bunk bed. Supervision helps prevent falls or rough play. Teach kids to use the bed gently and carefully.
Encourage children not to climb or jump on the bed. Explain the risks clearly and simply. Keeping an eye on them ensures safe play every time.
Troubleshooting Common Issues
Troubleshooting common issues helps keep your baby doll bunk bed safe and sturdy. Small problems can stop your project from working well. Fixing them early saves time and effort later. Below are simple tips to solve usual problems.
Fixing Wobbly Parts
Wobbly parts make the bed unsafe for dolls. Tighten all screws and bolts first. Use a screwdriver or wrench to secure loose joints. Add wood glue in joints for extra hold. Clamp the parts until the glue dries. Check if the bed still moves. Repeat tightening if needed.
Dealing With Uneven Surfaces
Uneven surfaces cause the bed to tilt or rock. Use sandpaper to smooth rough spots. Check the floor or table where the bed stands. Place small pads or rubber feet under the legs. Adjust the pads until the bed stands firm. Test by pressing gently on different sides.
Replacing Damaged Components
Broken parts reduce the bed’s strength and look. Remove damaged wood or hardware carefully. Measure the part to find the right size replacement. Buy matching wood, screws, or nails from a craft store. Cut and fit the new part in place. Secure it tightly and sand any sharp edges.

Credit: www.ana-white.com
Frequently Asked Questions
What Materials Are Needed To Build A Baby Doll Bunk Bed?
You need wood planks, screws, a saw, sandpaper, wood glue, paint, and brushes. Choose safe, non-toxic materials for child safety.
How Long Does It Take To Build A Baby Doll Bunk Bed?
Building usually takes 2 to 4 hours, depending on skill level and design complexity. Allow extra time for drying paint.
Can I Customize The Size Of The Baby Doll Bunk Bed?
Yes, you can adjust dimensions to fit your dolls. Measure your dolls first and modify the plans accordingly.
What Safety Tips Should I Follow While Building?
Use child-safe paint, smooth all edges, and ensure sturdy construction. Avoid small detachable parts that pose choking hazards.
Conclusion
Building a baby doll bunk bed can be a fun and rewarding project. It brings creativity and joy to playtime. Simple tools and steps make the process easy for anyone. Safety matters most, so double-check all parts. Personalize the bed with paint or decorations for extra charm.
Your child will love their new doll furniture. Try this project for a special gift or family activity. Enjoy the smile it brings!