Are you tired of cramming your favorite books into tiny shelves that just don’t fit? Imagine having a biggish bookshelf that holds all your treasured reads and still looks great in your space.
Building one yourself might sound tricky, but it’s easier than you think. In this guide, you’ll discover simple steps to create a sturdy, stylish bookshelf that suits your needs perfectly. Keep reading, and by the end, you’ll have the confidence and know-how to bring your ideal bookshelf to life.

Credit: www.anikasdiylife.com
Choosing The Right Materials
Choosing the right materials is key to building a strong, lasting bookshelf. The materials affect the shelf’s look, strength, and cost. Picking the right wood and tools makes the project easier and more fun.
This section helps you decide what wood to use, which tools to prepare, and what safety gear is needed. Clear choices lead to better results and a safer building process.
Types Of Wood
Softwoods like pine are easy to cut and affordable. They work well for light shelves. Hardwoods such as oak or maple are stronger and last longer. They cost more but give a nice finish. Plywood is another choice. It is stable and comes in large sheets. Choose wood that fits your budget and style.
Tools You’ll Need
Basic tools include a saw, drill, measuring tape, and screwdriver. A sander or sandpaper smooths the wood surfaces. Clamps hold pieces steady while working. A level ensures shelves are straight. Using the right tools helps make clean cuts and strong joints.
Safety Gear Essentials
Safety glasses protect your eyes from dust and wood chips. Ear protection guards against loud tool noise. Gloves keep your hands safe from splinters and sharp edges. A dust mask stops you from breathing in wood particles. Always wear safety gear to prevent injuries.
Planning Your Bookshelf Design
Planning your bookshelf design is the first step toward a successful build. It helps you avoid mistakes and saves time. Careful planning makes sure the bookshelf fits your space and needs perfectly.
Measuring Your Space
Start by measuring the wall or corner where the bookshelf will go. Use a tape measure for accurate results. Write down the height, width, and depth available. Check for any obstacles like switches or vents. This helps you choose the right bookshelf size.
Deciding Shelf Dimensions
Think about what you want to store on the shelves. Books, decor items, or boxes? Each needs different shelf heights and depths. A common shelf height is 10 to 12 inches for books. Depth usually ranges from 10 to 14 inches. Keep strong shelf thickness to hold weight safely.
Sketching A Simple Blueprint
Draw your bookshelf on paper or use a digital tool. Include all measurements and shelf spacing. Mark the sides, shelves, and back panel. This blueprint guides your cutting and assembly steps. It also helps check the design before building.
Cutting And Preparing Wood
Cutting and preparing wood is a key step in building a biggish bookshelf. It ensures the wood pieces fit well and the shelf looks neat. Careful measurement and clean cuts make assembly easier. Proper preparation also increases the shelf’s strength and durability.
Marking Cut Lines
Start by measuring the wood pieces you need. Use a pencil to mark straight cut lines. A ruler or a square tool helps keep lines accurate. Clear markings guide your saw and prevent mistakes. Take your time to double-check measurements before cutting.
Using A Saw Safely
Choose the right saw for your wood type and thickness. Always wear safety goggles and gloves. Keep your fingers away from the blade. Cut slowly along the marked lines to keep control. Secure the wood with clamps to avoid movement. Stop if the saw feels stuck or unsafe.
Sanding For Smooth Edges
After cutting, use sandpaper to smooth rough edges. Sanding removes splinters and sharp spots. Start with coarse sandpaper, then use finer grit for a smooth finish. Sand along the wood grain for best results. Clean dust off the wood before assembly.
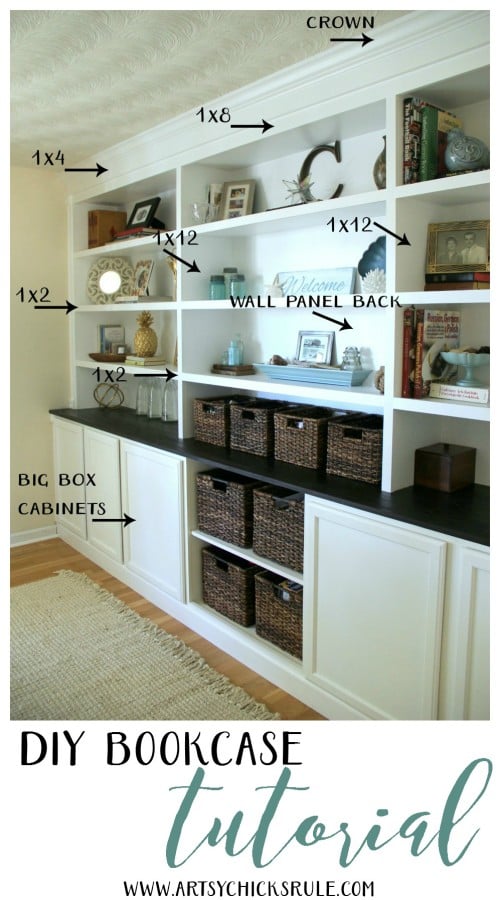
Credit: www.artsychicksrule.com
Assembling The Frame
Assembling the frame is the first big step in building your bookshelf. The frame holds everything together. It needs to be strong and straight. Taking time here makes the rest easier. Follow the steps carefully for a solid base.
Joining The Sides And Bottom
Start by placing the two side panels upright. Fit the bottom panel between them at the base. Make sure the edges line up well. The bottom should sit flush with the sides. Hold the pieces tightly before moving on.
Securing With Screws And Glue
Apply wood glue on the edges that touch. Spread it evenly for a strong bond. Use screws to hold the parts firmly. Drill pilot holes to avoid splitting the wood. Tighten screws just enough to hold, not crack.
Checking For Squareness
Use a carpenter’s square or measure diagonals. Both diagonals must be the same length. Adjust the frame if it is not square. A square frame prevents a wobbly bookshelf. Take your time and check twice.
Adding Shelves
Adding shelves is a key step in building your biggish bookshelf. Shelves hold your books and decor. Proper placement ensures strong support and good looks. This section guides you through spacing, attaching supports, and fixing shelves securely.
Spacing For Books And Decor
Measure the height of your tallest books first. Leave extra space for decor items. Typical shelf spacing ranges from 10 to 12 inches. Adjust spacing based on what you want to display. Keep shelves evenly spaced for a balanced look.
Attaching Shelf Supports
Choose sturdy supports that hold the weight of books. Metal brackets or wooden cleats work well. Attach supports to the bookshelf frame using screws. Make sure supports are level and aligned. Securely fastened supports prevent shelves from sagging.
Fixing Shelves In Place
Place the shelf boards on the supports. Check if each shelf is level using a spirit level. Secure shelves with screws or small nails through the supports. Avoid over-tightening to prevent wood splitting. Double-check stability before adding weight.
Finishing Touches
Finishing touches make your bookshelf look complete and last longer. These steps protect the wood and give it a smooth, nice look. Take time to do each step carefully. The result is a beautiful bookshelf that fits your space and style.
Sanding The Entire Unit
Sanding smooths rough edges and removes splinters. Use fine-grit sandpaper for the best finish. Sand all surfaces, including shelves and sides. Wipe off dust with a clean cloth before painting or staining. A smooth surface helps paint or stain stick better.
Applying Paint Or Stain
Choose paint or stain that matches your room’s style. Paint covers the wood completely and adds color. Stain shows the natural wood grain with a tint. Apply evenly with a brush or cloth. Let the first coat dry before adding more. Multiple coats give a richer, stronger color.
Sealing For Durability
Sealing protects the wood from water, scratches, and dirt. Use a clear polyurethane or varnish. Apply thin coats with a brush and let dry fully. Lightly sand between coats for a smooth finish. Sealing keeps your bookshelf looking good for years.
Installing And Styling
Installing and styling a biggish bookshelf is a satisfying step. It turns a simple shelf into a beautiful and safe feature. Proper installation keeps your books safe and your space neat. Styling adds personality and makes your shelf a focal point in the room.
Anchoring To Walls
Anchoring your bookshelf to the wall prevents tipping. Use strong brackets or wall straps for stability. Find studs in the wall using a stud finder. Screw the brackets into the studs for a secure hold. This step is important for safety, especially with tall shelves.
Organizing Your Books
Sort books by size, color, or category to keep order. Place larger books at the bottom for balance. Group similar genres or authors together for easy access. Leave some space between books for air and a clean look. Use bookends to hold books straight on open shelves.
Decor Ideas For Visual Appeal
Mix books with decorative items like plants or small sculptures. Add framed photos or artwork on some shelves for charm. Use baskets or boxes to hide clutter and store small items. Keep the colors of decor soft to complement your books. Change decorations seasonally to refresh the look.

Credit: rainonatinroof.com
Frequently Asked Questions
What Materials Do I Need To Build A Biggish Bookshelf?
You need plywood or solid wood, screws, wood glue, sandpaper, paint or stain, a saw, drill, and measuring tools.
How Do I Ensure My Bookshelf Is Sturdy?
Use quality wood, secure joints with screws and glue, and add a back panel for extra support.
What Is The Best Size For A Biggish Bookshelf?
A biggish bookshelf typically measures around 6 feet tall, 3 feet wide, and 12-15 inches deep.
Can I Customize My Biggish Bookshelf Design?
Yes, you can adjust shelf height, add doors, or include decorative trim to fit your space and style.
Conclusion
Building a biggish bookshelf takes time and care. Follow the steps one by one. Choose strong wood and measure twice before cutting. Use simple tools and work safely. A sturdy shelf holds many books and looks nice. You will feel proud seeing your work complete.
Try adding your style with paint or decorations. Enjoy your new bookshelf every day. Keep it clean and fix any loose parts. This project helps you learn and create something useful. Ready to start? Your bookshelf awaits!
