Are you looking for a simple, creative way to organize your books and add charm to your space? Building a bookshelf out of crates might be just what you need.
It’s an easy project that anyone can do, even if you don’t have much experience with DIY. Plus, you’ll end up with a unique shelf that fits your style perfectly. Keep reading, and you’ll discover step-by-step how to turn ordinary crates into a beautiful, functional bookshelf you’ll love.
Your space—and your books—will thank you.
Credit: jenwoodhouse.com
Choosing The Right Crates
Choosing the right crates is the first step to building a sturdy and attractive bookshelf. The type of crate affects the look and strength of your shelf. Picking the correct size, weight, and material ensures the shelf holds your books safely. This section explains how to select the perfect crates for your project.
Types Of Crates
Wooden crates are the most popular choice for bookshelves. They offer a classic and natural look. Plastic crates are lightweight and easy to clean but may not hold heavy books well. Metal crates provide strong support but can look cold or industrial. Choose a crate type that fits your style and needs.
Size And Weight Considerations
Measure the space where you want the bookshelf. Crates come in many sizes. Small crates work well for narrow spaces. Large crates hold more books but need more room. Check the weight limit of each crate. Heavy books need strong crates that won’t bend or break.
Material Options
Wood crates come in different types like pine, oak, or plywood. Pine is affordable and easy to work with. Oak is strong and lasts longer. Plywood is light and smooth. Plastic crates resist water and stains but may look less natural. Metal crates offer durability but can be heavy. Pick a material that fits your budget and style.
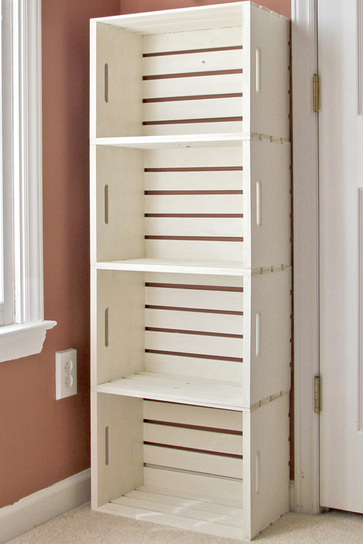
Credit: www.calmcradle.com
Tools And Materials Needed
Building a bookshelf out of crates is a fun and simple project. Having the right tools and materials makes the job easier and safer. This section lists everything you need to get started. Prepare well to create a sturdy and beautiful bookshelf.
Basic Tools List
- Electric drill for making holes and driving screws
- Screwdriver to tighten screws securely
- Measuring tape for accurate measurements
- Level to keep shelves straight and balanced
- Hammer for light tapping and adjustments
- Sandpaper to smooth rough crate surfaces
- Pencil to mark where to cut or drill
Additional Supplies
- Wood crates, clean and sturdy for shelves
- Wood screws to hold crates together
- Wood glue for extra strength and stability
- Paint or wood stain for a nice finish
- Paintbrush or cloth to apply paint or stain
- Protective felt pads to prevent floor scratches
Safety Equipment
- Safety goggles to protect your eyes from dust
- Work gloves to protect your hands
- Dust mask to avoid breathing in sawdust
- Ear protection if you use loud power tools
- First aid kit nearby for minor injuries
Preparing The Crates
Preparing the crates is a key step in building a sturdy bookshelf. It ensures the final piece looks good and lasts long. Taking time to clean, fix, and finish the crates makes a big difference. This process helps the crates fit well together and hold weight safely.
Cleaning And Sanding
Start by cleaning each crate with a damp cloth. Remove dirt, dust, and any old stickers. Let the crates dry completely before moving on.
Next, sand the wood surfaces gently. Use medium-grit sandpaper to smooth rough areas. Sanding removes splinters and prepares the wood for paint or stain. Focus on edges and corners for safety.
Reinforcing Weak Spots
Check each crate for weak spots or cracks. Use wood glue to fix small splits. Clamp the glued areas and let them dry well.
For larger issues, add small wooden braces or screws. These supports make the crates stronger. Reinforcing helps the bookshelf hold books without bending or breaking.
Painting And Finishing
Choose paint or wood stain that fits your style. Apply a thin, even coat with a brush. Let the first coat dry before adding more layers.
Finish with a clear sealant for protection. It keeps the wood safe from moisture and wear. A good finish gives your bookshelf a clean, polished look.
Designing Your Bookshelf
Designing a bookshelf from crates lets you create a unique and practical piece. Planning the design helps the project go smoothly. Think about how the bookshelf will fit your space and style.
Start with a clear idea of what you want. This step saves time and helps avoid mistakes. Your design can be simple or creative, based on your needs and taste.
Layout Ideas
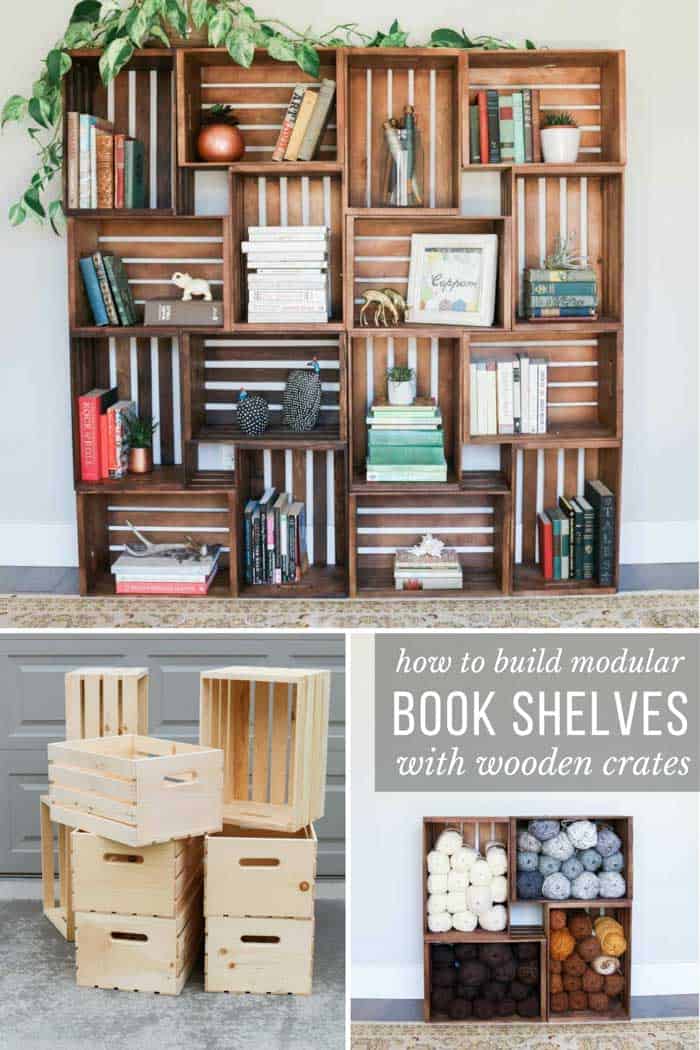
Arrange crates in different shapes to find the best look. Stack them vertically for tall shelves. Place them side by side for wide shelves. Mix sizes for a playful design. Think about open spaces for decor or plants.
Measuring And Planning
Measure the space where the bookshelf will go. Write down the width, height, and depth. Measure the crates too. Make sure the total size fits well in your room. Draw a simple sketch to plan the crate arrangement. This helps see how many crates you need.
Customizing For Space
Adjust the design to fit your room perfectly. Use smaller crates for tight spaces. Leave gaps for cables or light. Consider adding wheels if you want to move it easily. Paint or stain the crates to match your decor. Personal touches make your bookshelf special.
Assembling The Bookshelf
Assembling the bookshelf is the most exciting part of this project. It brings all your hard work together. Careful assembly ensures your bookshelf is strong and looks great. Follow these steps for a sturdy, neat finish.
Stacking And Aligning
Start by placing crates on a flat surface. Stack them in the shape you want. Make sure edges line up perfectly. Check that each crate sits flat without tilting. Align crates so shelves look even and balanced. This step sets the foundation for a stable bookshelf.
Securing Crates Together
Use screws or brackets to join crates firmly. Drill pilot holes to avoid splitting the wood. Attach crates from inside to keep screws hidden. Tighten screws but avoid overdoing it. This keeps the structure solid and safe. Secured crates prevent wobbling or shifting over time.
Adding Stability Features
Add wooden strips along the back for extra strength. Use corner braces inside each joint. Attach the bookshelf to the wall with anchors if possible. These steps stop the bookshelf from tipping forward. Stability features protect your books and ensure safety.
Finishing Touches
Finishing touches bring your crate bookshelf to life. They improve function and style. Small changes make a big difference. These final steps help your bookshelf look complete and last longer.
Adding Shelves Or Dividers
Adding shelves or dividers creates more storage space. Use thin wooden boards to fit inside crates. Cut them to size and fix with nails or screws. Dividers keep books and items neat. They stop things from falling or leaning.
Decorative Elements
Decorative elements give your bookshelf a personal touch. Paint the crates in colors you like. Add stencils or patterns for style. You can use washi tape for a simple design. Attach small hooks or knobs for hanging keys or bags. These details make the shelf unique and fun.
Protective Coatings
Protective coatings keep the wood safe from damage. Use clear varnish or wood sealant. Apply with a brush in thin layers. Let each layer dry before the next. Coatings prevent scratches and water marks. They make cleaning easier and extend shelf life.
Maintaining Your Bookshelf
Building a bookshelf out of crates is a fun project. To keep it looking good and lasting long, regular care is important. Maintaining your bookshelf helps protect the wood and keeps it strong. Small efforts can stop big problems later.
Cleaning Tips
Dust the bookshelf often with a soft cloth. Avoid using water directly on the wood. Use a dry or slightly damp cloth for cleaning. For stubborn dirt, a mild soap solution works well. Dry the surface quickly to avoid moisture damage. Keep the area around the bookshelf clean to reduce dust buildup.
Repairing Damage
Check for cracks or loose nails regularly. Tighten screws or nails to keep crates stable. Use wood glue to fix small cracks or splits. Sand rough edges gently to prevent splinters. Replace damaged crates if repair is not enough. Prompt repairs stop damage from getting worse.
Upgrading Over Time
Consider painting or staining the bookshelf to refresh its look. Add wheels or brackets for better mobility and support. Use decorative knobs or handles to personalize your shelves. Add extra crates to expand storage space. Upgrade lighting nearby to highlight your books and items.
Credit: makeanddocrew.com
Frequently Asked Questions
How Do I Choose The Right Crates For A Bookshelf?
Select sturdy, uniform-sized wooden crates for stability. Ensure they are clean, smooth, and free from cracks. Choose crates that fit your space and style preferences.
What Tools Are Needed To Build A Crate Bookshelf?
You’ll need a drill, screws, screwdriver, measuring tape, level, and sandpaper. Optional tools include wood glue and paint for finishing touches.
How Can I Secure Crates Safely Together?
Use screws or brackets to fasten crates. Applying wood glue adds extra strength. Check alignment with a level to ensure stability.
Can I Customize The Bookshelf’s Size And Shape?
Yes, arrange crates vertically or horizontally to fit your space. Stack or stagger crates for unique designs. Adjust quantity based on desired height and width.
Conclusion
Building a bookshelf out of crates is simple and fun. You only need a few materials and some patience. Each crate adds character and storage space. Arrange them in any shape you like. Paint or stain for a personal touch.
This project saves money and recycles old crates. Enjoy your new, custom bookshelf every day. Try it yourself and see the results!