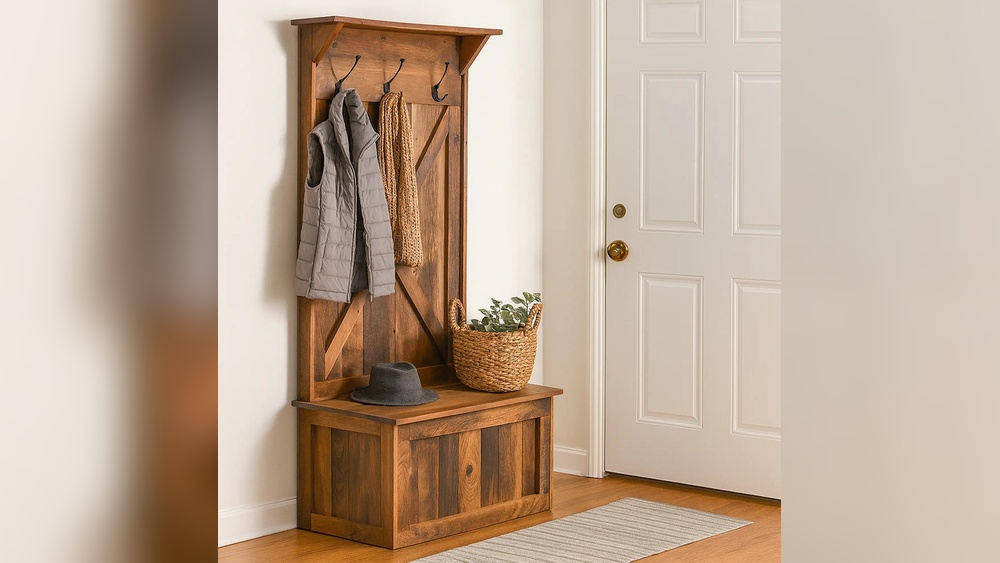
Are you looking for a smart and stylish way to organize your entryway? Building a deacon’s bench with a coat rack might be exactly what you need.
This simple project not only gives you a comfortable spot to sit but also keeps your coats and hats neatly in place. Imagine having a custom piece that fits your space perfectly and makes your daily routine easier. In this guide, you’ll discover easy steps to create your own deacon’s bench with a coat rack, even if you’re new to woodworking.
Ready to transform your home with a practical and charming addition? Let’s get started!
Materials And Tools Needed
Gathering the right materials and tools is the first step to build a deacon’s bench with a coat rack. Having everything ready makes the project easier and faster. This list includes wood, screws, and finishing items. Also, basic tools like saws and drills are needed.
Using quality materials helps your bench last longer. The tools should be in good condition for safe and smooth work. Below is a clear list of what you need before starting.
Materials Needed
- Solid wood boards (pine or oak)
- Wood screws (1.5 to 2 inches)
- Wood glue
- Sandpaper (medium and fine grit)
- Wood stain or paint
- Clear finish or sealant
- Coat hooks or pegs
- Wood filler (optional)
Tools Required
- Measuring tape
- Pencil
- Power drill with drill bits
- Hand saw or circular saw
- Clamps
- Screwdriver
- Orbital sander or sanding block
- Paintbrush or foam brush
Credit: www.etsy.com
Choosing The Right Wood
Choosing the right wood is a key step in building a deacon’s bench with a coat rack. The wood affects how strong and beautiful your bench will be. It also changes how easy the project is to complete. Picking the best wood helps your bench last many years.
Wood comes in many types. Each type has its own look and feel. Some woods are hard and heavy. Others are soft and light. Knowing the qualities of wood helps you choose the right one for your bench.
Hardwood Vs Softwood
Hardwood comes from trees that lose leaves each year. It is usually strong and durable. Oak, maple, and cherry are common hardwoods. They hold up well to daily use. Softwood comes from evergreen trees. Pine and cedar are popular softwoods. Softwood is easier to cut and shape. But it may dent or scratch more easily.
Durability And Strength
The bench must hold weight and last long. Strong woods like oak or maple support heavy loads well. They resist dents and scratches. Softwoods are less strong but lighter. Choose a wood that fits your bench size and use. Think about how many coats or people will hang on it.
Appearance And Finish
Wood color and grain affect the bench’s look. Oak has a coarse grain and warm color. Cherry darkens nicely over time. Pine has knots and a soft color. Some woods need more sanding for a smooth finish. Choose wood that matches your home style and paint or stain easily.
Cost And Availability
Wood prices vary widely. Hardwoods usually cost more than softwoods. Some woods are rare or imported, raising the price. Choose wood that fits your budget and is easy to buy locally. Buying common wood saves time and money.
Designing Your Bench And Rack
Designing your deacon’s bench with a coat rack involves careful planning. The design should fit your space and meet your needs. You want a bench that is comfortable and a rack that holds coats securely. Balance style and function for the best result.
Bench Dimensions
Start with the bench size. A typical bench is about 48 inches long. This length fits three people comfortably. The seat height should be around 18 inches. This height works well for most adults. The depth of the seat should be 14 to 16 inches. This size allows enough space to sit and store shoes underneath.
Measure your available space before finalizing dimensions. Leave some room around the bench. This prevents the area from feeling crowded. Adjust the size to fit your room perfectly.
Coat Rack Features
The coat rack should have strong hooks. Use at least five to seven hooks spaced evenly. Hooks placed 6 to 8 inches apart work best. The height of the rack should be about 60 to 72 inches. This height allows easy reach for most people. Choose hooks that can hold heavy coats without bending.
Consider adding a shelf above the hooks. It can store hats, gloves, or small bags. Make sure the shelf is deep enough to hold these items securely. Keep the design simple but practical for daily use.
Cutting The Wood Pieces
Cutting the wood pieces is the first key step in building your deacon’s bench with a coat rack. Precise cuts ensure the parts fit together well and the bench stays strong. Take your time and measure twice before cutting. This helps avoid mistakes and wasted wood.
Choose the right wood type for durability. Softwood like pine is easy to cut and work with. Hardwood like oak is tougher but lasts longer. Use a sharp saw for clean edges. Sand the cut pieces to smooth rough spots.
Preparing Your Wood For Cutting
Start by selecting boards with straight grain and few knots. Mark each piece clearly with a pencil and ruler. Label every part to avoid confusion later. Set up your workspace with good lighting and stable support for cutting.
Measuring And Marking Each Piece
Measure twice for accuracy. Use a tape measure and a square tool to mark straight lines. Draw clear lines on the wood where you need to cut. Double-check measurements against your bench plan before cutting.
Cutting Techniques For Clean Edges
Use a handsaw or circular saw depending on your tools. Cut slowly along the marked lines for control. Keep your saw steady to avoid jagged edges. After cutting, check each piece against your plan to confirm size.
Assembling The Bench Frame
Assembling the bench frame is the first key step in building your deacon’s bench with coat rack. This frame forms the base and structure. It must be sturdy and well-aligned for safety and durability.
Start by organizing all the wood pieces you cut earlier. Lay them out clearly. This helps you see what parts go where. It also makes the assembly smoother and faster.
Preparing The Wood Pieces
Check each wood piece for smoothness and correct size. Sand rough edges to avoid splinters. Double-check measurements to ensure they match your plan. Proper preparation saves time during assembly.
Joining The Side Panels
Attach the side panels to the base board first. Use wood glue on the edges for extra strength. Secure with screws or nails to hold firmly. Keep the panels square for a neat frame.
Installing The Seat Support
Place the seat support beams inside the frame. These beams carry the bench seat’s weight. Fix them tightly with screws. Make sure they sit evenly to avoid a wobbly seat.
Checking For Stability
After assembling the frame, test its stability. Press on different parts to check for movement. Tighten any loose screws or nails. A solid frame ensures your bench lasts long and stays safe.

Credit: www.cabinfield.com
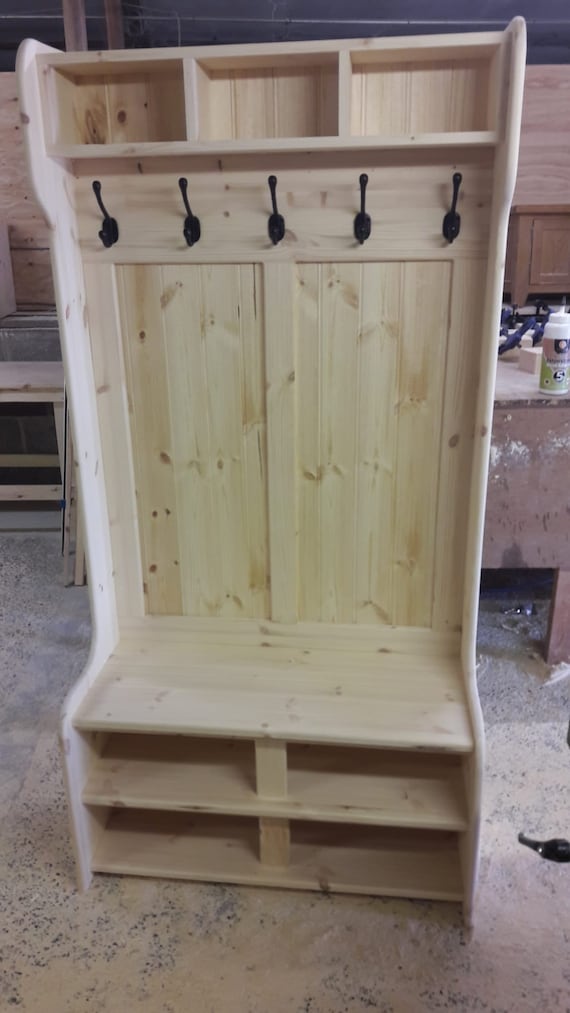
Adding The Seat And Storage
Adding the seat and storage to your deacon’s bench with coat rack completes its function and style. The seat must be sturdy and comfortable. Storage space below the seat helps keep items organized and out of sight.
Focus on making the seat strong enough to hold weight. The storage area should be easy to access and useful for daily needs. This section explains how to build both parts with simple steps.
Preparing The Seat Frame
Start by cutting the wood for the seat frame. Use strong, solid wood like pine or oak. Measure carefully to fit the bench dimensions. Join the pieces using screws or wood glue. Check the frame for stability before moving on.
Attaching The Seat Panel
Choose a smooth wooden panel for the seat top. Sand it well to avoid rough edges. Place the panel on the seat frame and fix it with screws. Make sure the seat is firmly attached and flat.
Building The Storage Compartment
Create a box under the seat for storage. Use plywood or solid wood panels. Attach the box securely to the seat frame. Leave enough space inside for shoes, bags, or other items.
Adding A Hinged Lid
Attach hinges to the seat panel and storage box. This allows the seat to open like a lid. Choose strong hinges for smooth movement. Test the lid to ensure it opens and closes easily.
Finishing Touches
Sand all surfaces to remove splinters. Paint or stain the bench to protect the wood. Use a finish that matches your home decor. Let the paint dry before using the bench.
Building And Attaching The Coat Rack
Building and attaching the coat rack is a key step in making your deacon’s bench both useful and stylish. This part adds storage space for coats, hats, and bags. It also enhances the bench’s overall look.
Focus on sturdy materials and accurate measurements. A well-built coat rack stays strong and lasts longer. Careful attachment ensures safety and stability for daily use.
Choosing The Right Wood For The Coat Rack
Select wood that matches your bench’s style and strength. Pine, oak, or maple are good options. These woods hold hooks well and resist wear. Avoid soft or thin wood that can break easily.
Cutting And Preparing The Wood Pieces
Measure the coat rack width carefully. Cut the wood to size with a saw. Sand edges smooth to prevent splinters. Drill holes for the hooks before attaching them.
Attaching The Coat Hooks
Place hooks evenly along the wood. Mark spots with a pencil for accuracy. Screw hooks tightly into the wood. Test each hook’s strength before final assembly.
Securing The Coat Rack To The Bench
Align the coat rack at the bench’s back or side. Use screws or brackets to attach it firmly. Check the rack is level and steady. Tighten all fasteners for safety.
Sanding And Finishing
Sanding and finishing are key steps in building a deacon’s bench with a coat rack. These steps make the wood smooth and protect it from damage. Good sanding removes rough edges and splinters. Finishing adds beauty and strength to the wood surface.
Taking time to sand and finish well ensures your bench looks great and lasts longer. This part of the project also makes the bench safe to use. You will enjoy sitting on it and hanging coats without worry.
Sanding The Wood
Start sanding with medium-grit sandpaper to smooth rough areas. Move the sandpaper along the wood grain. Avoid sanding too hard in one place. Use finer grit sandpaper to finish for a smooth touch. Wipe off dust with a clean cloth after sanding.
Choosing The Right Finish
Pick a finish that suits your bench use. Oil finishes give a natural look and feel. Polyurethane finishes add strong protection from water and scratches. Test the finish on a small wood piece first. Check if the color and shine match your style.
Applying The Finish
Use a clean brush or cloth to apply the finish. Spread it evenly and thinly over the bench surface. Let the first coat dry fully. Lightly sand with fine sandpaper between coats. Apply two or three coats for best results.
Final Touches
After the last coat dries, check the bench surface. Smooth out any rough spots with very fine sandpaper. Clean the bench well before use. Your deacon’s bench with coat rack is now ready to add charm and function to your space.
Installing Hooks And Accessories
Installing hooks and accessories on your deacon’s bench with coat rack is an important step. It makes the piece functional and stylish. This step allows you to hang coats, hats, and bags easily. It also adds personality to your bench.
Choose sturdy hooks that fit your bench’s style. Measure carefully before drilling holes. Proper placement ensures the hooks hold weight well and look balanced.
Choosing The Right Hooks
Pick hooks made of strong metal or wood. Simple designs suit most benches. Avoid hooks that are too large or too small. The right size keeps your items secure and neat.
Marking Hook Positions
Use a pencil and ruler to mark spots. Space hooks evenly for a clean look. Consider how many items you want to hang. Proper spacing prevents overcrowding and damage.
Installing Hooks Safely
Drill pilot holes before inserting screws. This prevents wood from splitting. Screw hooks tightly but do not over-tighten. Check each hook’s strength by gently pulling it.
Adding Decorative Accessories
Attach small shelves or baskets for extra storage. Use knobs or small rails for scarves and keys. Match accessories to the bench’s design and color. These add both function and charm.

Credit: www.youtube.com
Tips For Maintenance And Longevity
Maintaining your deacon’s bench with a coat rack helps keep it strong and beautiful. Simple care steps make the bench last longer and stay useful. Small efforts protect your work and keep it looking fresh for years.
Cleaning The Bench Regularly
Dust and dirt can damage the wood over time. Wipe the bench with a soft, dry cloth every week. Use a damp cloth for sticky spots, then dry quickly. Avoid harsh cleaners that can ruin the finish.
Protecting The Wood Surface
Apply a wood polish or wax to protect the surface. This keeps the wood shiny and safe from scratches. Do this every few months for the best results. Always follow the product instructions carefully.
Checking For Loose Screws And Joints
Inspect screws and joints often to find any looseness. Tighten them with a screwdriver to keep the bench stable. Loose parts can cause damage or make the bench unsafe. Regular checks prevent bigger problems later.
Avoiding Excess Moisture
Keep the bench away from water and damp areas. Moisture can warp or crack the wood. Use coasters or mats if placing wet items on the bench. Good airflow around the bench helps keep it dry.
Using Protective Pads
Place felt pads under the bench legs to protect floors. Pads also reduce noise when moving the bench. Replace pads when worn out to maintain protection. This keeps your home clean and your bench steady.
Frequently Asked Questions
What Tools Are Needed To Build A Deacon’s Bench With Coat Rack?
You need a saw, drill, screwdriver, measuring tape, clamps, and sandpaper. These tools help cut, assemble, and finish the bench and coat rack accurately.
How Much Time Does Building A Deacon’s Bench Take?
Building typically takes 4-6 hours, depending on skill level. Preparation and drying time for finishes may extend the total project duration.
What Wood Types Are Best For A Deacon’s Bench?
Pine, oak, and cedar are ideal. They offer durability, easy workability, and a beautiful finish for the bench and coat rack.
Can Beginners Build A Deacon’s Bench With Coat Rack?
Yes, beginners can build it by following step-by-step instructions. Basic woodworking skills and patience are essential for success.
Conclusion
Building a deacon’s bench with a coat rack adds style and function. It saves space and keeps your entryway neat. The steps are easy to follow and use simple tools. You can finish the bench with paint or stain to match your home.
This project gives a useful piece that fits your needs. Try it yourself and enjoy a tidy, welcoming space. Small projects like this bring big satisfaction. Ready to create your own?
