Are you looking to add style and function to your outdoor space? Building a long outdoor console table might be just what you need.
Imagine having a sturdy, beautiful table perfect for gatherings, plants, or extra storage. You might think it’s complicated, but with the right steps, you can create one yourself—even if you’ve never built furniture before. Keep reading, and you’ll discover simple tips and clear instructions that will make your project enjoyable and rewarding.
Your outdoor area is about to get a stunning upgrade!
Choosing The Right Materials
Choosing the right materials is key to building a strong outdoor console table. The materials must resist weather and last long. Picking good wood and tools makes the project easier and the table durable.
Selecting Wood Types
Choose wood that handles moisture and sun well. Teak, cedar, and redwood are top choices. These woods resist rot and insect damage. Pine is cheaper but needs treatment to last outdoors. Avoid soft woods that break easily. Quality wood keeps the table steady and good-looking for years.
Essential Tools And Supplies
Gather tools that help you work safely and quickly. A saw, drill, and measuring tape are must-haves. Sandpaper smooths rough edges. Use outdoor wood screws for strong joints. Wood glue adds extra hold. Finish with outdoor paint or sealant to protect the wood. Having the right supplies makes building more fun and less stressful.
Designing Your Console Table
Designing your outdoor console table is the first step to building a perfect piece. This stage helps you plan size, style, and features. A well-thought design will make your table both useful and beautiful. Take time to imagine how it will fit in your outdoor space.
Determining Table Dimensions
Start by measuring the space where the table will go. Consider length, width, and height carefully. The table should fit comfortably without blocking walkways. Think about how many people might use it at once. A long table usually ranges from 48 to 72 inches. The width should allow space for plates and decorations. Height matters too; standard console tables are about 30 to 36 inches tall.
Planning The Style And Features
Choose a style that matches your outdoor decor. Rustic wood, sleek metal, or a mix of both can work well. Decide on features like shelves, drawers, or hooks. These add storage and convenience. Keep the design simple for easy building and maintenance. Think about weather resistance when picking materials and finishes. Your style should be both attractive and practical for outdoor use.
Preparing The Workspace
Preparing your workspace is the first step to building a long outdoor console table. A well-organized and safe area helps you work faster and avoid accidents. Taking time to set up properly can make the whole project easier and more enjoyable.
Setting Up A Safe Work Area
Choose a flat and open space outside. Make sure it has good light and enough room to move freely. Clear away anything that might cause trips or falls. Keep children and pets away from the work zone. Wear safety gear like gloves and goggles to protect yourself. Safety is key to a smooth building process.
Organizing Tools And Materials
Gather all tools and materials before you start. Place them close to your work area for easy reach. Sort your wood, screws, and nails by size and type. Keep power tools plugged in and ready to use. Organizing helps you stay focused and saves time searching for items. This small step improves the flow of your project.
Cutting And Preparing Wood Pieces
Cutting and preparing wood pieces is the first step to build a strong outdoor console table. It sets the base for the whole project. Precise cutting and smooth surfaces ensure the table looks good and lasts long. Take your time to measure and prepare the wood carefully. This part will make assembly easier and the final product more stable.
Measuring And Marking Cuts
Start by measuring the wood pieces accurately. Use a tape measure and write down the exact lengths needed. Mark each cut line clearly with a pencil. Double-check your measurements before cutting. This prevents mistakes and wasted wood. Straight, well-marked lines help you cut wood precisely. Use a square tool for perfect right angles.
Sanding And Smoothing Surfaces
After cutting, sand the wood pieces to remove rough edges. Use medium-grit sandpaper first, then finish with fine-grit. Smooth surfaces improve the table’s appearance and prevent splinters. Sand all sides, including edges and corners. Clean off dust with a cloth before assembling. Well-prepared wood makes the table safer and more comfortable to use.
Assembling The Table Frame
Assembling the table frame is the first major step in building your outdoor console table. A strong frame ensures the table stays stable and lasts long. Focus on creating a solid base by carefully joining the legs and supports. This part sets the foundation for the whole project.
Take your time and follow each step closely. The goal is to build a frame that holds the tabletop firmly and withstands outdoor conditions.
Joining Legs And Supports
Start by arranging the legs in pairs. Use wood glue on the edges to create a tight bond. Then, connect the legs with horizontal support pieces. These supports keep the legs from wobbling.
Use screws to fasten the legs and supports together. Drill pilot holes first to avoid splitting the wood. Keep the screws flush with the wood surface to prevent snags.
Check that all legs are even in height. Use a carpenter’s square to confirm right angles. This step ensures your table will stand flat on the ground.
Securing The Frame
Reinforce the frame by adding corner braces. Attach these inside each corner for extra strength. Use screws to fix the braces firmly in place.
Double-check all joints for tightness. Tight connections prevent movement and increase durability. Sand any rough edges to avoid splinters later.
Finally, place the frame on a flat surface. Press down to test stability. Make any adjustments needed before moving on to the tabletop.
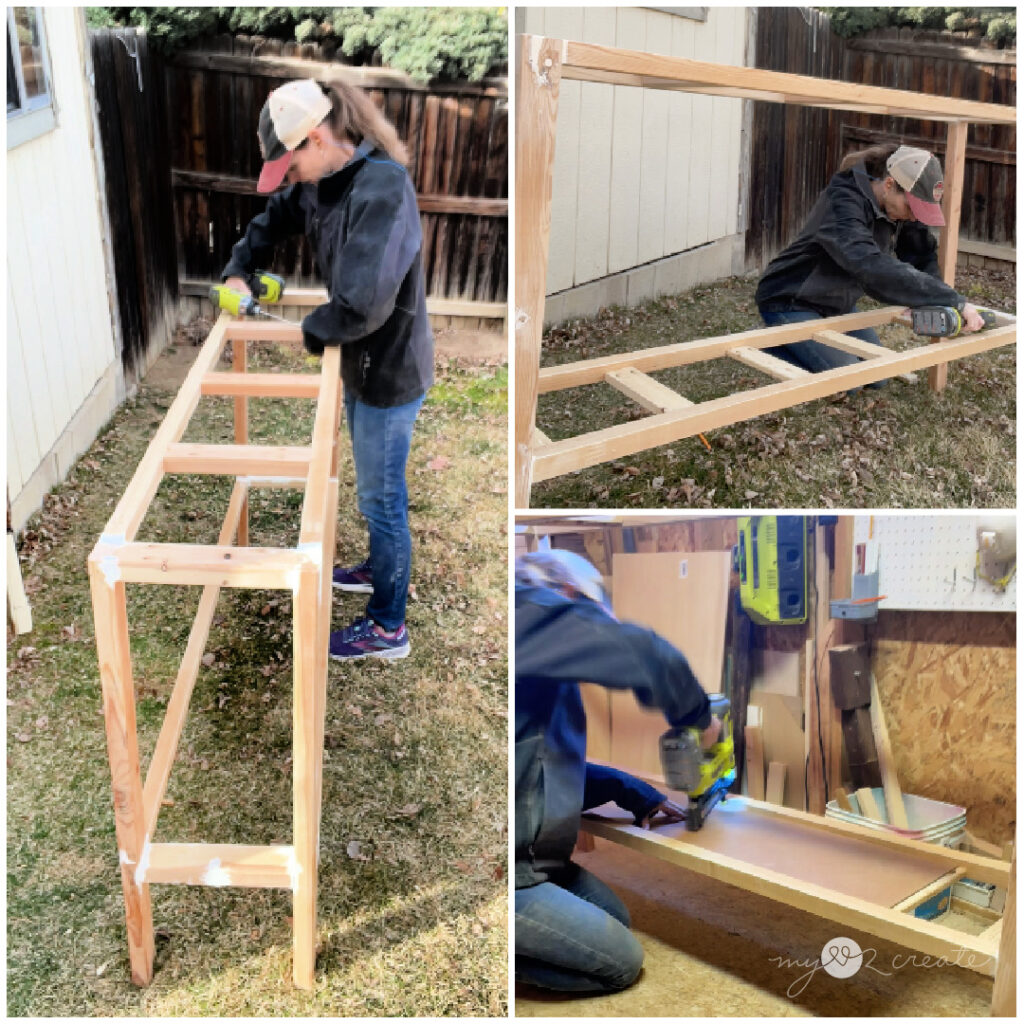
Credit: mylove2create.com
Attaching The Tabletop
Attaching the tabletop is a key step in building a long outdoor console table. This step brings the entire piece together and makes it ready for use. A well-attached tabletop ensures the table looks good and stays strong over time.
Take your time during this step. Proper alignment and firm fixing are important. This helps avoid a wobbly or uneven surface. Follow simple instructions to get the best result.
Aligning And Fixing The Top
Place the tabletop gently on the frame. Check that it lines up evenly on all sides. Use a tape measure or ruler for accuracy. The edges should match the base perfectly.
Once aligned, secure the tabletop using screws or brackets. Drill pilot holes first to avoid splitting the wood. Tighten screws evenly across the surface. Do not overtighten to prevent damage.
Ensuring Stability
After fixing, test the tabletop’s stability by pressing gently. It should not move or wiggle. Add corner braces or extra screws if needed. These support weak spots and keep the top firm.
Check the table on a flat surface. Adjust legs or base to prevent rocking. Stability is crucial for safety and durability outdoors.
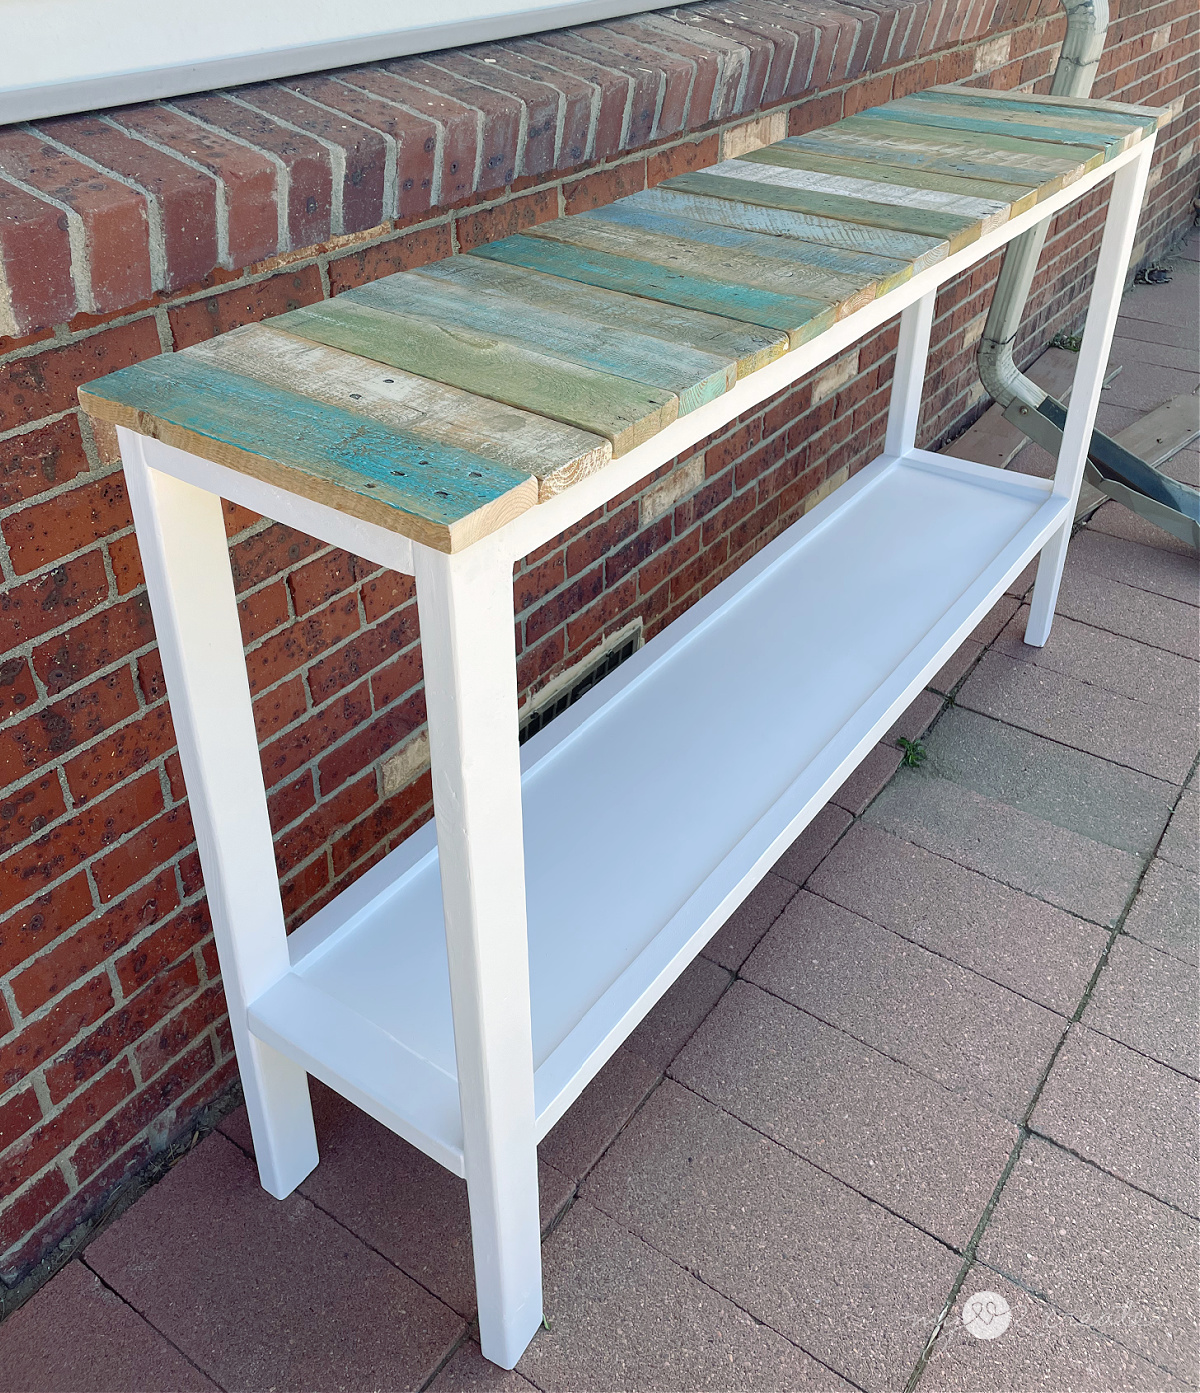
Finishing Touches
Finishing touches make your outdoor console table look great and last long. They protect the wood and add color. These final steps bring out the best in your project. Take your time and work carefully.
Applying Stain Or Paint
Choose a stain or paint made for outdoor use. Stain shows the wood grain and adds color. Paint covers the wood completely and can brighten your table. Use a brush or cloth to apply evenly. Let each coat dry well before adding another. This helps avoid streaks and blotches.
Adding Protective Coatings
Protective coatings shield your table from rain, sun, and dirt. Use a clear sealer or outdoor varnish for best results. Apply thin coats with a brush, following the wood grain. Wait until each layer dries before applying more. This step makes your table strong and weather-resistant.

Credit: lovegrowswild.com
Maintaining Your Outdoor Table
Keeping your outdoor console table in good shape takes regular care. Dirt, weather, and daily use can wear it down fast. A little effort helps your table stay strong and look great for years. Focus on cleaning and seasonal care to protect your investment.
Cleaning Tips
Start by wiping your table with a soft cloth. Use mild soap and water for general cleaning. Avoid harsh chemicals that can damage the surface. Rinse well and dry completely to stop water stains. Clean spills quickly to prevent stains. Dust often to keep your table fresh.
Seasonal Care Advice
Before winter, cover or store your table to protect it from snow and rain. Use waterproof covers that fit well. In spring, check for cracks or damage. Sand rough spots lightly and apply a fresh coat of sealant or paint. This keeps moisture out and stops wood from cracking. During hot months, move the table to a shaded area if possible. It helps prevent fading and warping.
Credit: mylove2create.com
Frequently Asked Questions
What Materials Are Best For Outdoor Console Tables?
Weather-resistant woods like cedar or teak are ideal. Use treated lumber or composite materials to prevent rot. Choose finishes that protect against UV rays and moisture for durability.
How Do I Protect My Outdoor Console Table From Weather?
Apply sealants or waterproof paint to shield the wood. Use covers when not in use and store indoors during extreme weather. Regular maintenance extends the table’s lifespan.
What Tools Are Needed To Build A Console Table?
Basic tools include a saw, drill, screws, measuring tape, and sander. Clamps and a level ensure precision. Safety gear like gloves and goggles is also essential.
How Long Does It Take To Build An Outdoor Console Table?
Typically, it takes 4 to 6 hours for a beginner. Time varies based on design complexity and drying times for finishes or adhesives.
Conclusion
Building a long outdoor console table is simpler than it seems. Follow each step carefully for best results. Choose sturdy materials that withstand weather well. Measure twice, cut once to avoid mistakes. Take your time assembling parts securely and neatly.
A well-made table adds charm to any outdoor space. Enjoy your new table for many seasons. Try customizing it with your favorite colors or designs. Small efforts lead to a beautiful, useful piece. Keep your tools ready and have fun creating.