Are you looking to save space without sacrificing style or function in your room? Building a Murphy bunk bed with a desk might be the perfect solution for you.
Imagine having a comfy bed that folds away neatly during the day, revealing a handy workspace just when you need it. This clever design not only frees up space but also keeps your room organized and versatile. In this guide, you’ll discover simple, step-by-step instructions to create your own Murphy bunk bed with a desk—no need to be a woodworking expert.
Ready to transform your room and make every inch count? Let’s dive in!
Materials And Tools Needed
Building a Murphy bunk bed with a desk requires the right materials and tools. Having everything ready makes the process smooth and faster. It also ensures your project is safe and sturdy.
This section lists all the essential items you will need. Each tool and material plays a key role in the final result. Let’s start with the materials.
Materials Needed
- High-quality plywood or hardwood boards
- Strong metal hinges for folding mechanism
- Wood screws and bolts
- Desk surface material, like laminate or solid wood
- Paint, stain, or wood finish
- Wall mounting brackets
- Safety locks or latches
- Sandpaper or sanding blocks
- Wood glue for extra strength
Tools Needed
- Power drill with drill bits
- Screwdriver set
- Measuring tape
- Level tool to keep everything straight
- Handsaw or circular saw
- Clamps to hold pieces in place
- Stud finder for secure wall mounting
- Safety goggles and gloves
- Pencil for marking measurements
Choosing The Right Space
Choosing the right space is a crucial first step for your Murphy bunk bed with desk project. The space affects how well the bed fits and how comfortable the desk will be. It also impacts room flow and daily use.
Measure the room carefully before starting. Think about how the bed will open and close. Allow enough room for movement and safety. The space should feel open, not cramped.
Assessing Room Size And Shape
Measure the width, height, and depth of the room. Check for obstacles like windows, doors, and heaters. The room shape affects where you place the bed.
Choose a wall that is flat and free from interruptions. This area gives the bed a strong, stable place to fold down. Avoid corners with too many objects nearby.
Considering Lighting And Ventilation
Good lighting helps make the desk area more useful. Natural light is best for work and study. Position the desk near a window if possible.
Ventilation keeps the room fresh. Avoid placing the bed near vents or heating units. Ensure air flows well around the space.
Planning For Electrical Outlets
Check the location of electrical outlets. The desk needs outlets for lamps, laptops, or chargers. Plan cord routes carefully to avoid tripping hazards.
If needed, add power strips or extension cords. Make sure they are safe and do not block pathways.
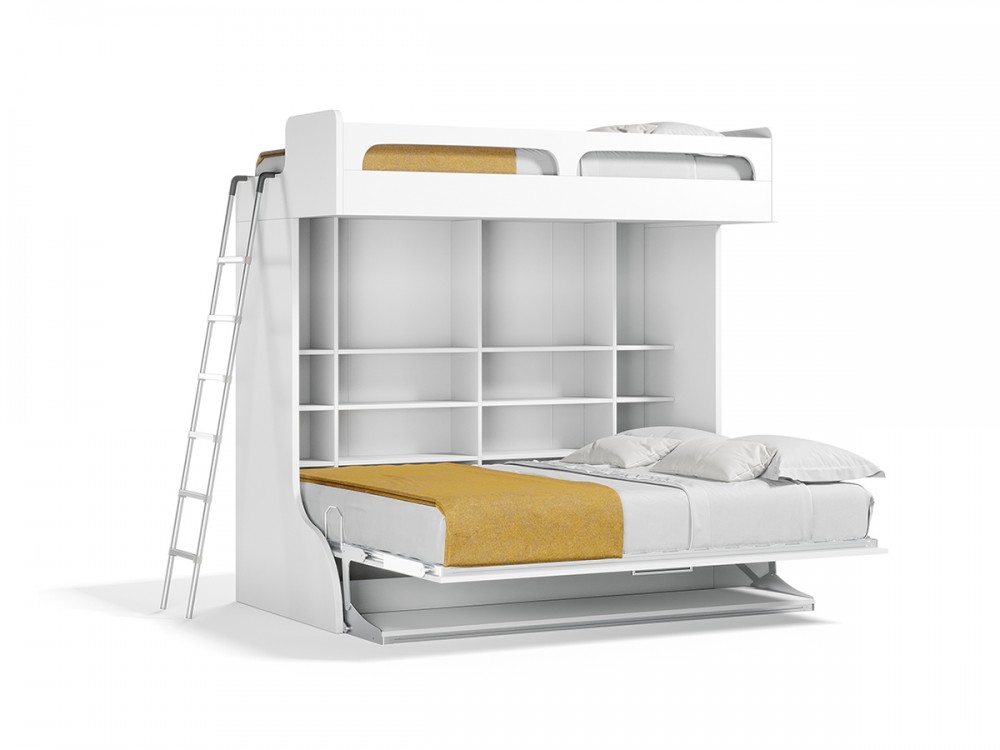
Designing Your Murphy Bunk Bed
Building the bed frame is the first step in creating your Murphy bunk bed with a desk. A strong frame ensures safety and durability. Precise measurements and sturdy materials make the process easier. Follow each step carefully to create a solid base.
Cutting The Wood
Start by selecting high-quality wood boards. Use a tape measure to mark the wood pieces. Cut the boards into the required lengths. Make sure all cuts are straight and clean. Sand the edges to avoid splinters. Proper cutting prevents problems during assembly.
Assembling The Frame
Arrange the cut pieces on a flat surface. Join the side panels to the head and foot boards. Use wood screws or bolts for a strong hold. Check that the frame is square and aligned. Tighten all fasteners securely but avoid over-tightening. A well-assembled frame supports the entire bed.
Installing Support Mechanisms
Attach metal brackets or hinges to allow the bed to fold. Install strong springs or pistons for smooth lifting. Fix support bars to hold the mattress platform firmly. Test the folding and unfolding action several times. Proper mechanisms ensure safety and easy use.

Credit: www.amazon.com
Preparing The Workspace
Finishing touches bring your Murphy bunk bed with desk to life. They make the bed safe, stylish, and ready to use. This final step shows off your hard work and adds personality to the space.
Paying attention to small details creates a polished and professional look. It also ensures the bed is smooth and comfortable. Let’s explore key finishing steps to complete your project perfectly.
Sanding And Painting
Start by sanding all surfaces to smooth rough edges. Use fine-grit sandpaper for a soft finish. Sanding helps the paint stick better and prevents splinters.
Choose paint that matches your room’s style. Apply thin, even coats for best coverage. Let each coat dry fully before adding the next. You can use primer for a brighter color and longer-lasting paint.
Adding Handles And Hardware
Select handles that are sturdy and easy to grip. Attach them where you can easily pull the bed down or push it up. Use screws that fit tightly for safety and durability.
Install hinges and locks carefully. Check they work smoothly without sticking. Proper hardware keeps the bed stable and secure when folded or open.
Decorating And Personalizing
Add cushions or pillows to make the bed cozy. Choose colors and patterns that suit the room’s theme. You can also hang small shelves or hooks on the desk side.
Personal touches make the space unique and inviting. Use stickers, decals, or framed photos to brighten the area. These details turn your bunk bed into a fun, functional spot.
Building The Bed Frame
Maintaining a Murphy bunk bed with a desk keeps it safe and looking good. Regular care helps the bed last longer and work smoothly. Small steps can stop big problems later.
Keep an eye on moving parts and clean often. This way, the bed stays strong and the desk stays useful.
Cleaning And Dusting
Dust gathers in corners and on hinges. Use a soft cloth to wipe all surfaces weekly. Avoid wet cloths on wood to stop damage.
Clean the desk surface after use. This keeps the workspace neat and helps avoid stains.
Checking Hinges And Hardware
Look at hinges and screws every month. Tighten any loose screws with a screwdriver. Loose hardware can cause accidents or noise.
Lubricate hinges with a small amount of oil. This makes folding and unfolding easier and quieter.
Protecting The Wood Finish
Use furniture polish on wood parts to keep shine. Polish also protects wood from scratches and wear. Do this every two months.
Avoid placing hot or wet items directly on the desk. Use coasters or mats to prevent marks.
Inspecting The Mattress And Frame
Check the mattress for lumps or damage regularly. Rotate the mattress to keep it even. Look at the bed frame for cracks or bends.
Fix any damage quickly to keep the bed safe to use. A strong frame supports good sleep and desk use.

Credit: expandfurniture.com
Credit: www.turbobeds.com
Frequently Asked Questions
What Tools Are Needed To Build A Murphy Bunk Bed With Desk?
You need basic woodworking tools like a drill, saw, measuring tape, level, and screwdriver. Safety gear is also essential. Having clamps and a stud finder improves accuracy and safety during assembly.
How Much Space Is Required For A Murphy Bunk Bed?
A Murphy bunk bed needs at least 7 feet of ceiling height and 6 feet width. Consider extra space for desk use and bed folding to ensure comfortable movement.
Can I Customize The Desk Size On A Murphy Bunk Bed?
Yes, the desk size is customizable based on room space and personal needs. Adjust dimensions during planning to fit your workflow and storage preferences.
How Do I Ensure Safety In A Murphy Bunk Bed Design?
Use sturdy materials, secure wall mounts, and proper locking mechanisms. Regularly check hinges and brackets for wear to prevent accidents.
Conclusion
Building a Murphy bunk bed with a desk saves space and adds function. It fits well in small rooms or shared spaces. Follow the steps carefully for a sturdy, safe result. Use the right tools and materials to make assembly easier.
Personalize it with paint or decorations to match your style. This project gives you both a bed and workspace in one. Try it and enjoy your new, smart furniture solution. Simple, practical, and useful for any home.