Are you ready to create a stunning and practical sleeping space that maximizes comfort and style? Building a queen over queen bunk bed might sound tricky, but with the right steps, you can make a strong, beautiful piece that fits perfectly in your home.
Imagine having two spacious queen beds stacked safely, giving your family or guests plenty of room without taking up extra floor space. In this guide, you’ll discover easy-to-follow tips and clear instructions to help you build your own queen over queen bunk bed.
Keep reading, and by the end, you’ll be confident to take on this rewarding project yourself!
Credit: gooddiyplans.com
Materials And Tools Needed
Building a queen over queen bunk bed requires the right materials and tools. Choosing quality wood and hardware ensures the bed is safe and strong. Proper tools make the job easier and more precise. This section lists everything needed for a smooth build process.
Wood Types And Sizes
Use hardwood like oak or maple for durability. Pine wood is a budget-friendly option but less strong. Select boards that are straight and free of cracks. Typical sizes include 2x4s for the frame and 1x6s for slats. Measure the mattress size before cutting wood pieces.
Hardware And Fasteners
Strong screws hold the bed frame securely. Use 3-inch wood screws for main joints. Include corner brackets for added support. Wood glue increases joint strength. Sandpaper helps smooth rough edges before assembly.
Essential Tools
A power drill speeds up screw driving. A saw cuts wood pieces to length. A tape measure ensures accurate dimensions. Use a level to keep the bed even. Clamps hold parts together while fastening.
Planning Your Bunk Bed
Planning your queen over queen bunk bed is the first step to success. Careful preparation saves time and effort during building. Knowing the space, design, and safety needs helps you create a strong, useful bed. A good plan means fewer mistakes and better results.
Take time to think about the space and how the bunk bed fits. Safety comes next, making sure the bed is secure for use. Finally, draw a clear blueprint to guide your work. Each step builds on the last for a smooth project.
Measuring Space And Dimensions
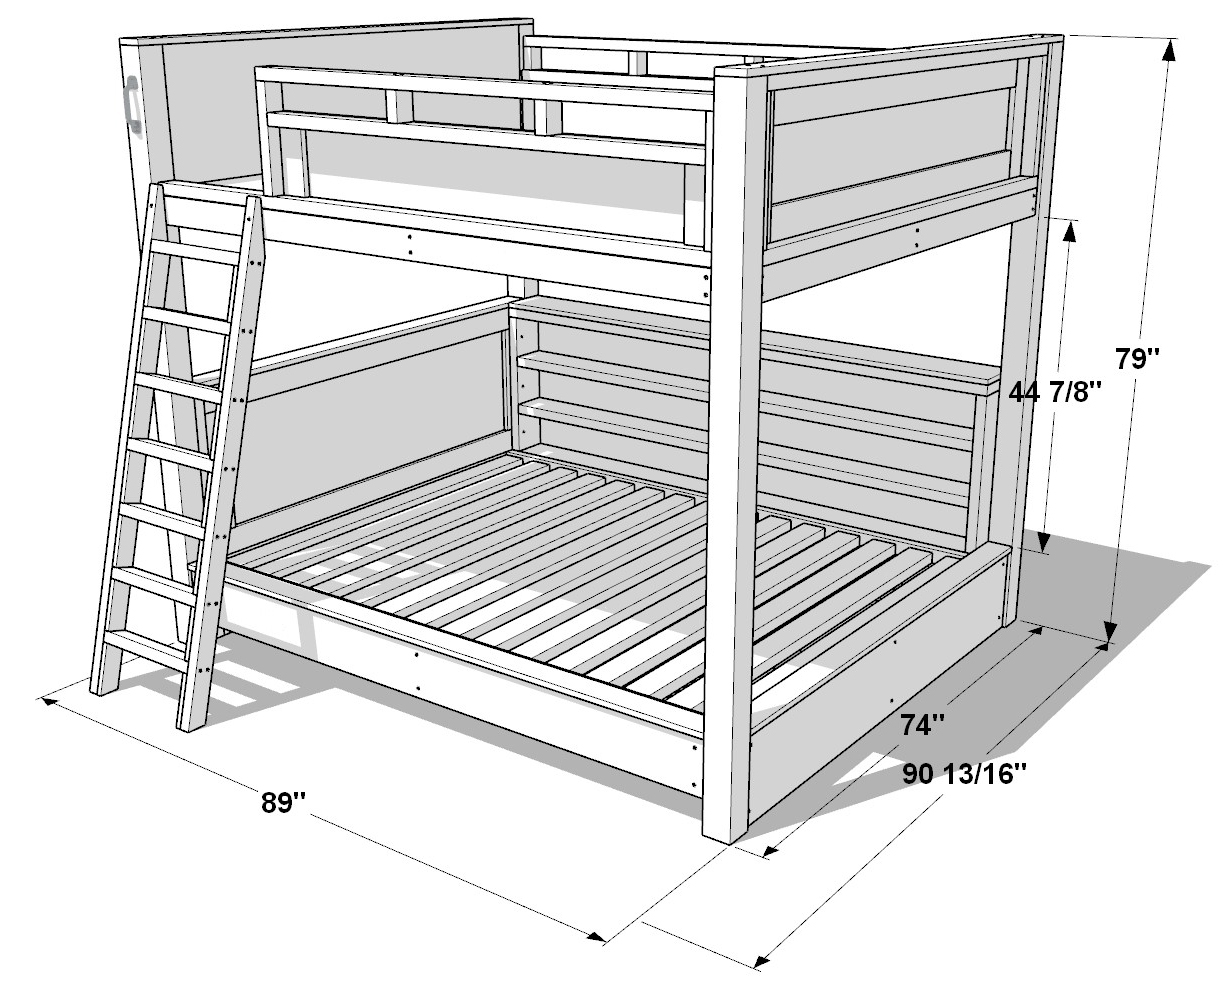
Start by measuring the room where the bunk bed will go. Check the ceiling height to avoid a cramped top bunk. Measure the floor area to fit the bed without blocking doors or windows. Write down all dimensions clearly.
Next, measure the mattresses you plan to use. Queen mattresses usually measure 60 by 80 inches. Allow extra space for the frame and safety rails. Accurate measurements ensure the bed fits well and stays stable.
Design And Safety Considerations
Choose a design that suits your space and needs. Think about how high the top bunk will be. Add guardrails to prevent falls. Make the ladder sturdy and easy to climb.
Use strong, quality materials to support weight safely. Avoid sharp edges and loose parts. Check all connections for tightness. Safety is key, especially with bunk beds for adults or kids.
Creating A Blueprint
Draw a detailed blueprint before starting the build. Include all measurements and design features. Show the locations of ladders, rails, and supports clearly. Use simple shapes and labels for easy reading.
A blueprint helps visualize the final bed. It guides cutting and assembly steps. Review the plan carefully and make changes if needed. A clear blueprint reduces errors and speeds up building.
Cutting And Preparing Wood
Cutting and preparing wood is a key step in building a queen over queen bunk bed. This process ensures all parts fit perfectly and the bed is safe and strong. Careful preparation helps avoid mistakes and wasted material. Follow the steps below to get your wood ready for assembly.
Marking And Measuring
Start by measuring each piece of wood carefully. Use a tape measure and pencil to mark exact lengths. Double-check your measurements before cutting. Mark straight lines clearly to guide your cuts. Accurate marks help keep the bed stable and balanced.
Cutting Techniques
Use a saw suited for your wood type. A circular saw works well for straight cuts. Cut slowly to keep edges clean and prevent splintering. Always wear safety gear like goggles and gloves. Keep the wood steady and follow your marks closely.
Sanding And Smoothing Edges
After cutting, sand all edges to remove rough spots. Use medium-grit sandpaper first, then fine-grit for smoothness. Smooth edges prevent splinters and improve the bed’s look. Take your time to create safe and neat wood pieces.
Assembling The Bed Frame
Assembling the bed frame is the first big step in building your queen over queen bunk bed. This part sets the base for the entire structure. Taking time here ensures the bed will be strong and safe. Follow each step carefully and keep all tools and parts ready.
Building The Lower Bed
Start by laying out all the pieces for the lower bed. Attach the side rails to the headboard and footboard. Use screws and bolts to secure each joint tightly. Check that the frame forms a perfect rectangle. Add the support slats evenly across the frame. These slats hold the mattress and add strength.
Constructing The Upper Bed
The upper bed frame is similar but smaller. Assemble the side rails, headboard, and footboard first. Make sure to use the right screws for the top frame. Attach support slats just like the lower bed. Double-check that all parts fit snugly. This frame must be sturdy for safety.
Connecting The Frames
Now, lift the upper frame carefully above the lower one. Align the posts on each corner of the lower bed. Slide the upper frame onto these posts. Use bolts to lock the frames together securely. Tighten all connections to avoid wobbling. Check the entire frame for stability before moving on.
Adding Support And Stability
Adding support and stability is key when building a queen over queen bunk bed. Strong support keeps the bed safe and steady. It prevents shaking and bending. This section covers how to install slats, reinforce joints, and secure the ladder. Follow these steps for a solid, long-lasting bunk bed.
Installing Slats And Supports
Start by placing wooden slats across the bed frame. Space them evenly for good mattress support. Use sturdy wood to hold weight well. Screw each slat firmly into the frame. Add extra supports under the middle to stop sagging. These slats spread weight and keep the bed stable.
Reinforcing Joints
Check all corners and joints for tight fits. Use metal brackets or corner braces to strengthen weak points. Screw them tightly to avoid movement. Wood glue adds extra hold between pieces. Reinforced joints stop wobbling and increase safety. Strong connections ensure the bed lasts longer.
Securing The Ladder
Attach the ladder firmly to the bunk bed frame. Use strong screws and brackets for safety. Place the ladder at a comfortable angle for easy climbing. Check the ladder for wobble before use. A secure ladder prevents falls and adds stability to the bed structure.
Finishing Touches
Finishing touches make your queen over queen bunk bed safe and beautiful. These final steps improve the look and ensure it lasts. Pay close attention to every detail for the best results.
Sanding And Painting
Smooth all wood surfaces with fine sandpaper. This removes rough spots and splinters. Clean dust off before painting. Choose paint safe for children and durable. Apply thin, even coats for a neat finish. Let each coat dry fully before the next.
Installing Guardrails
Attach guardrails to both top bunks. Use sturdy wood or metal rails to prevent falls. Secure rails with strong screws. Check that rails cover enough space for safety. Test them by gently pushing to ensure they hold firm.
Final Safety Checks
Inspect all screws and bolts for tightness. Make sure no parts stick out or cause hazards. Check ladder stability and step strength. Confirm the bed stands firm with no wobble. Test the entire structure before use to guarantee safety.
Tips For Maintenance And Longevity
Maintaining your queen over queen bunk bed ensures safety and long life. Small efforts keep the bed strong and looking good. Follow these tips to care for your bunk bed properly.
Regular Inspections
Check the bed often for any signs of damage. Look for cracks, splinters, or loose parts. Inspect the frame, ladder, and guardrails carefully. Catching problems early prevents bigger issues later.
Tightening Hardware
Bolts and screws can become loose over time. Use a wrench or screwdriver to tighten them regularly. Make sure all joints feel secure before use. This step keeps the bed stable and safe.
Cleaning And Care
Dust the bed weekly to keep it clean. Use a soft cloth and mild cleaner for wood or metal. Avoid harsh chemicals that can damage the finish. Clean spots right away to stop stains from setting.

Credit: topshelfdiy.com

Credit: www.etsy.com
Frequently Asked Questions
What Materials Are Needed For A Queen Over Queen Bunk Bed?
You need quality plywood or lumber, screws, bolts, wood glue, a drill, measuring tape, and safety gear. Choose sturdy wood like pine or oak for durability. Proper tools and fasteners ensure a safe, stable bunk bed structure.
How Long Does It Take To Build A Queen Over Queen Bunk Bed?
Building usually takes 8 to 12 hours, depending on skill level. Beginners may take longer. Planning, measuring, cutting, assembling, and finishing all affect the time. Taking breaks and double-checking measurements improve safety and accuracy.
Is It Safe To Build A Queen Over Queen Bunk Bed At Home?
Yes, if you follow safety guidelines and use quality materials. Proper joint reinforcement and secure fasteners prevent accidents. Always test stability before use and add guardrails. Safety should be your top priority during construction.
What Tools Are Essential For Constructing Queen Over Queen Bunk Beds?
Key tools include a power drill, circular saw, screwdriver, measuring tape, level, clamps, and sander. These help with precise cuts and secure assembly. Using the right tools speeds up the build and ensures a professional finish.
Conclusion
Building a queen over queen bunk bed takes time and care. Follow each step to ensure safety and strength. Use good materials and check measurements twice. Take breaks and ask for help if needed. A sturdy bunk bed saves space and adds comfort.
Enjoy your new bed and the extra room it creates. Keep it clean and inspect it often for safety. This project brings both fun and function to your home.