Are you looking for a smart way to save space and add fun to your child’s bedroom? Building a twin loft bunk bed might be the perfect solution.
Imagine giving your kids more room to play, study, or sleep comfortably—all by creating a sturdy, stylish bed yourself. In this guide, you’ll discover simple steps and helpful tips to build a twin loft bunk bed that fits your space and style.
Ready to turn your idea into reality? Keep reading, and you’ll find everything you need to make this project easy and rewarding.
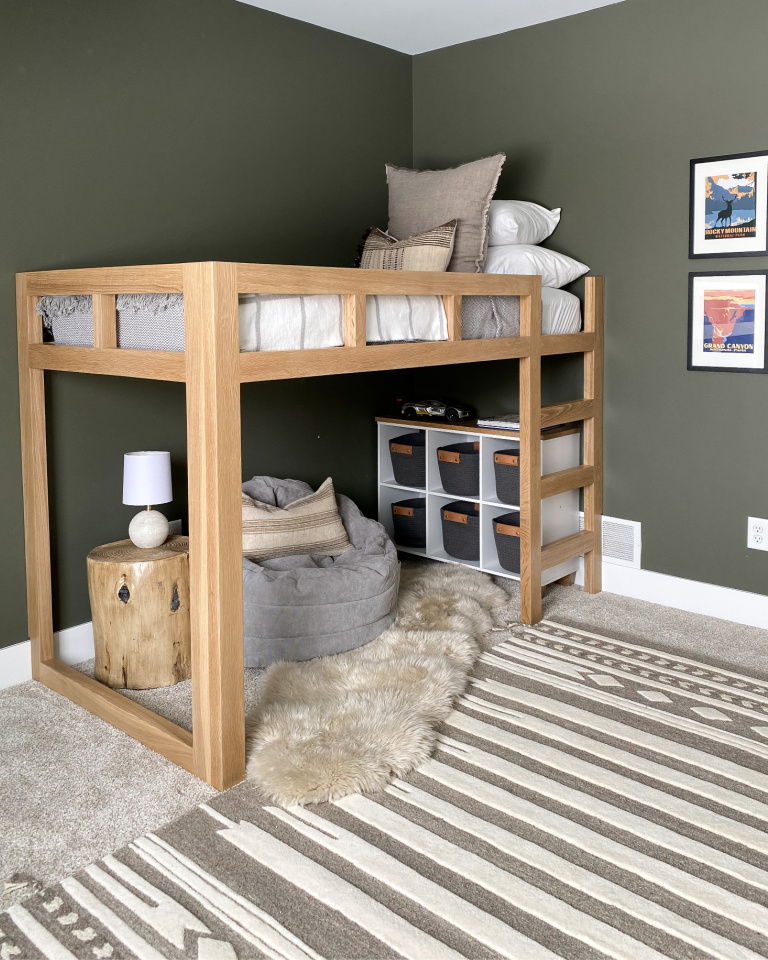
Credit: joinerydesignco.com
Materials And Tools Needed
Gathering the right materials and tools is the first step in building a twin loft bunk bed. The quality of your supplies affects both safety and durability. Planning ahead helps avoid delays during the build. Below, you will find a list of essential materials and tools for this project.
Selecting The Right Wood
Choose wood that is strong and easy to work with. Pine, oak, and maple are popular choices. Pine is affordable and lightweight. Oak and maple offer more strength but cost more. Use wood that is smooth and free of knots. This ensures better stability and a cleaner finish.
Essential Hardware And Fasteners
Strong hardware keeps the bed secure and safe. Use wood screws designed for heavy loads. Lag bolts add extra strength to key joints. Include washers to protect the wood from damage. Corner brackets help stabilize the frame. Sandpaper and wood glue improve fitting and finish.
Tools For The Project
Basic tools make the building process easier and safer. A power drill speeds up screwing and drilling. A circular saw or handsaw cuts wood to size. A measuring tape ensures precise dimensions. Use a level to keep the bed even. Clamps hold pieces steady during assembly. A screwdriver completes the fastening work.
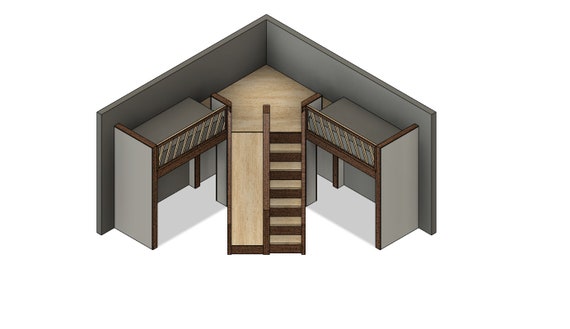
Credit: www.etsy.com
Planning Your Loft Bunk Bed
Planning your twin loft bunk bed is the first step toward a perfect build. Thoughtful planning saves time, money, and effort. It helps create a safe and comfortable space for sleeping and playing. Good planning starts with understanding your room’s size and needs.
Measuring Your Space
Measure the room carefully. Check the ceiling height and floor area. Note any obstacles like windows, doors, or heaters. Leave enough space around the bed for easy movement. Measure twice to avoid mistakes. This ensures the bed fits well without crowding the room.
Designing For Safety And Comfort
Safety is the top priority. Use strong materials that support weight well. Include guardrails to prevent falls. Make sure the ladder is sturdy and easy to climb. Check the distance between the loft and ceiling. It should allow enough headroom for comfort. Plan for smooth edges to avoid injuries.
Choosing A Style
Pick a style that matches your room’s look. Simple designs fit most spaces. Choose colors that blend with your walls and furniture. Decide if you want extra features like shelves or desks. Style affects both the bed’s function and the room’s feel. Keep it practical and attractive.
Cutting And Preparing Wood
Cutting and preparing wood is a key step in building a twin loft bunk bed. This phase sets the foundation for strong and safe construction. Careful measurement and precise cutting will help the bed fit together perfectly. Proper sanding ensures smooth surfaces, making the bed safe and comfortable for use.
Marking Measurements
Start by measuring all the wood pieces you need. Use a tape measure and a pencil to mark each cut line clearly. Double-check your measurements before cutting. Mark the wood on the face that will be visible to avoid mistakes. Accurate marks help keep the bed parts uniform and balanced.
Cutting Techniques
Use a saw that suits the type of cuts you need. A circular saw works well for straight cuts. For curves or detailed cuts, try a jigsaw. Cut slowly and steadily to avoid splintering the wood. Always wear safety gear like goggles and gloves. Keep your hands clear from the blade at all times.
Sanding And Finishing
After cutting, sand all the wood surfaces smoothly. Start with coarse-grit sandpaper to remove rough edges. Then use fine-grit paper for a soft finish. Sand edges and corners carefully to prevent splinters. Clean off dust before applying paint or wood finish. A smooth surface improves both safety and appearance.
Assembling The Frame
Assembling the frame is the first big step in building your twin loft bunk bed. This part creates the strong base that holds everything together. Take your time and follow each step carefully. A solid frame keeps the bed safe and steady.
Start by organizing all the wooden pieces and hardware. Check that you have everything before you begin. Use a flat surface to work on. This makes it easier to align parts correctly.
Building The Bed Rails
Bed rails connect the headboard and footboard. They support the mattress and keep it in place. Use sturdy wood for the rails. Attach metal brackets at each end for extra strength. Screw the rails securely into the bed posts. Check that they sit level and tight.
Constructing The Ladder
The ladder is essential for safe climbing. Cut two long side rails and several shorter steps. Space the steps evenly along the sides. Attach each step with strong screws. Sand all edges smooth to avoid splinters. Fix the ladder firmly to the bed frame for stability.
Adding Support Slats
Support slats hold the mattress evenly across the frame. Use multiple slats spaced a few inches apart. Lay them across the bed rails from side to side. Screw each slat into the rails to prevent movement. Make sure the slats do not bend under weight.
Securing The Loft Bed
Securing the loft bed is a crucial step in building a twin loft bunk bed. It keeps the structure strong and safe for daily use. Proper securing prevents wobbling and accidents. This section guides you through important steps to secure your loft bed firmly.
Joining Frame Components
Start by aligning all frame parts carefully. Use bolts and screws to join the pieces tightly. Tight connections reduce movement and increase strength. Check that each joint fits snugly before tightening. Avoid loose fittings to keep the frame solid. Use a power drill for better control and speed.
Ensuring Stability
Place the bed on a flat surface to test balance. Add corner braces or metal brackets at key joints. These help keep the bed from swaying. Tighten all fasteners once you confirm the frame is stable. Stability is key for a safe sleeping environment. Double-check all connections after assembly.
Installing Safety Rails
Attach safety rails on the loft bed edges. Use strong screws to secure rails firmly to the frame. Rails prevent falls during sleep and play. Make sure the rails are high enough for safety. Inspect rails regularly for any loosening or damage. Proper safety rails increase confidence and protect sleepers.
Finishing Touches
Finishing touches bring your twin loft bunk bed to life. They protect the wood and add style. Small details make the bed unique and cozy. Focus on three key areas to complete your project.
Painting Or Staining
Choose paint or stain to protect the wood. Paint adds color and hides flaws. Stain shows the wood’s natural grain. Use a primer before painting for better results. Apply thin coats and let each dry well. Sand lightly between coats for smoothness. Select non-toxic finishes to keep it safe for kids.
Adding Mattress And Bedding
Select mattresses that fit snugly on each bunk. Use firm, comfortable mattresses for good support. Pick bedding that matches the room’s theme. Soft sheets and cozy blankets create warmth. Use fitted sheets to keep bedding tidy. Add pillows for extra comfort and style. Make sure bedding is easy to wash and maintain.
Customizing With Accessories
Add personal touches to make the bed special. Attach a small shelf for books and toys. Use clip-on lamps for bedtime reading. Hang curtains for privacy and fun. Add safety rails if needed for extra security. Use hooks for backpacks or clothes. Personal accessories make the space inviting and practical.
Maintenance Tips
Proper maintenance keeps your twin loft bunk bed safe and durable. Regular care prevents damage and extends the bed’s life. Small efforts make a big difference in safety and comfort.
Regular Safety Checks
Check the bed for any cracks or splits in the wood. Look for loose or missing screws and bolts. Make sure the guardrails are secure and stable. Inspect the ladder for any damage or wobbling. Test the bed’s sturdiness by gently shaking it. Safety checks every month keep accidents away.
Cleaning And Care
Dust the bed frame with a soft cloth regularly. Use mild soap and water for deeper cleaning. Avoid harsh chemicals that can damage the finish. Clean the mattress and bedding often to prevent dust mites. Keep the area under the bed free from clutter. Clean beds create a healthy sleeping space.
Tightening Hardware
Loose screws and bolts cause the bed to shake or fall. Use a screwdriver or wrench to tighten all hardware. Check the fasteners at least once a month. Replace any stripped or damaged screws right away. Tight hardware ensures the bed stays strong and safe.

Credit: www.youtube.com
Frequently Asked Questions
What Materials Are Needed To Build A Twin Loft Bunk Bed?
You need quality wood, screws, nails, wood glue, sandpaper, and a drill. Choose durable hardwood for strength and safety.
How Long Does It Take To Build A Twin Loft Bunk Bed?
Building typically takes 8-12 hours depending on skill level and tools available. Planning and preparation can reduce the time needed.
Is A Twin Loft Bunk Bed Safe For Children?
Yes, if built with sturdy materials and proper guardrails. Always follow safety guidelines and weight limits to prevent accidents.
Can I Customize The Design Of My Loft Bunk Bed?
Absolutely! You can change dimensions, add storage, or paint it. Customization helps fit your space and personal style perfectly.
Conclusion
Building a twin loft bunk bed takes time and patience. Follow each step carefully for best results. Use safe materials and check all connections. A sturdy bed keeps kids safe and comfortable. This project saves space and adds style to any room.
Enjoy the process and the final product. Your effort creates a cozy, fun sleeping area. Keep tools organized and work slowly to avoid mistakes. The finished bed will bring joy for years. Simple plans and clear steps make this project easy.