Are you ready to create a cozy and fun space for your kids or guests? Building a twin size bunk bed is easier than you might think, and it can save you money while giving you a sense of pride.
Imagine having a sturdy, stylish bunk bed that fits perfectly in your room and meets your family’s needs. In this guide, you’ll find simple steps and clear tips that make the process smooth and enjoyable. Keep reading, and by the end, you’ll have everything you need to build a safe and comfortable twin size bunk bed yourself.
Your perfect bunk bed is just a few steps away!

Credit: funwithwoodworking.com
Materials And Tools Needed
Gathering the right materials and tools is the first step to build a sturdy twin size bunk bed. Using quality items ensures safety and durability. This list covers everything needed for a smooth building process.
Wood And Lumber
Select strong, smooth wood like pine or oak. You will need boards for the bed frame, side rails, ladder, and slats. Measure twice and buy a little extra to avoid shortages.
Fasteners And Hardware
Use wood screws, bolts, and nuts to hold the bed securely. Choose screws that are long enough to join thick wood pieces. Add brackets for extra support and safety.
Tools Required
Basic tools include a drill, screwdriver, saw, measuring tape, and a level. A sander will smooth rough edges. Clamps help hold pieces steady while assembling.
Safety Gear
Wear safety glasses and gloves to protect your eyes and hands. Use a dust mask to avoid breathing sawdust. Always work in a well-ventilated area.
Choosing The Right Wood
Choosing the right wood is key to building a strong twin size bunk bed. The wood affects the bed’s safety, look, and how long it lasts. It also changes the work needed to build the bed. Picking the best wood makes the project easier and the bed better.
Wood types vary in weight, strength, and cost. Some woods work better for heavy loads. Others have smooth finishes and nice colors. Some woods are easier to cut and join. Knowing these differences helps to choose the best one for your bunk bed.
Types Of Wood For Bunk Beds
Hardwoods like oak, maple, and cherry are very strong and last a long time. They resist dents and scratches well. Softwoods like pine and fir are lighter and cheaper. They are easier to work with but may dent easier. Choose hardwood for durability, softwood for budget and ease.
Wood Strength And Safety
Strength is vital for bunk beds. The wood must hold weight without bending or breaking. Look for wood with tight grain and few knots. Avoid wood with cracks or soft spots. Strong wood keeps the bed safe for kids or adults.
Wood Finish And Appearance
Wood finish affects how the bed looks. Some woods have a natural shine and rich color. Others need paint or stain to look good. Pine has a light color and smooth surface. Oak has a deep grain and warm tone. Pick a wood that matches the room style.
Cost And Availability
Wood prices vary by type and location. Pine and fir are usually cheaper and easy to find. Hardwoods cost more but last longer. Check local stores for available wood options. Choose wood that fits your budget and building plan.
Workability Of Wood
Some woods are easier to cut and drill. Softwoods like pine are simple to shape. Hardwoods need sharper tools and more effort. Think about your skills and tools before picking wood. Easier woods make the building process faster and smoother.
Preparing The Workspace
Preparing the workspace is the first step in building a twin size bunk bed. A clean, organized space makes the project easier and safer. It helps you find tools quickly and work without distractions.
Before starting, clear the area of any clutter or obstacles. Choose a place with enough room to spread out materials and move freely. Good lighting is important to see all details clearly.
Clear The Area
Remove furniture and items from the workspace. This gives you more room to work and reduces accidents. A clear floor prevents tripping and keeps parts clean.
Gather Necessary Tools
Collect all tools before starting. Common tools include a drill, screwdriver, measuring tape, and level. Having tools ready saves time and keeps the project smooth.
Organize Materials
Lay out wood pieces, screws, and hardware neatly. Group similar items together for easy access. This organization speeds up assembly and reduces mistakes.
Ensure Proper Lighting
Work in a well-lit area or add extra lights. Good lighting helps you see measurements and screw placements clearly. It also reduces eye strain during work.
Set Up A Workbench
Use a sturdy table or workbench to support parts during assembly. A stable surface prevents damage and makes handling pieces safer. It keeps the project steady as you build.
Cutting The Wood Pieces
Cutting the wood pieces is a key step in building a twin size bunk bed. Accurate cuts ensure the bed fits together well. It also makes the bed strong and safe for use.
Measure twice before cutting any wood. This avoids mistakes and wasted material. Use a pencil to mark the wood clearly. Keep your marks straight and easy to see.
Select wood that is sturdy and smooth. Pine and fir are common choices. Avoid wood with knots or cracks. These can weaken the bed frame.
Measuring And Marking
Use a tape measure for exact lengths. Mark each piece carefully on the wood. Double-check all measurements before cutting. This saves time and wood.
Cutting The Wood Safely
Wear safety goggles and gloves during cutting. Use a saw suitable for the wood type. A circular saw works well for straight cuts. Cut slowly and follow the lines precisely.
Organizing Cut Pieces
Label each piece after cutting. This helps keep track of parts. Store pieces in a clean, dry place. Keep them flat to avoid warping.
Assembling The Bed Frame
Assembling the bed frame is the key step in building a twin size bunk bed. This part holds the entire structure together. A strong frame ensures safety and durability. Follow the steps carefully to make the frame solid and stable.
Building The Headboard And Footboard
Start by preparing the headboard and footboard pieces. Use sturdy wood planks cut to size. Attach the vertical posts to the horizontal boards. Make sure the joints are tight and secure. Use screws or bolts designed for wood. Check that both boards are even and straight. These will support the bed’s weight and provide stability.
Constructing The Side Rails
Next, focus on the side rails. These connect the headboard and footboard. Measure the length carefully to fit the mattress size. Attach the rails to the posts using brackets or screws. Ensure the rails are level and firmly attached. Side rails hold the mattress and support the top bunk. Double-check all connections for safety before moving on.
Creating The Ladder
Creating the ladder is a key step in building a twin size bunk bed. It must be safe, sturdy, and easy to climb. The ladder supports the person climbing up and down the bunk bed. Proper planning and measuring ensure the ladder fits perfectly.
Wood selection affects strength and appearance. Choose wood that is strong and smooth to avoid splinters. The ladder design should match the style of the bunk bed. Secure attachment to the bed frame is essential for safety.
Measuring And Cutting The Ladder Rails
Start by measuring the height of the bunk bed. Cut two long rails from wood to match this height. Use a saw to make clean, straight cuts. Sand the edges to remove rough spots. These rails will hold the steps of the ladder.
Preparing The Ladder Steps
Cut several shorter pieces of wood for the steps. Each step should be wide enough for safe footing. Sand these pieces well to make them smooth. The number of steps depends on the height of the bed. Space the steps evenly for comfortable climbing.
Assembling The Ladder
Attach the steps between the two rails. Use wood glue and screws for a strong bond. Check that each step is level before securing. Make sure the ladder is square and stable. Tighten all screws to prevent wobbling.
Finishing Touches For Safety And Comfort
Sand the entire ladder to smooth all surfaces. Round the edges to avoid sharp corners. Apply a non-toxic finish or paint for protection. Add rubber feet or pads to the bottom for grip. Test the ladder by climbing to ensure safety.
Adding Safety Rails
Adding safety rails is a key step in building a twin size bunk bed. Safety rails keep sleepers from falling out of the top bunk. They provide peace of mind for parents and kids alike.
Choosing the right design and installing rails correctly ensures a secure bed. This section explains how to add safety rails properly.
Choosing The Right Material For Safety Rails
Wood is a common choice for safety rails. It is strong and easy to work with. Smooth, sanded wood prevents splinters and injuries. Metal rails can also be used but must be checked for sharp edges.
Select materials that match the bed frame for a uniform look. Avoid materials that can easily break or bend.
Measuring And Cutting Safety Rails
Measure the length of the bed’s side carefully. Rails must be long enough to cover most of the sleeping area. Cut the rails to size using a saw. Smooth any rough edges with sandpaper.
Ensure the height of the rail is enough to prevent falls. Usually, rails should be at least 5 inches above the mattress top.
Securing Safety Rails To The Bunk Bed
Use screws or bolts to attach the rails firmly. Drill pilot holes to avoid splitting the wood. Tighten fasteners securely but do not overtighten.
Test the rails by applying pressure to make sure they hold well. Double-check for any loose parts before use.
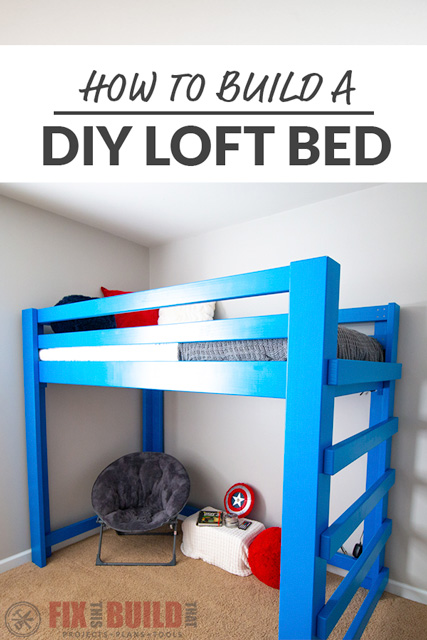
Credit: fixthisbuildthat.com
Sanding And Finishing
Sanding and finishing are important steps in building a twin size bunk bed. These steps make the wood smooth and protect it. Proper sanding removes rough spots and splinters. Finishing adds color and shields the wood from damage. Taking time here improves the bed’s look and safety.
Sanding For Smoothness
Start sanding with medium-grit sandpaper. Sand all wooden surfaces carefully. Use even pressure to avoid scratches. Move with the wood grain, not against it. Check edges and corners for roughness. Switch to fine-grit sandpaper for a smooth finish. Wipe dust off with a damp cloth. Sanding well prevents splinters and helps paint stick.
Applying Paint Or Stain
Choose paint or stain that suits your style. Use a brush or roller for even coverage. Apply thin coats to avoid drips and runs. Let each coat dry fully before adding another. Stain enhances the wood’s natural look. Paint offers more color options and protection. Finish with a clear sealant for long-lasting results. This step keeps the bunk bed strong and beautiful.
Final Assembly And Inspection
The final assembly and inspection stage is crucial when building a twin size bunk bed. This step ensures the bed is safe, strong, and ready for use. Careful attention at this point helps avoid future problems like wobbling or weak joints.
Take your time to follow each step carefully. Double-check all connections and fasteners. Proper assembly guarantees the bunk bed lasts longer and stays secure for children.
Attach The Guardrails Securely
Start by fixing the guardrails on the top bunk. Use the screws or bolts provided in the kit. Tighten them firmly but avoid over-tightening. The guardrails protect from falls, so they must be stable and well fixed.
Check The Ladder And Steps
Next, attach the ladder or steps to the bed frame. Confirm it is steady and does not move when weight is applied. Test climbing up and down slowly. Safety is the priority, especially for kids.
Tighten All Bolts And Screws
Go over every bolt and screw on the bunk bed. Use the right tools to make sure each one is tight. Loose hardware can cause the bed to shake or collapse. Recheck after assembly and periodically after use.
Inspect The Mattress Support
Look at the slats or platform holding the mattresses. They should be evenly spaced and firmly attached. Avoid gaps or weak spots. The mattress must sit flat for a comfortable and safe sleep surface.
Test Stability And Weight Capacity
Finally, test the bed’s stability by gently shaking it. It should not wobble or feel loose. Check the recommended weight limit and do not exceed it. Proper testing prevents accidents and ensures long-term use.
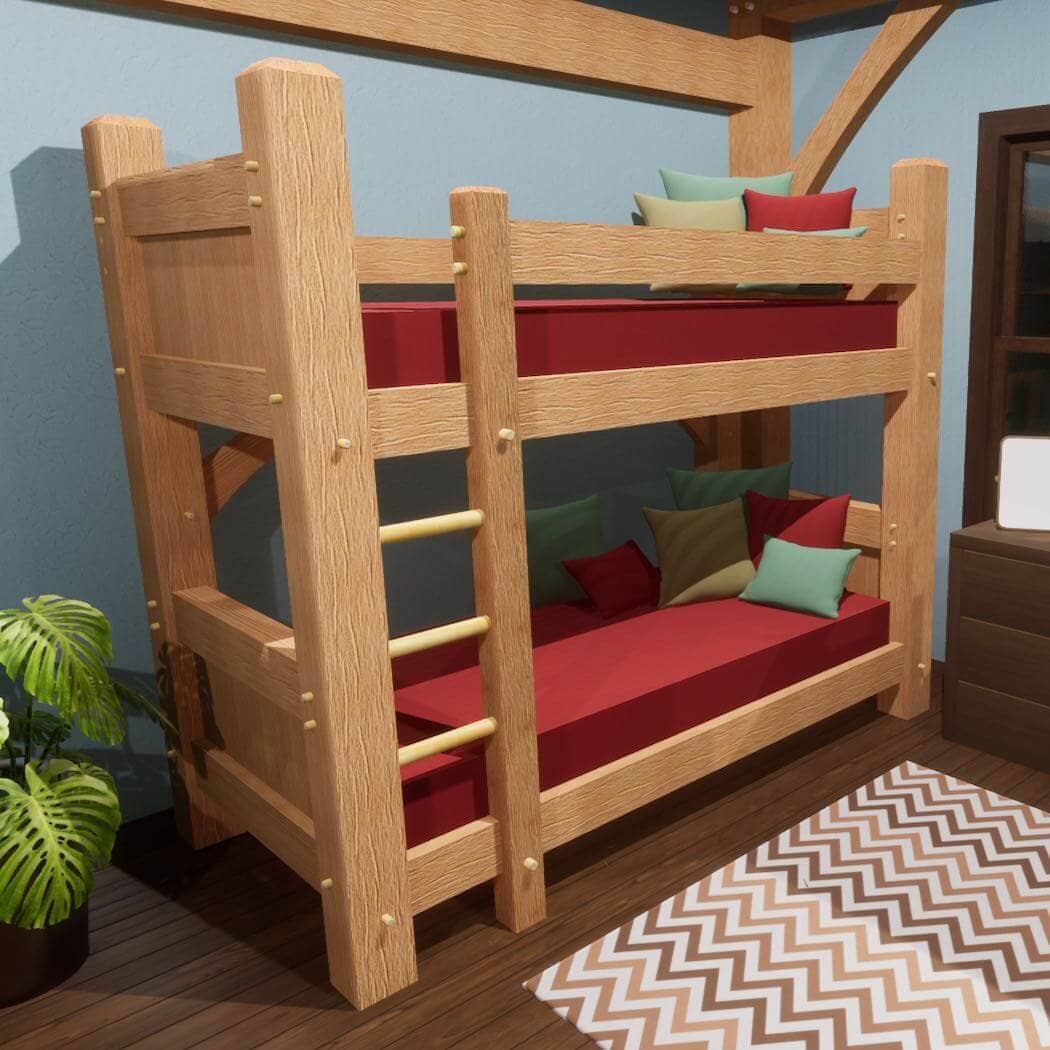
Credit: timberframehq.com
Frequently Asked Questions
What Materials Are Needed To Build A Twin Size Bunk Bed?
You need wood boards, screws, bolts, a drill, sandpaper, wood glue, and a safety finish. Choose sturdy hardwood for durability and safety.
How Long Does It Take To Build A Twin Size Bunk Bed?
Building a twin size bunk bed typically takes 6 to 10 hours. Time varies based on skill level and available tools.
What Safety Features Should A Twin Size Bunk Bed Have?
Include guardrails on the top bunk, secure ladder attachment, and sturdy construction. Ensure all edges are smooth to prevent injuries.
Can I Customize The Design Of My Twin Size Bunk Bed?
Yes, you can customize size, color, and storage options. Personalization allows it to fit your room and style preferences perfectly.
Conclusion
Building a twin size bunk bed can save space and add style. Follow the steps carefully to ensure safety and durability. Use the right tools and materials for a strong frame. Take your time and double-check all measurements. Enjoy the process and create a cozy space for kids or guests.
With patience, you can build a bed that lasts for years. Ready to start your project? It’s easier than you think.