Are you looking for a simple way to organize your books and display your favorite items? Building a cube bookshelf could be exactly what you need.
Imagine having a sturdy, stylish piece of furniture that fits perfectly in your space and holds everything neatly. This guide will show you how to create your own cube bookshelf step-by-step, even if you’ve never built anything before. Keep reading, and you’ll soon have a custom shelf that’s both practical and eye-catching.
Your home deserves it, and so do you.
Materials And Tools Needed
Building a cube bookshelf is a fun and rewarding project. Having the right materials and tools is very important. This section helps you prepare everything before starting. Proper preparation saves time and effort. It also ensures a sturdy and beautiful bookshelf.
Choosing The Right Wood
Pick wood that is strong and easy to work with. Pine, plywood, or MDF are good choices. Pine is light and affordable. Plywood offers good strength and smooth surfaces. MDF is smooth but heavier and needs careful handling. Avoid soft woods that can bend or break easily. Also, check for wood that is dry and free of cracks.
Essential Tools Checklist
Gather basic tools before you begin. A saw is needed to cut wood pieces. A drill helps make holes and drive screws. Use a screwdriver to tighten screws firmly. Sandpaper smooths rough edges and surfaces. A tape measure gives precise measurements. A square or angle tool ensures right angles. Clamps hold pieces together while gluing or screwing.
Additional Supplies
Besides wood and tools, some supplies help finish the project. Wood glue adds extra strength to joints. Screws or nails fasten the parts firmly. Wood filler covers small holes or cracks. Paint or stain gives the bookshelf a nice look. Brushes or rags apply the finish evenly. Safety gear like gloves and goggles protect your hands and eyes.

Credit: gosforthhandyman.com
Planning Your Bookshelf
Planning your cube bookshelf is the first step to a great project. Careful planning saves time and money. It helps you build a sturdy and useful shelf. Start by thinking about where you want to place the bookshelf. Consider how many books or items you want to store. Planning well leads to a shelf that fits your space and needs perfectly.
Determining Size And Dimensions
Measure the wall or space for your bookshelf. Note the height, width, and depth available. Decide the size of each cube based on what you will store. Common cube sizes range from 12 to 16 inches. Keep in mind doorways and room flow. Choose dimensions that make your shelf easy to use and fit your space well.
Designing The Cube Layout
Think about how many cubes you want in rows and columns. Decide if you want all cubes the same size or mixed sizes. Plan for open or closed backs depending on your wall type. Consider adding extra space for decor or plants. A balanced layout looks neat and holds your items safely.
Sketching The Blueprint
Draw a simple sketch of your bookshelf on paper. Mark the overall size and each cube’s dimensions. Use a ruler to keep lines straight and proportions correct. Label parts like shelves, sides, and back panels. This blueprint guides your cutting and assembling steps. A clear sketch helps avoid mistakes during building.
Cutting The Wood Pieces
Cutting the wood pieces is the first important step in building your cube bookshelf. Getting accurate cuts helps the shelf fit together well. It also makes the final product strong and neat. Take your time to measure and cut carefully. This process sets the base for the whole project.
Measuring And Marking
Start by measuring the wood with a tape measure. Double-check all numbers before marking. Use a pencil to draw straight lines where you will cut. Mark clearly so you do not lose track. Accurate measuring avoids mistakes and wasted wood.
Safe Cutting Techniques
Always wear safety goggles and gloves while cutting. Use a stable surface to place your wood. Follow the marked lines slowly and steadily. Keep your hands away from the blade. Use clamps to hold the wood steady if needed.
Preparing Edges For Assembly
After cutting, smooth the edges with sandpaper. This removes splinters and rough spots. Clean edges help pieces fit tightly together. Smooth surfaces also improve the shelf’s appearance. Take your time to prepare edges well.
Assembling The Frame
Assembling the frame is the first big step in building your cube bookshelf. This part creates the strong base that holds all cubes together. A solid frame means your bookshelf will last long and hold many items safely.
Follow each step carefully to make sure the cubes fit perfectly. Take your time to align each piece before fixing it in place. A well-assembled frame makes the rest of the build easier and more stable.
Joining The Cubes
Start by placing two cubes side by side on a flat surface. Make sure their edges line up evenly. Use wood glue on the sides that touch. Press the cubes together firmly. Repeat this for all cubes in each row. Stack the rows and join them the same way. This forms the basic shape of your bookshelf.
Securing With Screws And Glue
After the glue dries, add screws for extra strength. Drill small pilot holes first to avoid splitting the wood. Insert screws into the holes to hold cubes tightly. Use screws at every joint for strong support. This stops the frame from wobbling or falling apart. Glue and screws together make a firm hold.
Checking For Stability
Place the frame on a flat floor. Gently shake it from side to side. Look for any movement or gaps between cubes. Tighten screws if parts feel loose. Use clamps to hold pieces while glue dries fully. A stable frame keeps your bookshelf safe and sturdy for daily use.
Finishing Touches
Finishing touches make your cube bookshelf look great and last longer. These steps protect the wood and improve its feel. Take your time to complete each part carefully for the best results.
Sanding For Smoothness
Start by sanding the entire bookshelf surface. Use medium-grit sandpaper to remove rough spots. Then, switch to fine-grit sandpaper for a smooth finish. Sand edges and corners well to avoid splinters. Wipe the dust off with a clean cloth before moving on.
Applying Paint Or Stain
Choose paint or stain based on your style and wood type. Use a brush or cloth to apply evenly. Let the first coat dry completely before adding a second. Paint gives color and hides wood grain. Stain enhances the natural wood look. Apply thin coats to prevent drips and runs.
Adding Protective Coating
Seal your bookshelf with a protective coating for durability. Polyurethane or varnish works well to guard against scratches and moisture. Use a clean brush and apply thin, even layers. Allow each coat to dry fully before the next. This step keeps your bookshelf looking new longer.

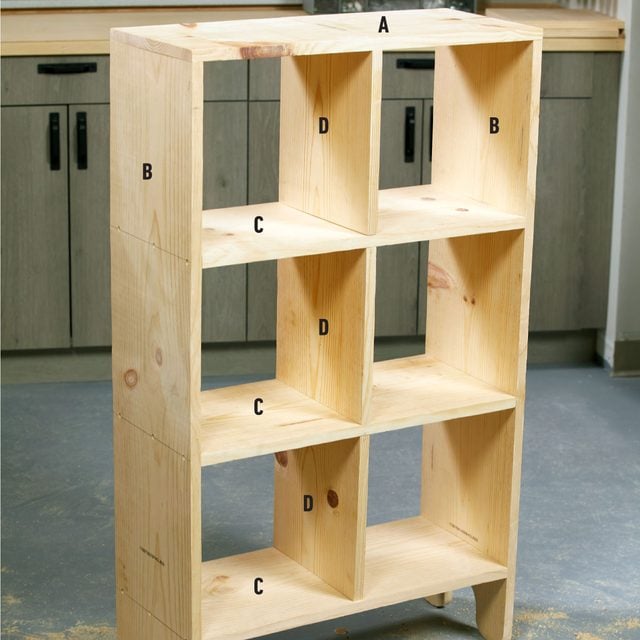
Credit: www.instructables.com
Installing And Styling
Installing and styling your cube bookshelf is the final step to make it both useful and attractive. Proper placement and thoughtful organization can enhance your space and create a cozy, functional area. Simple maintenance keeps your bookshelf looking new for years. Let’s explore easy ways to position, arrange, and care for your cube bookshelf.
Positioning Your Bookshelf
Choose a spot with enough space for your cube bookshelf. Place it against a wall to save room. Avoid direct sunlight to prevent fading. Make sure it stands on a flat surface for stability. Leave space around it to allow easy access to each cube.
Organizing Books And Decor
Group books by size or color for a neat look. Mix books with decorative items like plants or photo frames. Use baskets inside cubes to hide small items. Keep heavy items on lower cubes to avoid tipping. Balance the cubes visually for a pleasant display.
Maintenance Tips
Dust your bookshelf weekly with a soft cloth. Wipe spills immediately to prevent stains. Tighten screws every few months to keep it sturdy. Avoid placing wet or hot items directly on the shelves. Use furniture polish occasionally to maintain the finish.
Credit: www.familyhandyman.com
Frequently Asked Questions
What Tools Are Needed To Build A Cube Bookshelf?
You need a saw, drill, measuring tape, screwdriver, clamps, and sandpaper. These tools help in cutting, assembling, and finishing the bookshelf accurately.
How Long Does It Take To Build A Cube Bookshelf?
Building a cube bookshelf typically takes 3 to 5 hours. Time varies based on skill level and complexity of design.
What Type Of Wood Is Best For Cube Bookshelves?
Pine, plywood, and MDF are popular choices. Pine is affordable; plywood offers strength, and MDF gives a smooth finish.
How Do I Ensure My Cube Bookshelf Is Sturdy?
Use quality wood, tighten screws properly, and add corner braces. Proper assembly ensures stability and long-lasting durability.
Conclusion
Building a cube bookshelf is simple and rewarding. You get to create storage that fits your space perfectly. Follow each step carefully and take your time. Use good materials to ensure strength and durability. Enjoy the process of making something with your hands.
Soon, you will have a useful and stylish shelf. It holds books, decorations, or anything you like. This project adds charm to any room. Try customizing the colors or sizes next time. Building your own furniture can save money and bring pride.
Give it a go—you might surprise yourself!