Are you tired of cluttered floors and messy piles of books? Imagine having a neat, stylish bookshelf right on your wall—saving space and adding charm to your room.
Building a bookshelf on the wall might sound tricky, but it’s easier than you think. In this guide, you’ll discover simple steps that anyone can follow to create a sturdy, beautiful shelf. Ready to turn your blank wall into a smart storage solution?
Let’s get started!
Choosing The Right Bookshelf Style
Choosing the right bookshelf style sets the tone for your room. It affects both the look and function of your space. The style depends on your needs, wall space, and personal taste. Picking the best style makes your bookshelf practical and attractive.
Floating Shelves
Floating shelves are popular for their clean, modern look. They attach directly to the wall with hidden brackets. This creates a “floating” effect with no visible supports. Floating shelves save floor space and fit small rooms well. They work best for light to medium weight books and decor.
Built-in Shelves
Built-in shelves are fixed into the wall for a seamless appearance. They often reach from floor to ceiling. This style gives a custom, high-end feel to the room. Built-ins hold many books and heavy items securely. They require more work but add lasting value to your home.
Bracket Shelves
Bracket shelves use visible supports under the shelf boards. They come in many styles from simple to decorative. Brackets add charm and can support heavier loads. This style is easy to install and adjust. Choose brackets that match your room’s decor for a balanced look.
Selecting Materials And Tools
Selecting the right materials and tools is key to building a strong bookshelf on your wall. Good materials ensure the shelf lasts long and holds weight safely. The right tools make the work easier and faster. This section covers wood types, hardware essentials, and necessary tools for your project.
Wood Types
Choose wood that fits your budget and style. Pine is soft, light, and easy to cut. Oak is strong and looks classic but costs more. Plywood is stable and affordable. It resists warping better than solid wood. Avoid cheap particleboard; it can break under weight. Pick wood with smooth surfaces for easy finishing.
Hardware Essentials
Brackets hold your shelf firmly on the wall. Use metal brackets for strong support. Screws must match the bracket size and type of wall. Drywall anchors help if you don’t hit a stud. Choose anchors rated for your shelf’s weight. Sandpaper smooths rough wood edges. Wood glue adds extra strength at joints.
Necessary Tools
A drill speeds up screwing and making holes. A level ensures your shelf is straight and even. A tape measure helps with precise cuts and placement. A saw cuts wood to the right size. Screwdrivers fit screws tightly. A pencil marks measurements clearly. Safety glasses protect your eyes during work.
Measuring And Planning Your Space
Measuring and planning your space is the first step in making a bookshelf on the wall. It helps you know exactly where and how to place the shelves. This step ensures your bookshelf fits well and looks good. Careful planning saves time and avoids mistakes.
Wall Space Assessment
Start by checking the wall where you want to install the bookshelf. Use a tape measure to find the height and width of the wall space. Note any obstacles like light switches or power outlets. Look for studs behind the wall for better support. Mark the space clearly to visualize the shelf placement.
Shelf Dimensions
Decide the size of each shelf based on the space available. Measure the length and depth of the shelves to fit your books and items. Keep enough space between shelves for taller books. Choose standard shelf sizes or customize to fit your needs. Write down all measurements before buying materials.
Load Capacity Considerations
Think about how much weight the shelves need to hold. Books can be heavy, so the shelves must be strong. Use sturdy materials like solid wood or metal brackets. Check the wall type to select the right anchors and screws. Plan for extra support to keep shelves safe and stable.
Preparing The Wall
Preparing the wall is an important first step before installing a bookshelf. It ensures the shelf will be strong and safe. Proper preparation helps avoid damage to the wall and keeps the shelf steady. This step involves finding the best spots to anchor the shelf and marking where it will go.
Locating Studs
Studs are vertical wooden beams inside the wall. They provide strong support for heavy items. Use a stud finder to locate them. Move the finder slowly across the wall. Mark the edges of each stud with a pencil. Studs are usually 16 or 24 inches apart. Mounting the shelf on studs keeps it from falling.
Marking Placement
Decide how high and wide you want the shelf. Use a level to draw straight lines on the wall. Mark the points where the shelf brackets will go. Measure carefully to keep the shelf even. Double-check the marks before drilling. Proper marking saves time and prevents mistakes.
Wall Anchors And Supports
Not all walls have studs where you need them. Use wall anchors to hold screws in drywall. Choose anchors that match the shelf weight. Insert anchors into drilled holes before attaching screws. Anchors spread the load and keep the shelf stable. Use strong supports for heavy or long shelves.
Cutting And Sanding Wood
Cutting and sanding wood are key steps in building a sturdy and attractive wall bookshelf. These steps shape your wood pieces and prepare them for assembly. Proper cutting ensures the wood fits perfectly on your wall. Sanding smooths rough edges for a clean, finished look. Taking time with these tasks improves your bookshelf’s strength and appearance.
Measuring And Marking Wood
Start by measuring your wood carefully. Use a tape measure to get exact lengths. Mark the cutting lines clearly with a pencil. Double-check your marks before cutting. Accurate measurements prevent mistakes and wasted wood. Mark each piece for easy identification during assembly.
Safe Cutting Techniques
Always wear safety goggles and gloves before cutting. Use a saw suited for your wood type and thickness. Cut slowly along your marked lines for precision. Keep your hands away from the saw blade. Secure the wood with clamps to stop movement. Work in a well-lit area for better visibility.
Sanding For Smooth Finish
Use sandpaper or a sanding block to smooth edges. Start with coarse grit to remove rough spots. Then switch to fine grit for a soft finish. Sand in the direction of the wood grain. Check for splinters or uneven surfaces. Clean dust off the wood before painting or staining.

Credit: www.youtube.com
Assembling And Installing Shelves
Assembling and installing shelves is a key step in creating a sturdy wall bookshelf. Proper installation ensures your shelves hold books safely and look neat. Follow clear steps to attach brackets, mount shelves, and secure everything in place.
Attaching Brackets
Start by marking where the brackets will go on the wall. Use a level to keep marks straight. Drill holes in the wall at the marked spots. Insert wall anchors if needed for extra support. Screw the brackets firmly into place. Make sure brackets are secure and do not wiggle.
Mounting Shelves
Place the shelf boards on the attached brackets. Check that the boards fit well and sit flat. Adjust the position to avoid gaps or tilting. Use screws to fasten the shelves to the brackets. This helps keep shelves steady and stops movement.
Securing And Leveling
Double-check the shelf level with a spirit level tool. Adjust screws or brackets to fix any tilt. Tighten all screws to hold shelves firmly. Give shelves a gentle shake to test strength. A well-secured shelf will feel stable and safe.
Finishing Touches
After building your wall bookshelf, the finishing touches make it stand out. These steps protect your work and give it a clean, polished look. Small details can change the whole feel of your shelf. Let’s explore how to paint, seal, and decorate it with style.
Painting And Staining
Painting or staining adds color and character to your shelf. Choose paint that matches your room’s style. Use a brush or roller for even coats. Staining keeps the wood’s natural look. Apply stain with a cloth to avoid blotches. Let each layer dry fully before adding another. This step improves the shelf’s appearance and blends it with your space.
Sealing For Durability
Sealing protects the shelf from scratches and water. Use clear varnish or polyurethane for a strong finish. Apply thin, even coats with a brush. Let the seal dry between layers for best results. Sealing keeps the wood safe and makes cleaning easier. It also extends the shelf’s life, keeping it looking new longer.
Decorating Ideas
Decorate your shelf to reflect your style. Add small plants or framed photos for a personal touch. Arrange books by color or size for a neat look. Use baskets or boxes to store small items neatly. Lighting, like small LED strips, can highlight your shelf’s design. These ideas turn a simple shelf into a room feature.
:max_bytes(150000):strip_icc()/dominiquegebruinsta-35b11dd4f037417980649e06e17c4027.jpg)
Credit: www.thespruce.com
Safety Tips And Maintenance
Safety is a key part of building a wall bookshelf. Proper care keeps the shelf strong and secure. Regular checks and good cleaning help your shelf last longer. Follow these tips to protect your books and your home.
Weight Limits
Each shelf has a weight limit. Do not put heavy items on weak shelves. Use sturdy brackets and wall anchors for support. Spread weight evenly across the shelf. Overloading can cause the shelf to fall.
Regular Checks
Check your shelf often for signs of wear. Look for loose screws or brackets. Tighten any parts that feel weak. Inspect the wall for cracks or damage. Early fixes prevent accidents and damage.
Cleaning Advice
Dust your shelf regularly with a soft cloth. Avoid wet cloths that can harm the wood or paint. Use mild soap if needed but dry the shelf well. Keep your shelf clean to keep it looking new.
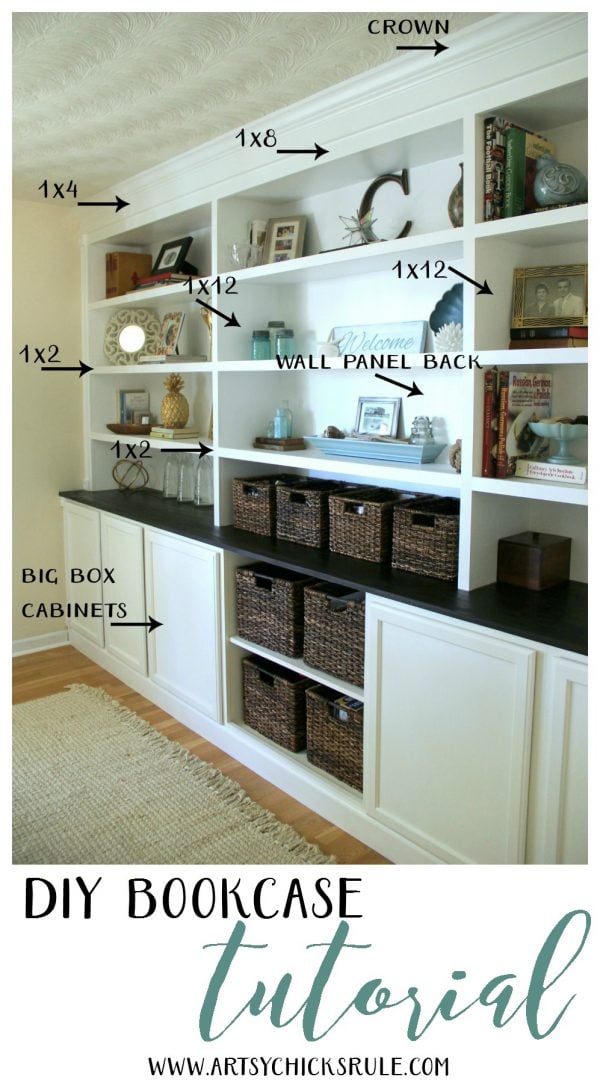
Credit: www.artsychicksrule.com
Frequently Asked Questions
How Do I Choose The Right Wall For A Bookshelf?
Select a sturdy wall with enough space and no obstructions. Ensure it supports the bookshelf weight. Avoid walls with electrical wiring or plumbing inside.
What Materials Are Best For Making A Wall Bookshelf?
Use solid wood or plywood for durability. Metal brackets add strong support. Choose materials that match your room’s style and weight needs.
How Do I Securely Mount A Bookshelf On Drywall?
Find wall studs using a stud finder. Use heavy-duty anchors or screws into studs. This ensures your shelf holds heavy books safely.
Can I Customize The Size Of My Wall Bookshelf?
Yes, measure your wall space first. Cut shelves and brackets to fit. Custom sizes maximize space and suit your storage needs.
Conclusion
Building a bookshelf on the wall adds style and saves space. You only need basic tools and simple steps. Measuring carefully keeps the shelf strong and level. Choose the right materials for your room and needs. Decorating your shelf with books and items makes it personal.
This project brings a useful, neat look to any room. Try it yourself and enjoy the new space you create. Small effort, big difference. A perfect way to organize and decorate.