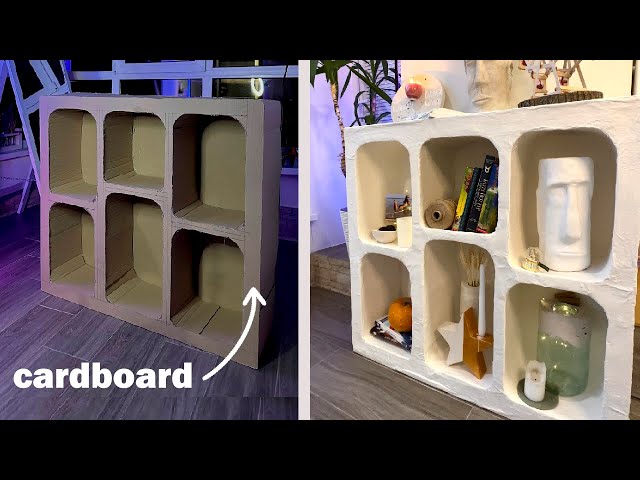
Are you looking for a simple, creative way to organize your books without spending a lot of money? Making a bookshelf out of cardboards might be exactly what you need.
It’s easy, affordable, and lets you customize your space exactly how you want. Imagine turning ordinary cardboard into a sturdy, stylish shelf that fits perfectly in your room. In this guide, you’ll discover step-by-step how to build your own bookshelf with just a few materials and some simple techniques.
Ready to transform your space and impress your friends with a unique DIY project? Keep reading, and let’s get started!
Credit: www.youtube.com
Materials Needed
Building a cardboard bookshelf needs the right materials. This step is crucial for a sturdy and neat finished product.
Gathering all items before starting saves time and effort. It also helps avoid interruptions during the project.
Choosing The Right Cardboard
Select strong, thick cardboard for durability. Double-wall or triple-wall cardboard works best.
Check that the cardboard is flat and clean. Avoid bent or wet pieces as they weaken the structure.
Use large sheets to minimize joints. Fewer cuts mean stronger shelves and easier assembly.
Additional Supplies
Gather a sharp box cutter or craft knife for clean cuts. A ruler or measuring tape is essential.
Use strong glue, like hot glue or wood glue, to hold parts firmly. Tape can support edges temporarily.
Sandpaper smooths rough edges, making the bookshelf safer. Paint or decorative paper can finish the look.

Credit: www.wikihow.com
Preparing The Cardboard
Preparing the cardboard is the first important step in making your bookshelf. It sets the base for a strong and neat structure. Take your time to get this part right. Proper preparation helps avoid mistakes later on.
Choose thick, sturdy cardboard sheets. Thin ones can bend or break easily. Use clean, flat pieces without wrinkles or tears. Now, let’s start with measuring and cutting.
Measuring And Marking
Measure each piece carefully. Use a ruler or tape measure for accuracy. Mark the lines with a pencil. Draw straight lines on the cardboard. These lines will guide your cuts.
Measure twice, cut once. This rule saves material and time. Mark all the parts you need before cutting. Label each piece if needed. This keeps your work organized.
Cutting Techniques
Use a sharp craft knife or box cutter for clean cuts. Cut on a safe surface like a cutting mat. Follow the pencil lines slowly and steadily. Avoid rushing to prevent jagged edges.
Cut multiple layers together if they are the same size. This saves effort and keeps pieces uniform. Always keep your fingers away from the blade. Safety first.
Assembling The Frame
Assembling the frame is the key step in building your cardboard bookshelf. It forms the main shape and holds everything together. A strong frame ensures your shelf stands firm and holds weight well. Follow simple steps to create a solid base and sides, then strengthen the whole structure.
Creating The Base And Sides
Start by cutting flat cardboard pieces for the base and sides. Use a ruler and pencil for straight lines. The base must be wide and thick enough to support books. Attach the sides to the base using strong glue or tape. Hold them until secure. Make sure the sides are straight and even. This forms the basic box shape of your bookshelf.
Strengthening The Structure
Reinforce the frame to prevent bending or collapsing. Add extra cardboard strips along the edges inside the box. Glue these strips firmly for extra support. Use cross braces by placing cardboard pieces diagonally inside corners. This stops wobbling and adds strength. Check all joints and add more tape if needed. A strong frame means a sturdy bookshelf that lasts long.
Adding Shelves
Adding shelves to your cardboard bookshelf creates the space to hold your books and items. Shelves need to be strong and fit well inside the frame. Careful cutting and secure fixing make the bookshelf stable and useful.
Cutting Shelf Pieces
Measure the width and depth of your bookshelf carefully. Mark these measurements on a flat piece of cardboard. Use a sharp knife or box cutter to cut the shelf pieces. Cut slowly to keep edges straight and clean. Make sure each shelf fits snugly inside the frame.
Securing Shelves In Place
Place the cut shelves inside the bookshelf frame. Use strong glue or double-sided tape to hold them firmly. Press each shelf down and hold for a few seconds. Add extra support by taping the edges inside the frame. This keeps shelves from moving or bending under weight.
Finishing Touches
Finishing touches make your cardboard bookshelf look neat and strong. They protect the shelf and give it a nice style. Taking time for these small steps helps your project last longer. It also makes the shelf safer to use and easy to clean.
Sanding And Smoothing Edges
Use fine sandpaper to smooth all rough edges. Sand gently to avoid tearing the cardboard. Smooth edges prevent paper cuts and improve the shelf’s look. Check every corner and side for bumps or loose bits. Wipe away dust with a dry cloth after sanding.
Painting And Decorating
Choose paint made for paper or cardboard. Water-based paint works well and dries fast. Apply thin layers and let each dry before adding another. Paint gives color and helps protect the cardboard from moisture. Decorate with stickers, stencils, or drawings for a personal touch. Seal your design with clear varnish for extra strength.

Credit: www.instructables.com
Maintenance Tips
Maintaining your cardboard bookshelf helps it last longer and stay strong. Simple care keeps the shelf safe from damage. Follow these tips to keep your bookshelf in good shape.
Keeping The Bookshelf Sturdy
Check the joints and corners often. Tighten any loose tape or glue. Add extra support with strong tape if needed. Avoid placing very heavy books on the shelf. Distribute weight evenly across all shelves. This prevents bending or collapsing over time.
Protecting From Moisture
Keep the shelf away from wet or damp places. Use a plastic cover or clear spray to protect cardboard. Wipe off any spills immediately. Moisture can weaken the cardboard and cause damage fast. Good airflow around the shelf also helps keep it dry.
Frequently Asked Questions
What Materials Do I Need To Make A Cardboard Bookshelf?
You need sturdy cardboard sheets, a cutting tool, glue, ruler, pencil, and tape. These basic materials help build a strong, durable bookshelf.
How Long Does It Take To Build A Cardboard Bookshelf?
Building a cardboard bookshelf typically takes 2 to 4 hours. The time depends on design complexity and drying time for glue.
Can A Cardboard Bookshelf Hold Heavy Books Safely?
Yes, if made with thick cardboard and reinforced layers, it can hold moderate weight safely. Avoid overloading for durability.
How Do I Make A Cardboard Bookshelf More Durable?
Use multiple cardboard layers, strong glue, and reinforce edges with tape. Adding a protective finish also increases durability.
Conclusion
Building a cardboard bookshelf is simple and fun. You only need a few materials and some patience. This project saves money and helps the environment by recycling. You can customize the size and shape to fit your space. It is a great way to organize books and small items.
Try this easy craft to add a personal touch to your room. Start today and enjoy your new, handmade bookshelf.