Looking for a unique way to organize your coats and add a rustic touch to your space? Making a coat rack from deer antlers is a creative project you’ll love.
Not only does it bring a natural charm to your home, but it also gives you a sturdy and stylish place to hang your gear. If you want something that stands out and fits perfectly with your personal style, this guide will show you exactly how to turn antlers into a functional coat rack.
Keep reading, and you’ll discover simple steps that make this craft easy and rewarding for you.

Credit: www.youtube.com
Choosing The Right Antlers
Choosing the right antlers is the first step to making a great coat rack. The antlers should match the style and size you want. Picking the right type, source, and shape helps create a sturdy and beautiful rack.
Each antler has its own look and strength. Some work better for holding coats and bags. Knowing what to choose saves time and effort.
Types Of Deer Antlers
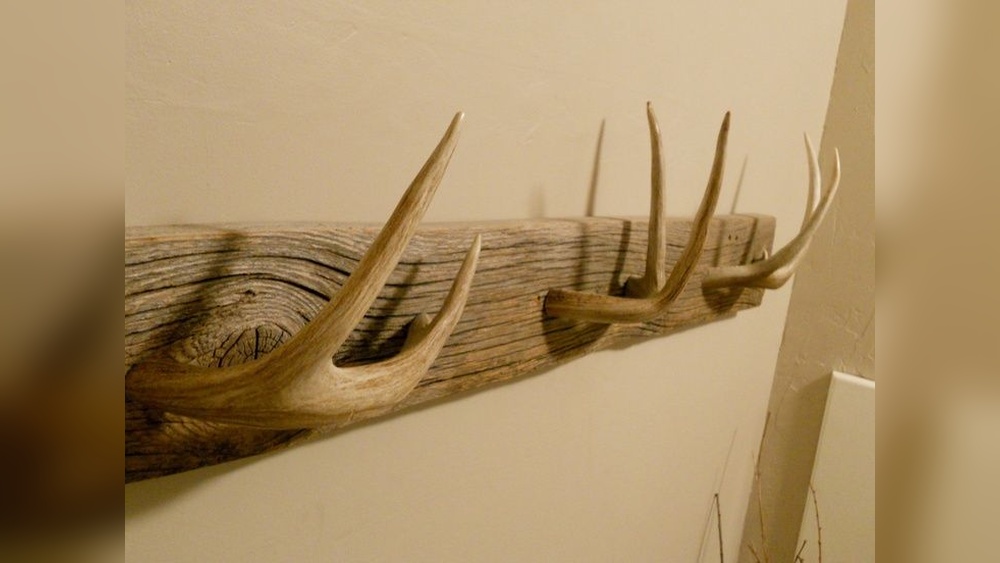
Deer antlers come in many shapes and sizes. Some common types are white-tailed, mule deer, and elk antlers. White-tailed antlers are smaller and have many points. Mule deer antlers are wider and stronger. Elk antlers are large and heavy, good for big racks. Choose the type that fits your space and style.
Sources For Antlers
Antlers are found in nature or bought online. Some people collect shed antlers from forests. Others buy them from hunters or specialty stores. Make sure the antlers are clean and legal to use. Using shed antlers is natural and eco-friendly. Buying antlers is easier and faster.
Size And Shape Considerations
Pick antlers that are strong and balanced. Size matters for how many coats the rack can hold. Long and thick antlers hold more weight. Shape affects how the rack looks on the wall. Curved antlers add style and function. Straight antlers give a modern look. Match size and shape to your room and needs.
Gathering Materials And Tools
Gathering the right materials and tools is the first step to make a coat rack from deer antlers. This stage sets the foundation for a smooth build. Having everything ready saves time and avoids frustration during the project. Focus on quality and safety to create a sturdy, lasting rack. Below is a list of essential tools and additional supplies to prepare before starting.
Essential Tools Checklist
- Drill with different bit sizes
- Screwdriver or power driver
- Measuring tape
- Level
- Sandpaper or sanding block
- Clamps to hold pieces steady
- Protective gloves and goggles
- Marker or pencil for marking spots
Additional Supplies Needed
- Deer antlers cleaned and dried
- Wooden backing board or plank
- Wood screws or heavy-duty nails
- Wall anchors for mounting
- Wood stain or paint (optional)
- Clear sealant for protection
- Rags for cleaning and finishing
Preparing The Antlers
Preparing the antlers is the first key step in making a coat rack from deer antlers. This step ensures the antlers are clean, safe, and ready for use. Proper preparation helps the antlers last longer and look better. It also makes the final product sturdy and attractive.
Cleaning And Sanitizing
Start by removing dirt and debris from the antlers. Use a soft brush to scrub the surface gently. Next, wash the antlers with warm water and mild soap. Rinse well to remove all soap residue. After washing, sanitize the antlers to kill bacteria. Use a mixture of water and white vinegar or rubbing alcohol. Let the antlers soak for about 10 minutes. Dry them completely before moving to the next step.
Trimming And Shaping
Examine the antlers for any sharp points or rough edges. Use a saw or rotary tool to trim unwanted parts carefully. Shape the antlers to fit your coat rack design. Sand the cut edges smooth to prevent injury. Take your time to make the antlers safe and visually pleasing. Proper trimming and shaping improve the rack’s function and look.

Credit: www.youtube.com
Designing Your Coat Rack
Designing your coat rack from deer antlers is a fun and creative process. It lets you turn natural materials into a useful home item. Careful planning helps make a sturdy and attractive rack. Think about where you want to place it. Consider how many coats or items it needs to hold.
Layout Ideas
Arrange the antlers in a balanced way for strength and style. Use larger antlers at the base for support. Smaller ones can be hooks. Try a circular or branching pattern to spread hooks evenly. Space hooks so coats don’t overlap too much. Keep the design simple to highlight the antlers’ natural shape.
Mounting Options
Choose mounting methods that suit your wall type and rack size. Screws and anchors work well for drywall. For wooden walls, wood screws offer firm support. Consider a backboard to attach antlers securely. This adds stability and makes installation easier. Make sure the rack is mounted at a height easy to reach.
Assembling The Coat Rack
Assembling the coat rack from deer antlers is an exciting step. It brings your project to life. This part requires attention to detail and careful handling. Secure the antlers firmly to ensure the rack is strong and stable. Follow clear steps to attach hooks and hardware properly. This will make your coat rack both useful and beautiful.
Attaching Antlers To Base
Start by choosing a sturdy base for your coat rack. Wood works well for stability and style. Place the antlers on the base to find the best layout. Use a drill to make pilot holes in the base and antlers. These holes help prevent cracking when you add screws. Screw the antlers tightly to the base. Check that each antler is secure and does not wobble. The base should hold the antlers firmly in place.
Securing Hooks And Hardware
Choose strong hooks that match the style of your rack. Attach them to the antlers where you want to hang items. Drill small pilot holes before inserting screws for the hooks. This keeps the wood and antlers from splitting. Tighten the screws firmly to hold the hooks. Add hardware like wall brackets if you want the rack to hang on a wall. Test the hooks by hanging light items to ensure they hold well.

Credit: www.spec-school.org
Finishing Touches
Finishing touches give your deer antler coat rack a polished, refined look. These steps protect the rack and enhance its natural beauty. Taking time here ensures a smooth, durable surface that lasts. Follow simple finishing methods for the best results.
Sanding And Polishing
Start by sanding the antlers gently. Use fine-grit sandpaper for a smooth finish. Sand all surfaces to remove rough spots and splinters. This step helps the coat rack feel safe and look neat.
After sanding, polish the antlers with a soft cloth. Polishing brings out their natural shine. It also highlights the unique shape and texture of each antler. Take your time to make the surface smooth and glossy.
Applying Protective Coating
Apply a clear protective coating to the antlers next. Use a wood finish or clear spray sealant. This layer guards against dirt, moisture, and wear. It keeps the rack looking fresh for years.
Apply the coating evenly with a brush or spray. Let it dry completely between layers. Two or three coats work well for strong protection. This step preserves your hard work and maintains the rack’s beauty.
Mounting And Displaying
Mounting and displaying your deer antler coat rack is the final step. This step brings your project to life. Proper mounting ensures the rack is secure and looks good. Displaying it well highlights its rustic charm. Follow these tips to install and place your coat rack perfectly.
Wall Installation Tips
Choose a strong wall for mounting the rack. Use wall anchors if you don’t find studs. Measure twice before drilling to avoid mistakes. Use screws that fit the antler base securely. Check the rack’s weight and select fasteners that hold it well. Level the rack before tightening screws to keep it straight. Test the rack’s stability before hanging coats.
Placement Ideas For Rustic Decor
Place the coat rack near your entryway for easy use. It fits well in cabins or rooms with wood accents. Try mounting it above a bench for a cozy look. Use it in a mudroom to organize outerwear neatly. A rustic living room wall can also showcase the rack. Avoid placing it in damp areas to protect the antlers. Position it where it adds charm and function.
Maintenance And Care
Maintaining and caring for a coat rack made from deer antlers keeps it strong and beautiful. Proper care helps the rack last for years. It also preserves the natural look of the antlers. Simple steps make a big difference.
Cleaning Tips
Dust the antlers regularly with a soft cloth. Avoid using water or harsh chemicals. Use a dry or slightly damp cloth for cleaning. For stubborn dirt, try a mild soap solution and wipe gently. Dry the antlers right away to prevent moisture damage. Keep the rack away from direct sunlight to stop fading.
Long-term Preservation
Apply a thin coat of clear wax or oil to keep the antlers from drying out. Do this once or twice a year. Check for cracks or loose parts regularly. Tighten screws and fix any damage immediately. Store the rack in a cool, dry place during extreme weather. Proper care extends the life of your unique coat rack.
Frequently Asked Questions
What Materials Are Needed To Make A Deer Antler Coat Rack?
You need deer antlers, a wooden base, screws, drill, sandpaper, and a finish. These materials ensure a sturdy, attractive coat rack.
How Do You Clean Deer Antlers Before Crafting?
Use warm water and mild soap to clean antlers. Dry them thoroughly to avoid mold and prepare for finishing.
Can I Hang Heavy Coats On An Antler Coat Rack?
Yes, deer antlers are strong enough to hold heavy coats securely when properly mounted.
How Do You Attach Antlers To The Wooden Base?
Drill holes in the base and antlers. Use screws and wood glue for a firm, stable attachment.
Conclusion
Crafting a coat rack from deer antlers adds charm to any space. It’s a simple project anyone can try. The natural look brings warmth and style to your home. Plus, it’s a unique way to recycle materials. You get a sturdy and eye-catching rack for coats or hats.
Give it a go and enjoy your handmade piece every day. Small projects like this make a big difference in home decor. Why not create something special with your own hands?