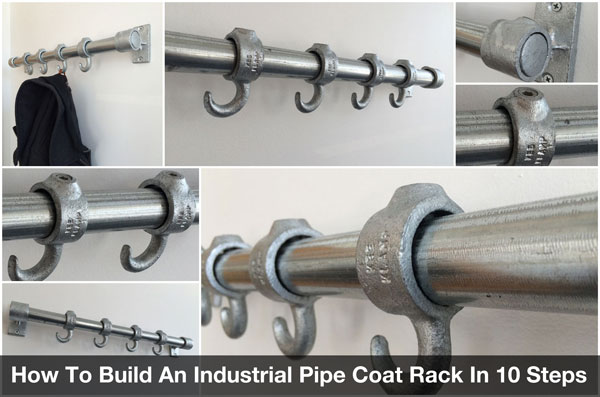
Looking for a stylish and sturdy way to organize your coats and hats? You’re in the right place.
Making a coat rack out of pipe is easier than you think, and it adds a unique, industrial touch to your space. Imagine having a custom rack that fits perfectly in your home, holds all your gear, and sparks compliments from guests.
In this guide, you’ll discover simple steps to create your own pipe coat rack—no special skills needed. Ready to transform your entryway and impress everyone who walks in? Let’s get started!
Materials Needed
Gathering the right materials is the first step to build a sturdy pipe coat rack. Each item plays a key role in the final product’s strength and appearance.
Using common hardware store supplies keeps the project affordable and easy to complete. Check your tools and workspace before starting.
Steel Pipes And Fittings
Choose steel pipes for durability and a modern look. Common sizes include 1/2 inch or 3/4 inch diameter.
Fittings like elbows and tees connect pipes and create hooks and stands.
Pipe Flanges
Flanges anchor the coat rack to walls or floors. They provide firm support and stability.
Pick flanges that match your pipe size for a tight fit.
Wall Anchors And Screws
Use strong wall anchors to secure flanges on drywall or plaster.
Long screws hold the rack firmly in place, preventing wobbling.
Measuring Tape And Pencil
Measure pipe lengths accurately for a balanced design. Mark cut points clearly with a pencil.
Pipe Cutter Or Hacksaw
Cut pipes to size with a pipe cutter or a hacksaw. Smooth edges with sandpaper to avoid scratches.
Thread Seal Tape
Wrap thread seal tape on pipe threads to ensure tight and leak-proof connections.
Optional: Paint Or Spray Finish
Paint pipes to match your room style. Use spray paint for an even, smooth finish.
Choosing The Right Pipes
Choosing the right pipes is key to making a strong and stylish coat rack. The pipe type affects how sturdy the rack will be and how it looks in your space. Picking the right material and size ensures your coat rack holds up well over time.
Think about where you want to place the coat rack. This helps decide the pipe style and finish. Pipes come in various materials like steel, iron, and copper. Each has different strengths and looks.
Material Options For Pipe Coat Racks
Steel pipes are popular for their strength and low cost. They handle heavy coats well and last long. Iron pipes have a classic look and are very sturdy. Copper pipes add a warm, unique color but cost more. Choose based on your style and budget.
Pipe Size And Diameter
Pipe thickness affects the rack’s strength. Thicker pipes hold more weight but look bulkier. Thinner pipes look sleek but may bend under heavy coats. For most racks, 1/2-inch to 3/4-inch pipes work well.
Pipe Finish And Coating
Finishes protect pipes from rust and wear. Black matte or galvanized finishes suit industrial styles. Painted pipes can match room colors. Consider a finish that fits your room’s look and protects the pipe.
Tools Required
Gathering the right tools makes building a pipe coat rack easier. You will need basic tools for cutting, measuring, and assembling the pipes. Each tool helps create a strong and neat rack.
Measuring Tape
A measuring tape is key to getting exact pipe lengths. Accurate measurements keep the rack balanced and stable. Use a sturdy tape for easy reading.
Pipe Cutter Or Hacksaw
A pipe cutter or hacksaw cuts pipes to size. A pipe cutter gives clean, straight cuts quickly. A hacksaw works well but needs careful handling.
Pipe Wrench
A pipe wrench tightens and secures pipe fittings. It holds the pipe firm while you twist parts together. Choose a wrench that fits your pipe size.
Screwdriver
A screwdriver fastens screws into the wall or base. It helps secure mounting brackets or wood supports. Use a Phillips or flathead, based on your screws.
Drill
A drill makes holes for screws and anchors. It speeds up the mounting process and ensures strong support. Use the right drill bit for your wall type.
Thread Seal Tape
Thread seal tape prevents leaks at pipe joints. Wrap it around pipe threads before connecting. It keeps the rack sturdy and avoids loosening.
Planning Your Design
Planning your coat rack design is the first step to a successful project. A clear plan saves time and reduces mistakes. It helps you create a rack that fits your space and style.
Think about how you want the rack to look and where it will go. Consider the size, shape, and materials. This way, you can build a coat rack that suits your needs perfectly.
Measuring Space
Measure the wall or area where the coat rack will hang. Note the width, height, and depth available. Leave extra space around the rack for easy access. Small spaces need compact racks. Large walls allow for bigger designs.
Check for any obstacles like light switches or shelves. These can affect your rack’s size and position. Write down all measurements before buying materials.
Selecting Style
Choose a style that matches your room’s look. Industrial style uses black or galvanized pipes. It looks strong and modern. Rustic style uses aged pipes and wood. It feels warm and cozy.
Decide how many hooks or shelves you want. Think about pipe shapes and finishes. Simple designs are easy to build. Complex racks need more parts and skills.
Cutting And Preparing Pipes
Cutting and preparing pipes is the first step in making a sturdy coat rack. This part shapes the pipes to the right size. It ensures all parts fit perfectly during assembly.
Proper cutting prevents mistakes and saves time later. Taking time to prepare pipes well leads to a strong and neat coat rack.
Choosing The Right Pipe
Select pipes that are durable and rust-resistant. Steel or black iron pipes work best. Avoid thin or weak pipes that may bend easily.
Measure the length needed for each section before buying pipes. This step avoids extra cuts or wasted material.
Measuring And Marking Pipes
Use a tape measure for exact pipe lengths. Mark the cutting points clearly with a permanent marker.
Double-check measurements to reduce errors. Straight lines make cutting easier and more precise.
Cutting Pipes Safely
Use a pipe cutter or hacksaw to cut pipes. Clamp the pipe firmly to avoid slipping.
Wear safety goggles and gloves during cutting. Smooth rough edges with a metal file to prevent injuries.
Cleaning And Preparing Pipe Ends
Remove rust or dirt from pipe ends with sandpaper. Clean ends ensure tight connections with fittings.
Apply a light coat of oil to prevent rust. This step extends the life of your coat rack.
Assembling The Frame
Assembling the frame is a key step in making a pipe coat rack. This part creates the structure that holds everything together. A strong frame ensures your rack stands steady and lasts long.
Start by gathering all the pipes and fittings. Check that you have the right sizes. Measure twice to avoid mistakes. Take your time and work carefully.
Prepare The Pipes And Fittings
Cut the pipes to the needed lengths using a pipe cutter or saw. Smooth any rough edges with sandpaper. Lay out all parts on a flat surface to see how they fit together.
Connect The Base Pipes
Begin by assembling the base of the frame. Use T-joints and elbows to join the pipes. Tighten each connection securely. The base must be stable to support the coat rack’s weight.
Build The Vertical Supports
Attach vertical pipes to the base. These will hold the hooks or crossbars. Make sure the pipes stand straight. Use a level tool to check alignment before tightening.
Add Crossbars And Final Touches
Connect horizontal crossbars between vertical pipes. These add strength and provide places for hooks. Tighten all fittings firmly. Check that the frame is steady and well-balanced.
Adding Hooks And Accessories
Adding hooks and accessories to your pipe coat rack gives it full function. Hooks hold coats, hats, and bags neatly. Accessories like baskets or shelves bring extra storage. These small details make your rack more useful and stylish.
Choosing The Right Hooks
Select hooks that fit the pipe size and style. Metal hooks match industrial pipe racks well. Wooden or plastic hooks add color and contrast. Consider the weight your hooks need to hold. Strong hooks prevent damage and keep items secure.
Attaching Hooks Securely
Use screws or clamps to fix hooks firmly. Drill pilot holes for easier screw insertion. Ensure hooks sit straight and do not wobble. Tight attachments keep your rack safe and durable. Check the strength by hanging some weight before use.
Adding Functional Accessories
Install small shelves or baskets for extra storage. Wire baskets work well with pipe racks. Shelves provide space for gloves or keys. Keep accessories simple to avoid clutter. Choose items that match your room’s style.
Personalizing Your Coat Rack
Paint hooks or accessories to add color. Use stencils or stickers for fun designs. Add labels to organize items easily. Personal touches make your rack unique and welcoming.

Credit: www.simplifiedbuilding.com
Finishing Touches
Finishing touches give your pipe coat rack a polished look. These final steps protect your work and improve its style. They also make sure your rack is ready for use.
Painting Or Sealing
Choose paint or sealant to protect the metal pipes. Paint adds color and hides any scratches or marks. Use spray paint for an even coat and smooth finish.
Sealing keeps the metal from rusting. Clear sealants keep the natural pipe look. Apply a thin layer and let it dry completely. This step helps your rack last longer.
Mounting Options
Decide how to attach the coat rack to the wall. Use screws and anchors for strong support. Make sure the rack is level before fixing it.
Wall mounting saves floor space and keeps coats organized. Freestanding options work if you don’t want to drill holes. Choose the method that fits your space best.
Maintenance Tips
Keeping your pipe coat rack in good shape makes it last longer. Regular care helps prevent rust and damage. Simple steps keep it looking new and strong.
Cleaning The Pipe Coat Rack
Wipe the pipes with a damp cloth every week. Use mild soap for dirt or stains. Avoid harsh chemicals that can wear the metal.
Checking For Rust
Look closely for any rust spots on the pipes. Small rust patches can spread quickly. Use sandpaper to remove rust and apply paint or sealant.
Tightening The Joints
Check all pipe connections regularly. Loose joints make the rack unstable. Use a wrench to tighten bolts and screws as needed.
Protecting The Metal Surface
Apply a clear coat or metal sealant once a year. This stops moisture from causing rust. Choose a product made for metal surfaces.
Avoiding Overloading
Do not hang too many heavy items on the rack. Excess weight can bend or break pipes. Spread out coats and bags evenly.

Credit: hotelmurchunga.com
Credit: www.simplifiedbuilding.com
Frequently Asked Questions
What Materials Are Needed To Make A Pipe Coat Rack?
You need galvanized or black steel pipes, flanges, elbows, tees, screws, and a drill. These materials ensure sturdy construction and a stylish industrial look.
How Do I Assemble A Pipe Coat Rack Step-by-step?
Start by measuring and cutting pipes. Then, connect with flanges and elbows. Secure to the wall using screws for stability and durability.
Can I Customize The Size Of My Pipe Coat Rack?
Yes, you can customize length and number of hooks by adjusting pipe sizes and fittings. This allows you to fit any space or needs.
Is It Difficult To Install A Pipe Coat Rack On Drywall?
No, just use wall anchors or toggle bolts to support the weight. Proper installation prevents damage and keeps the rack secure.
Conclusion
Making a coat rack from pipes is simple and fun. You only need a few tools and materials. This project fits well in any home or office space. It saves money and adds a unique look. You can customize it to match your style.
Try different pipe sizes or colors for variety. This DIY coat rack holds coats, hats, and bags easily. It keeps your space neat and organized. Building something with your hands feels rewarding. Give it a try and enjoy your new coat rack!